

Publication Deposition
Use Publication Deposition when your spectra are connected to a manuscript, preprint, thesis, or other publication-based research project. This guide explains the full publication deposition workflow, from selecting the deposition type to publishing the final record.
Publication Deposition is designed for structured research submissions. If you are depositing spectra as part of a publication or thesis, nmrXiv will require more detailed publication metadata, such as the project title, authors, license, citations, and release date.
Before You Start
Before uploading data, you need an nmrXiv account.
Your account is used to manage private drafts, connect published records to a responsible owner, and receive notifications about processing, validation, DOI assignment, and publication status.
You can register directly on nmrXiv or log in using single sign-on with your GitHub or Twitter/X account. Please note that using single sign-on will also create an nmrXiv account.
How nmrXiv Organizes Data
nmrXiv uses a three-level data structure:
Project -> Study -> Dataset
- A Project usually represents a publication or research project.
- A Study represents one sample within that project.
- A Dataset represents one NMR experiment or measurement, such as 1H NMR, 13C NMR, COSY, HSQC, HMBC, or NOESY.
A project can contain multiple studies, and each study can contain multiple datasets.
How to Prepare Your Files
Before uploading, organize your files clearly so that nmrXiv can automatically process them.
The simple rule is:
One folder per sample, with all NMR experiments for that sample inside it.
Each sample folder should contain:
- all raw or processed NMR experiment files for that sample
- a structure file, preferably
.molor.sdf
The .mol or .sdf file contains the chemical structure information. If this file is missing, you will need to enter the structure manually later.
Recommended Folder Structure
Project folder
  Sample 1 folder
    NMR experiment 1 folder or file
    NMR experiment 2 folder or file
    structure file (.mol or .sdf)

  Sample 2 folder
    NMR experiment 1 folder or file
    NMR experiment 2 folder or file
    structure file (.mol or .sdf)
For more details, see the folder structure section.
Supported File Formats
nmrXiv can detect and process common NMR formats, including:
- Bruker
- Varian/Agilent
- JEOL
- JCAMP-DX
Structure and annotation files such as .mol and NMReData .sdf help describe the sample, but they are not spectral datasets by themselves.
To generate spectra in nmrXiv, make sure your upload includes at least one file format supported by NMRium.
What Happens After Upload?
After uploading your raw or processed NMR data, nmrXiv uses the folder structure to automatically generate the corresponding samples and datasets.
A well-structured upload helps nmrXiv extract information correctly and reduces the amount of manual editing needed later.
WARNING
Once a project is made public, you will no longer be able to edit its information.
Therefore, check your metadata, structure files, sample details, and datasets carefully before publication.
Choose Publication Deposition
From the Deposit data menu, choose Publication Deposition.
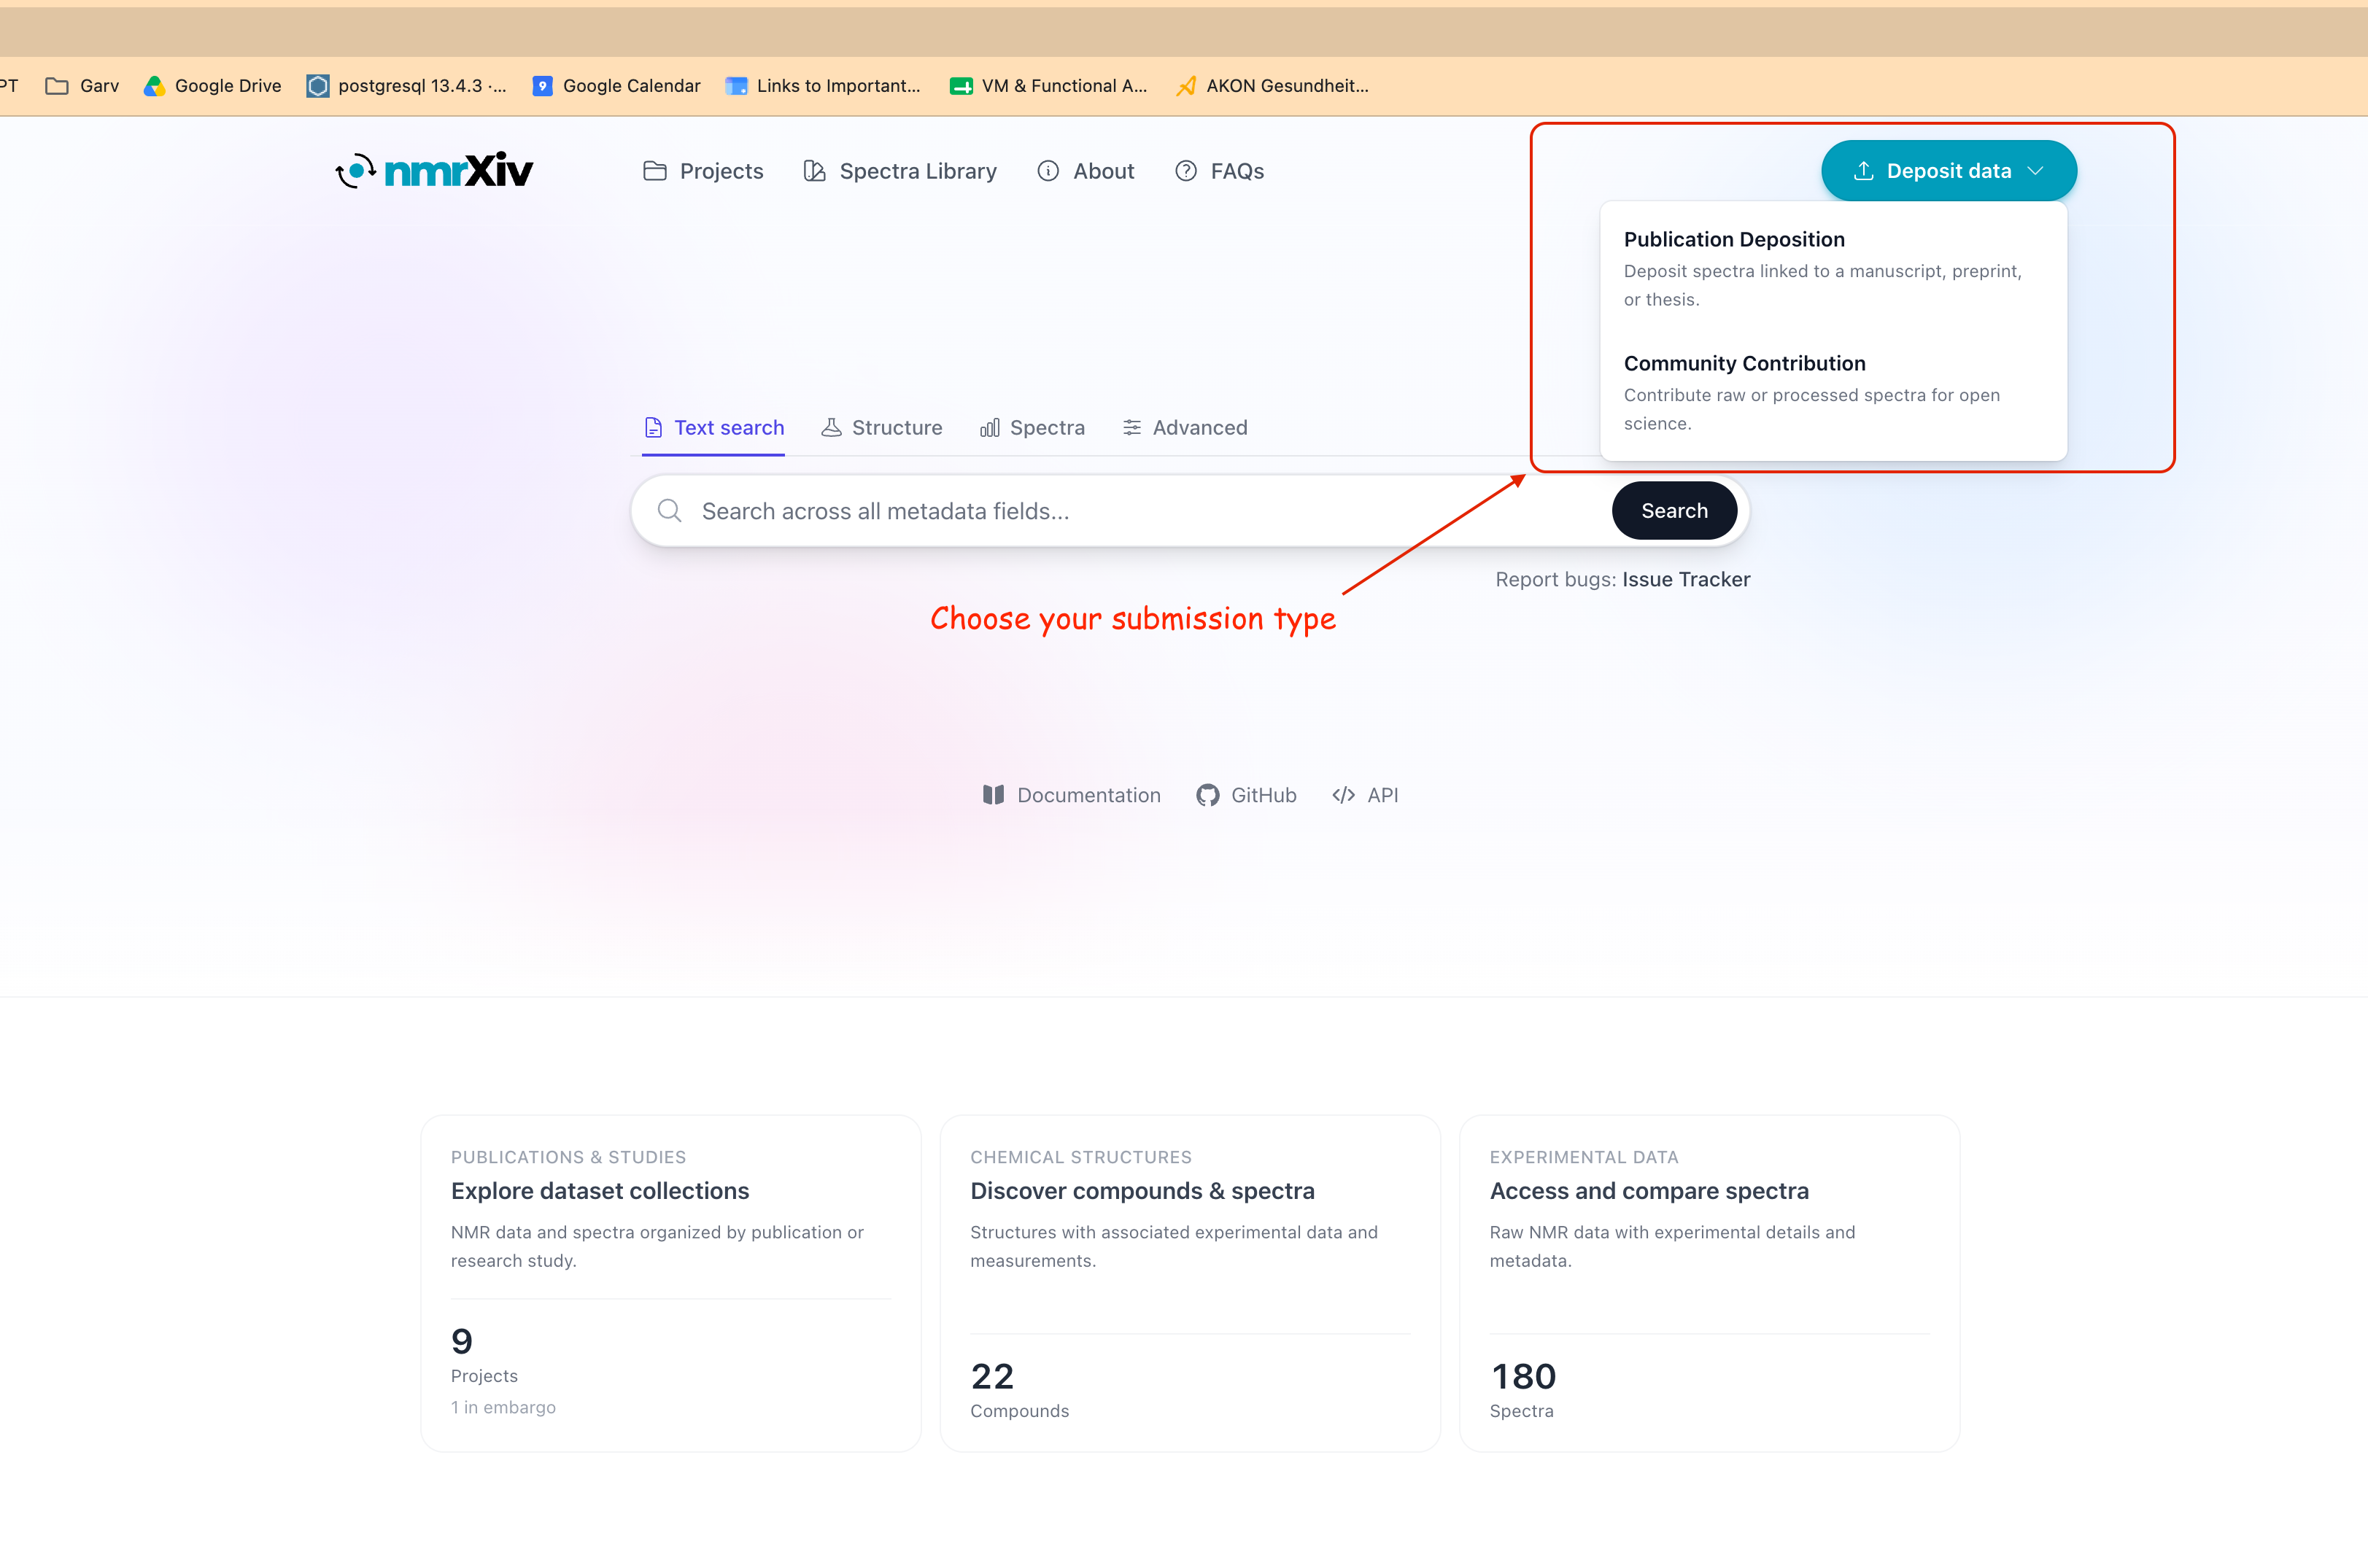
Publication Deposition is for spectra linked to a publication, manuscript, preprint, thesis, or other research output. If you want to contribute standalone reference spectra instead, use Community Contribution.
Select or Create a Draft
After choosing Publication Deposition, nmrXiv shows your draft submissions. You can continue an existing draft or create a new one.
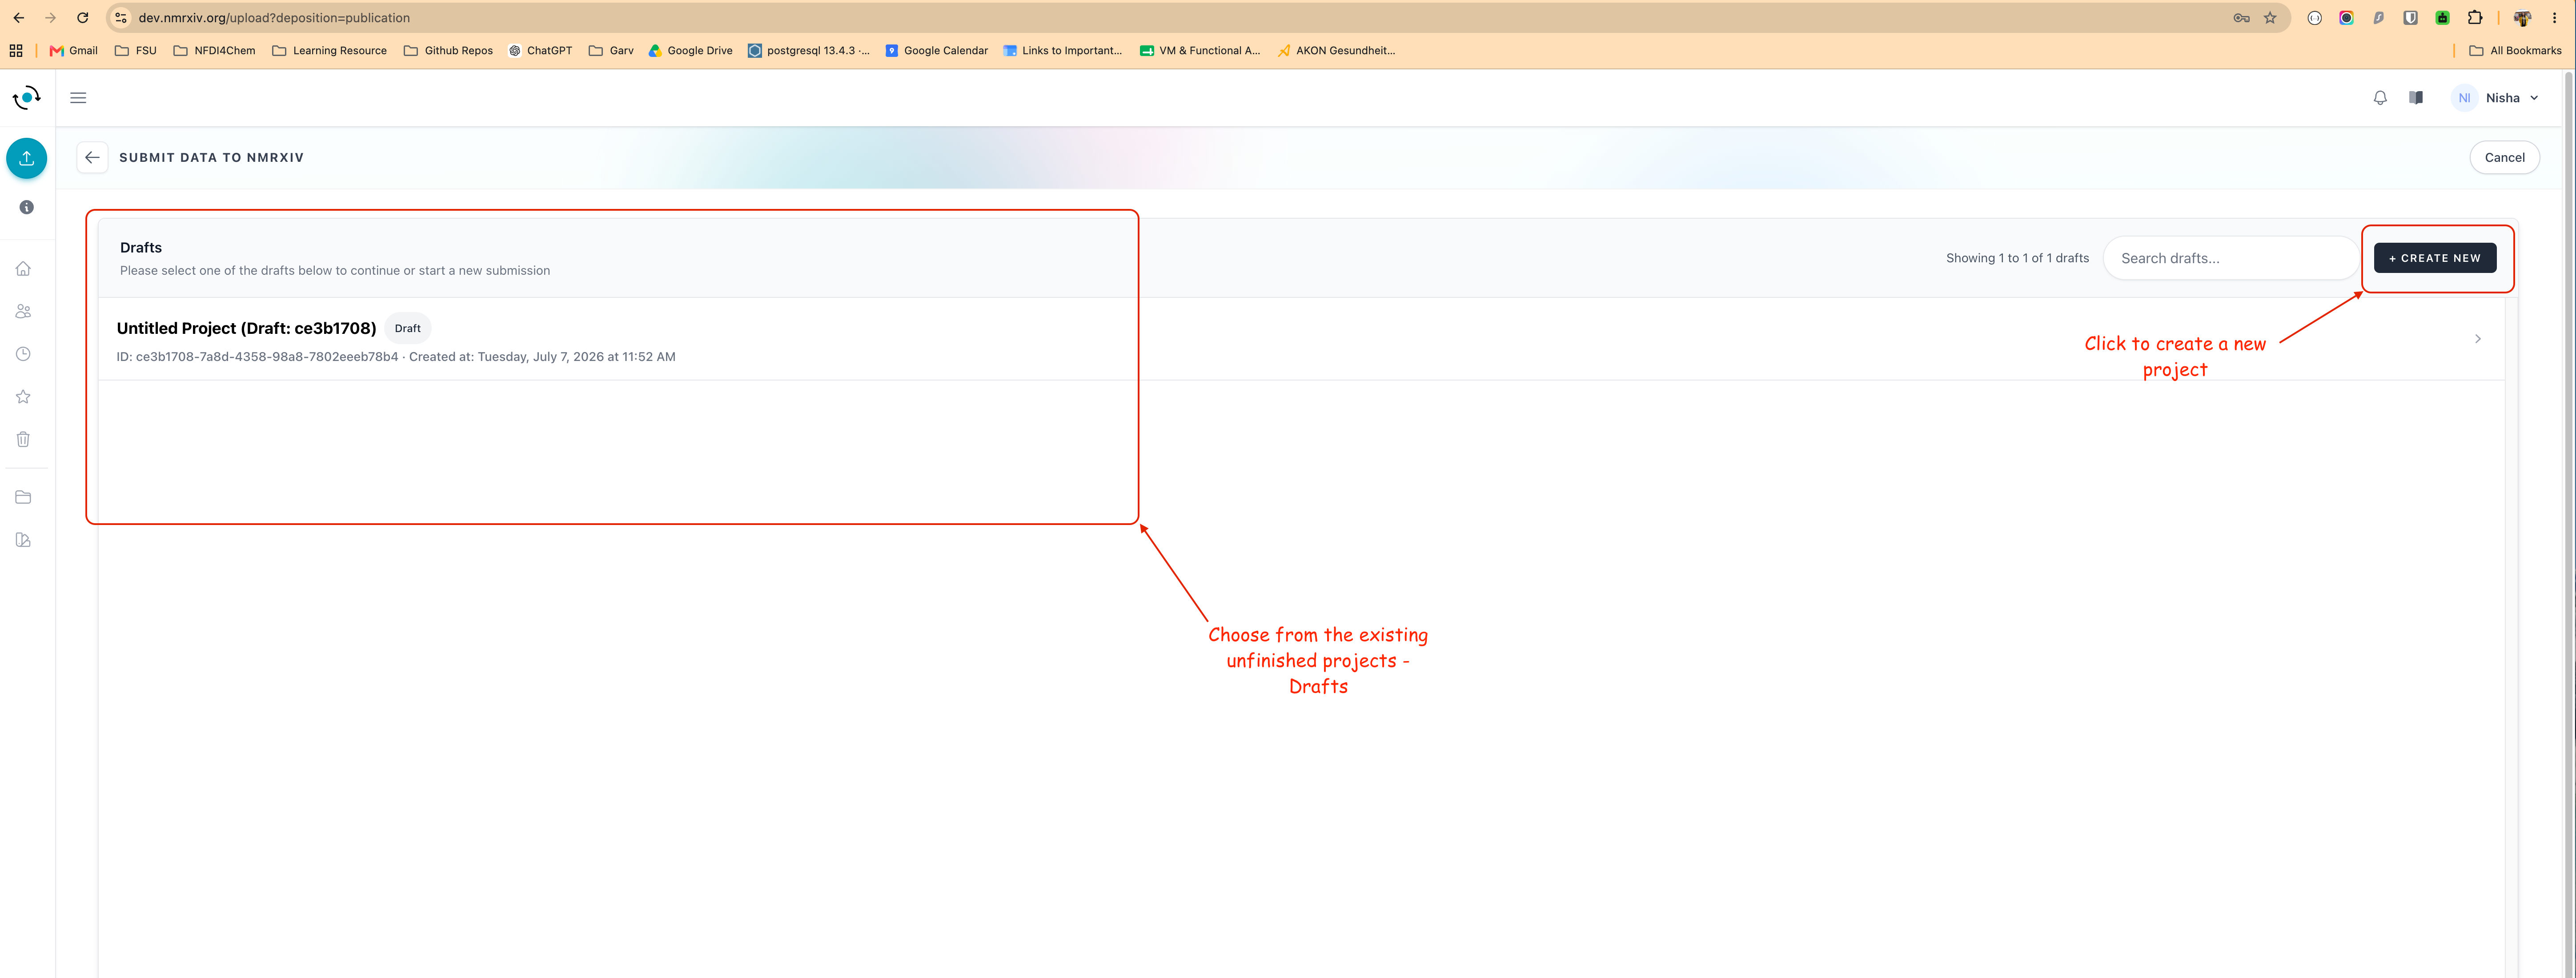
A draft is private. It is the workspace where files, metadata, validation, and publication settings are prepared before anything becomes public.
Basic Concepts
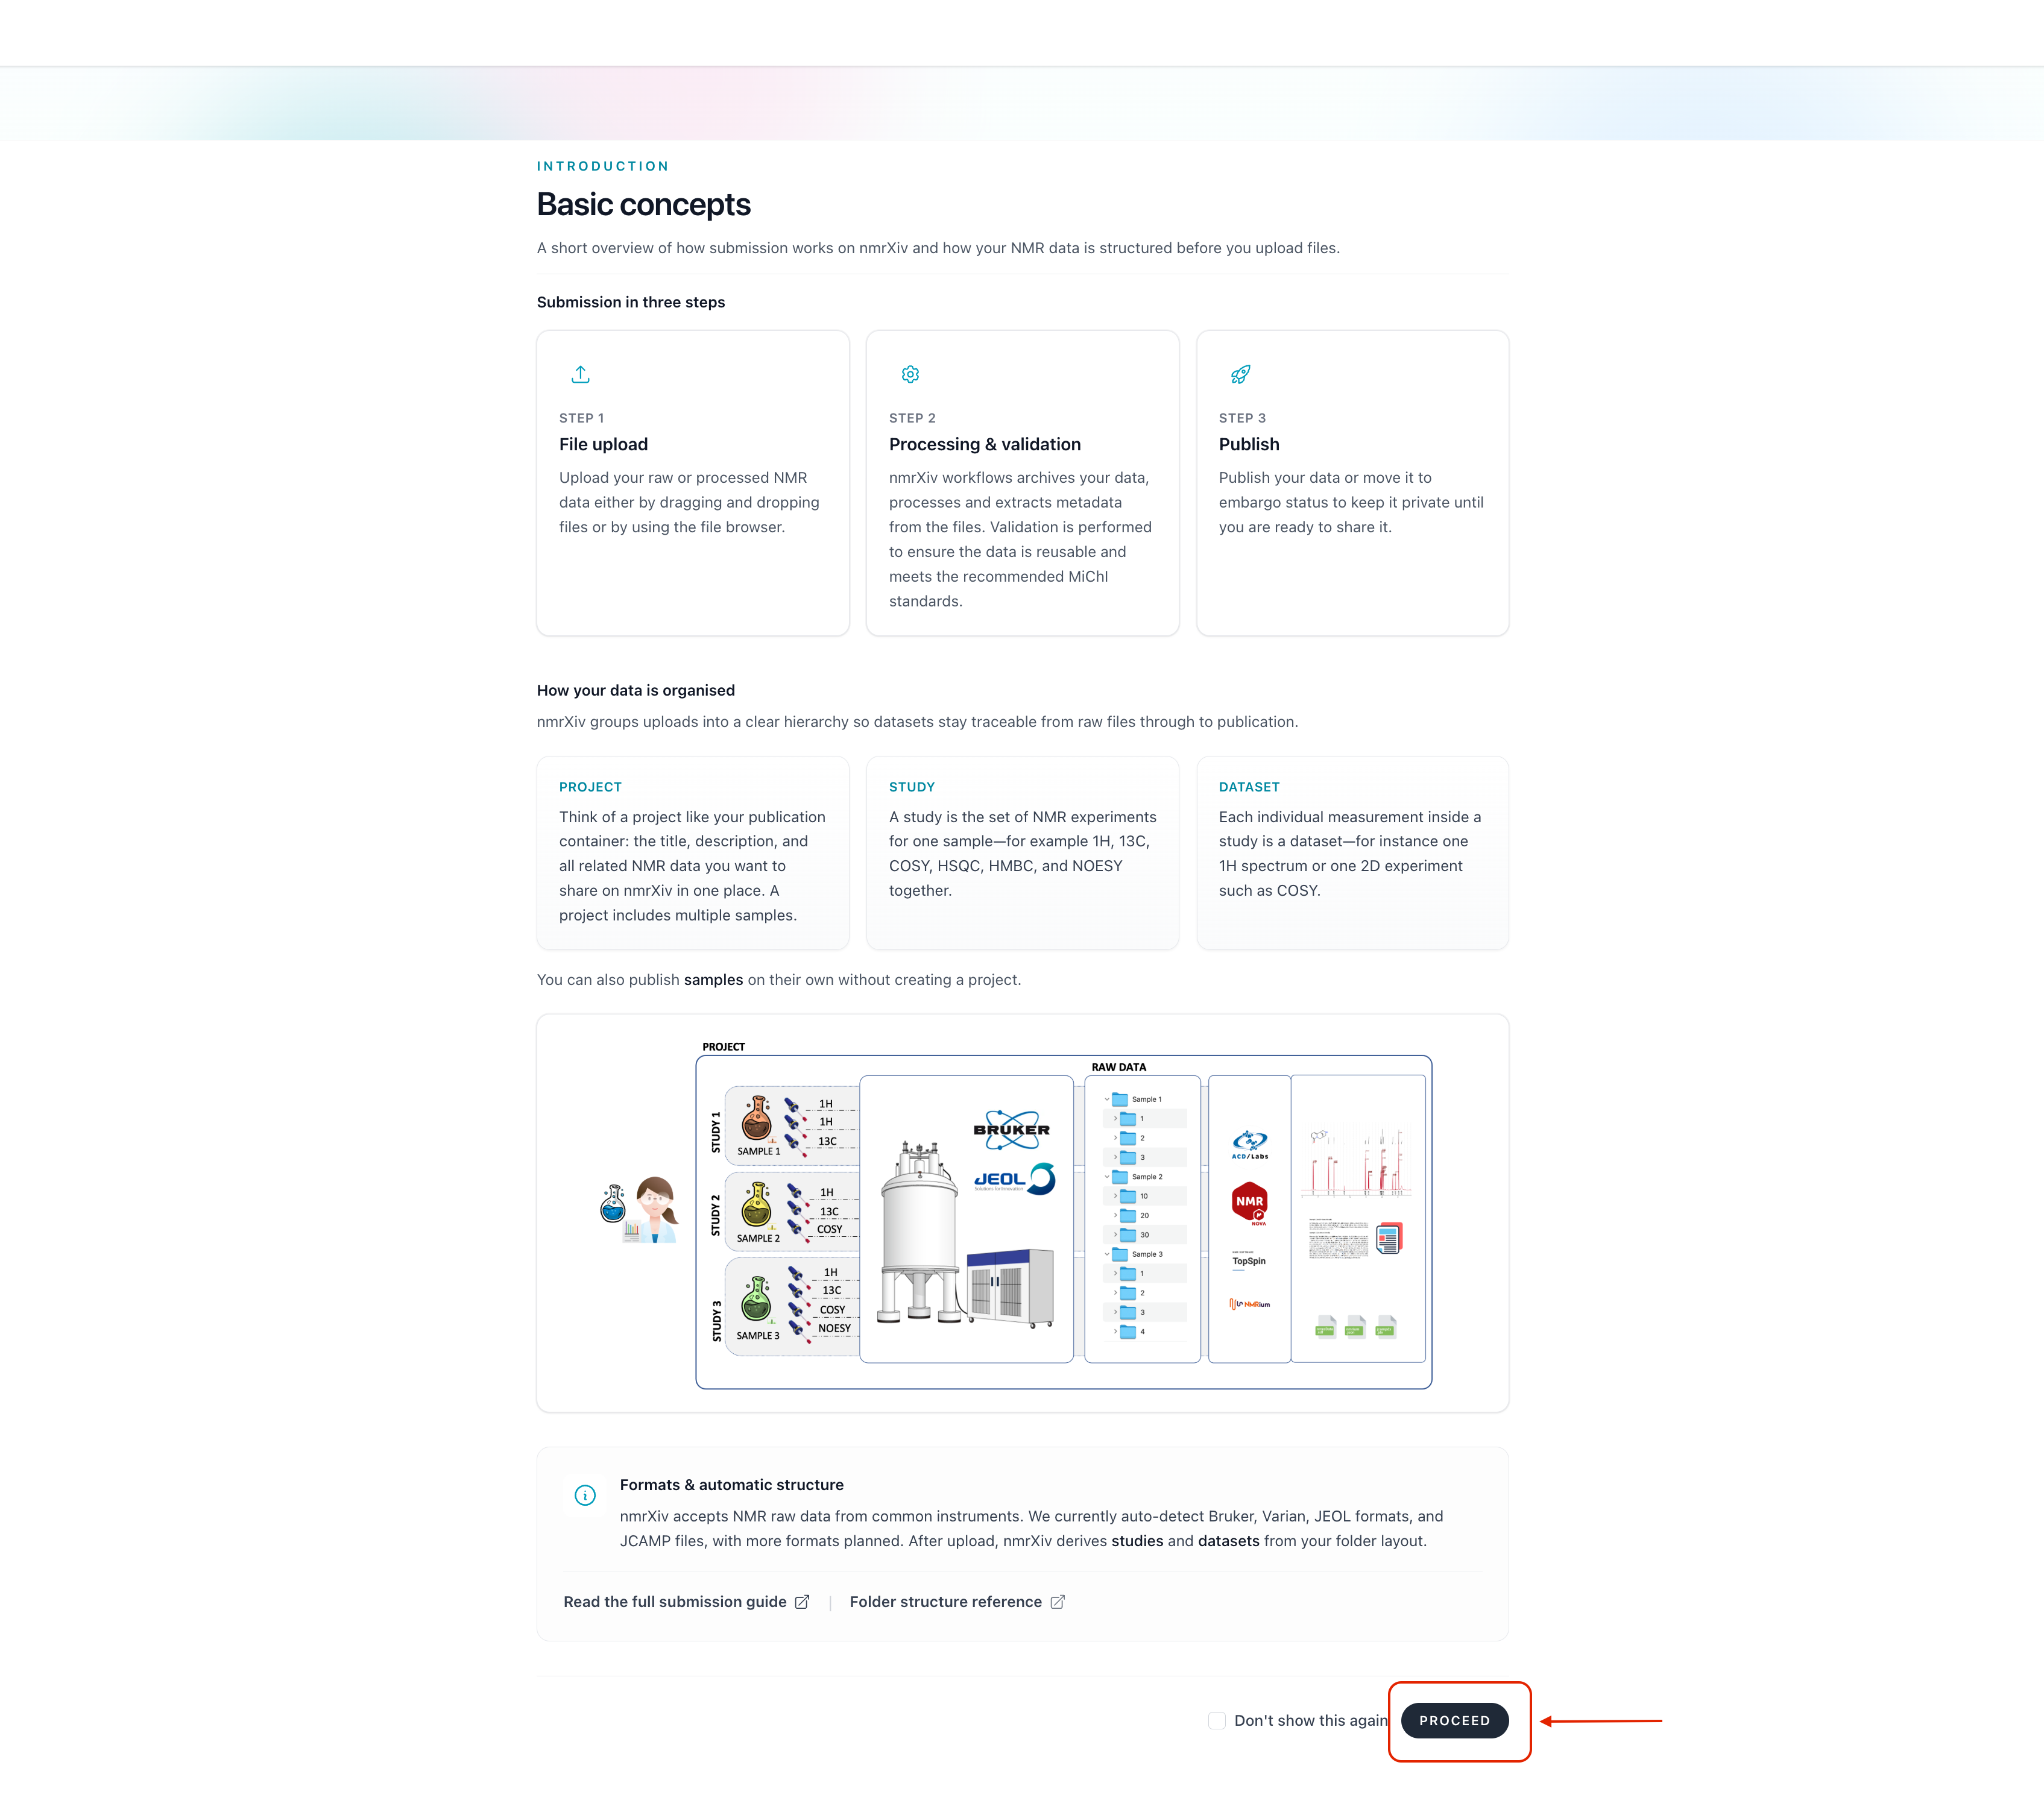
The introduction screen explains how nmrXiv organizes submitted data.
INFO
nmrXiv uses this hierarchy:
- Project: the publication container or complete submission.
- Sample: one compound, material, or sample.
- Dataset: one NMR experiment or spectrum for that sample.
For example, a sample folder named Usnic acid may contain datasets such as 1_proton, 13_c13, 3_hsqc, and 4_hmbc.
Step 1 - File Upload
In Step 1, upload the folder containing your NMR data. You can rename the draft project, reserve a provisional DOI if needed, and open the folder structure guide.
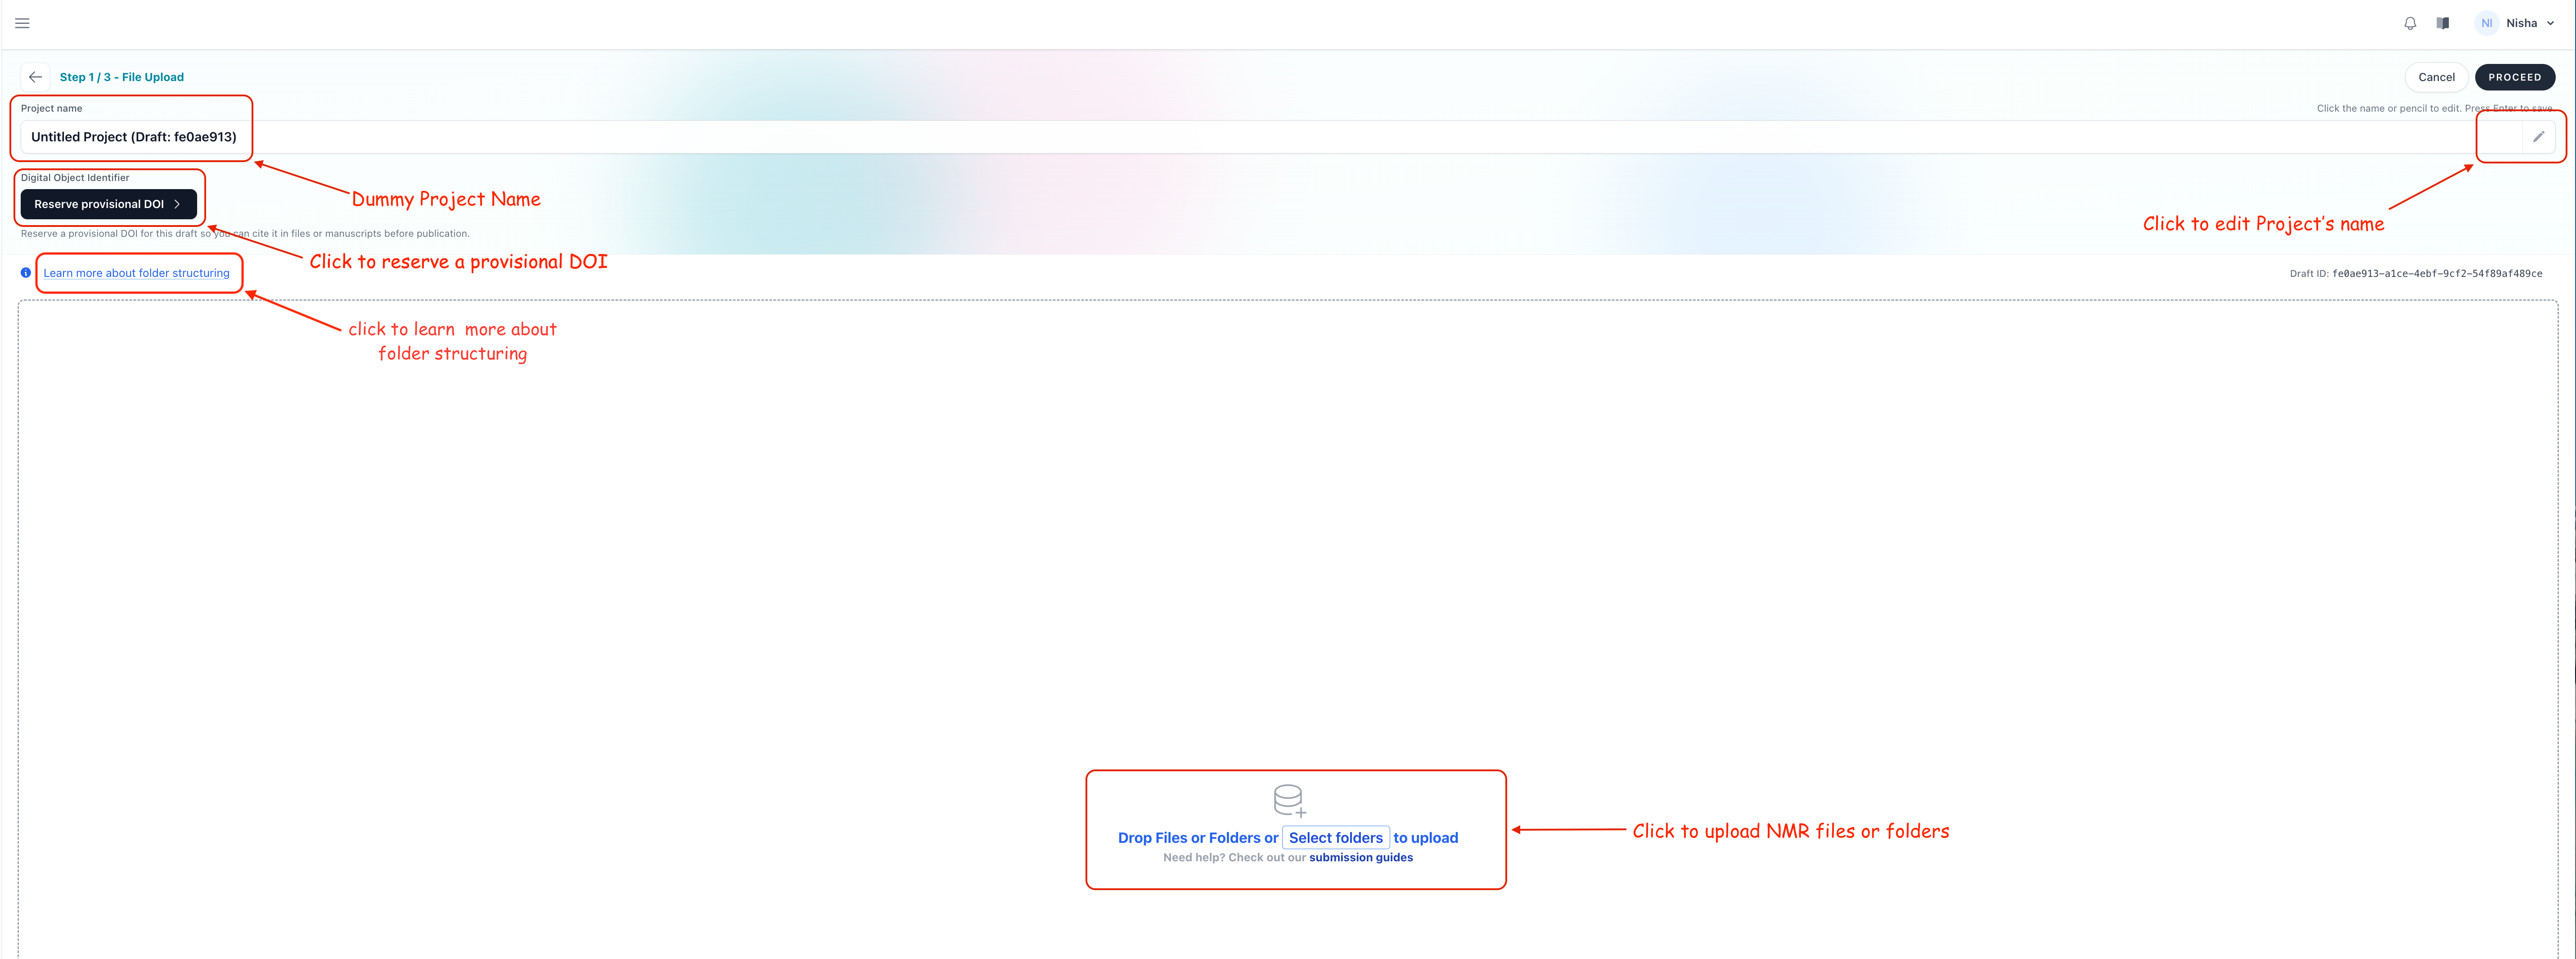
During upload, nmrXiv preserves the folder tree in a private draft workspace. It creates internal file records and uploads the actual files to object storage.
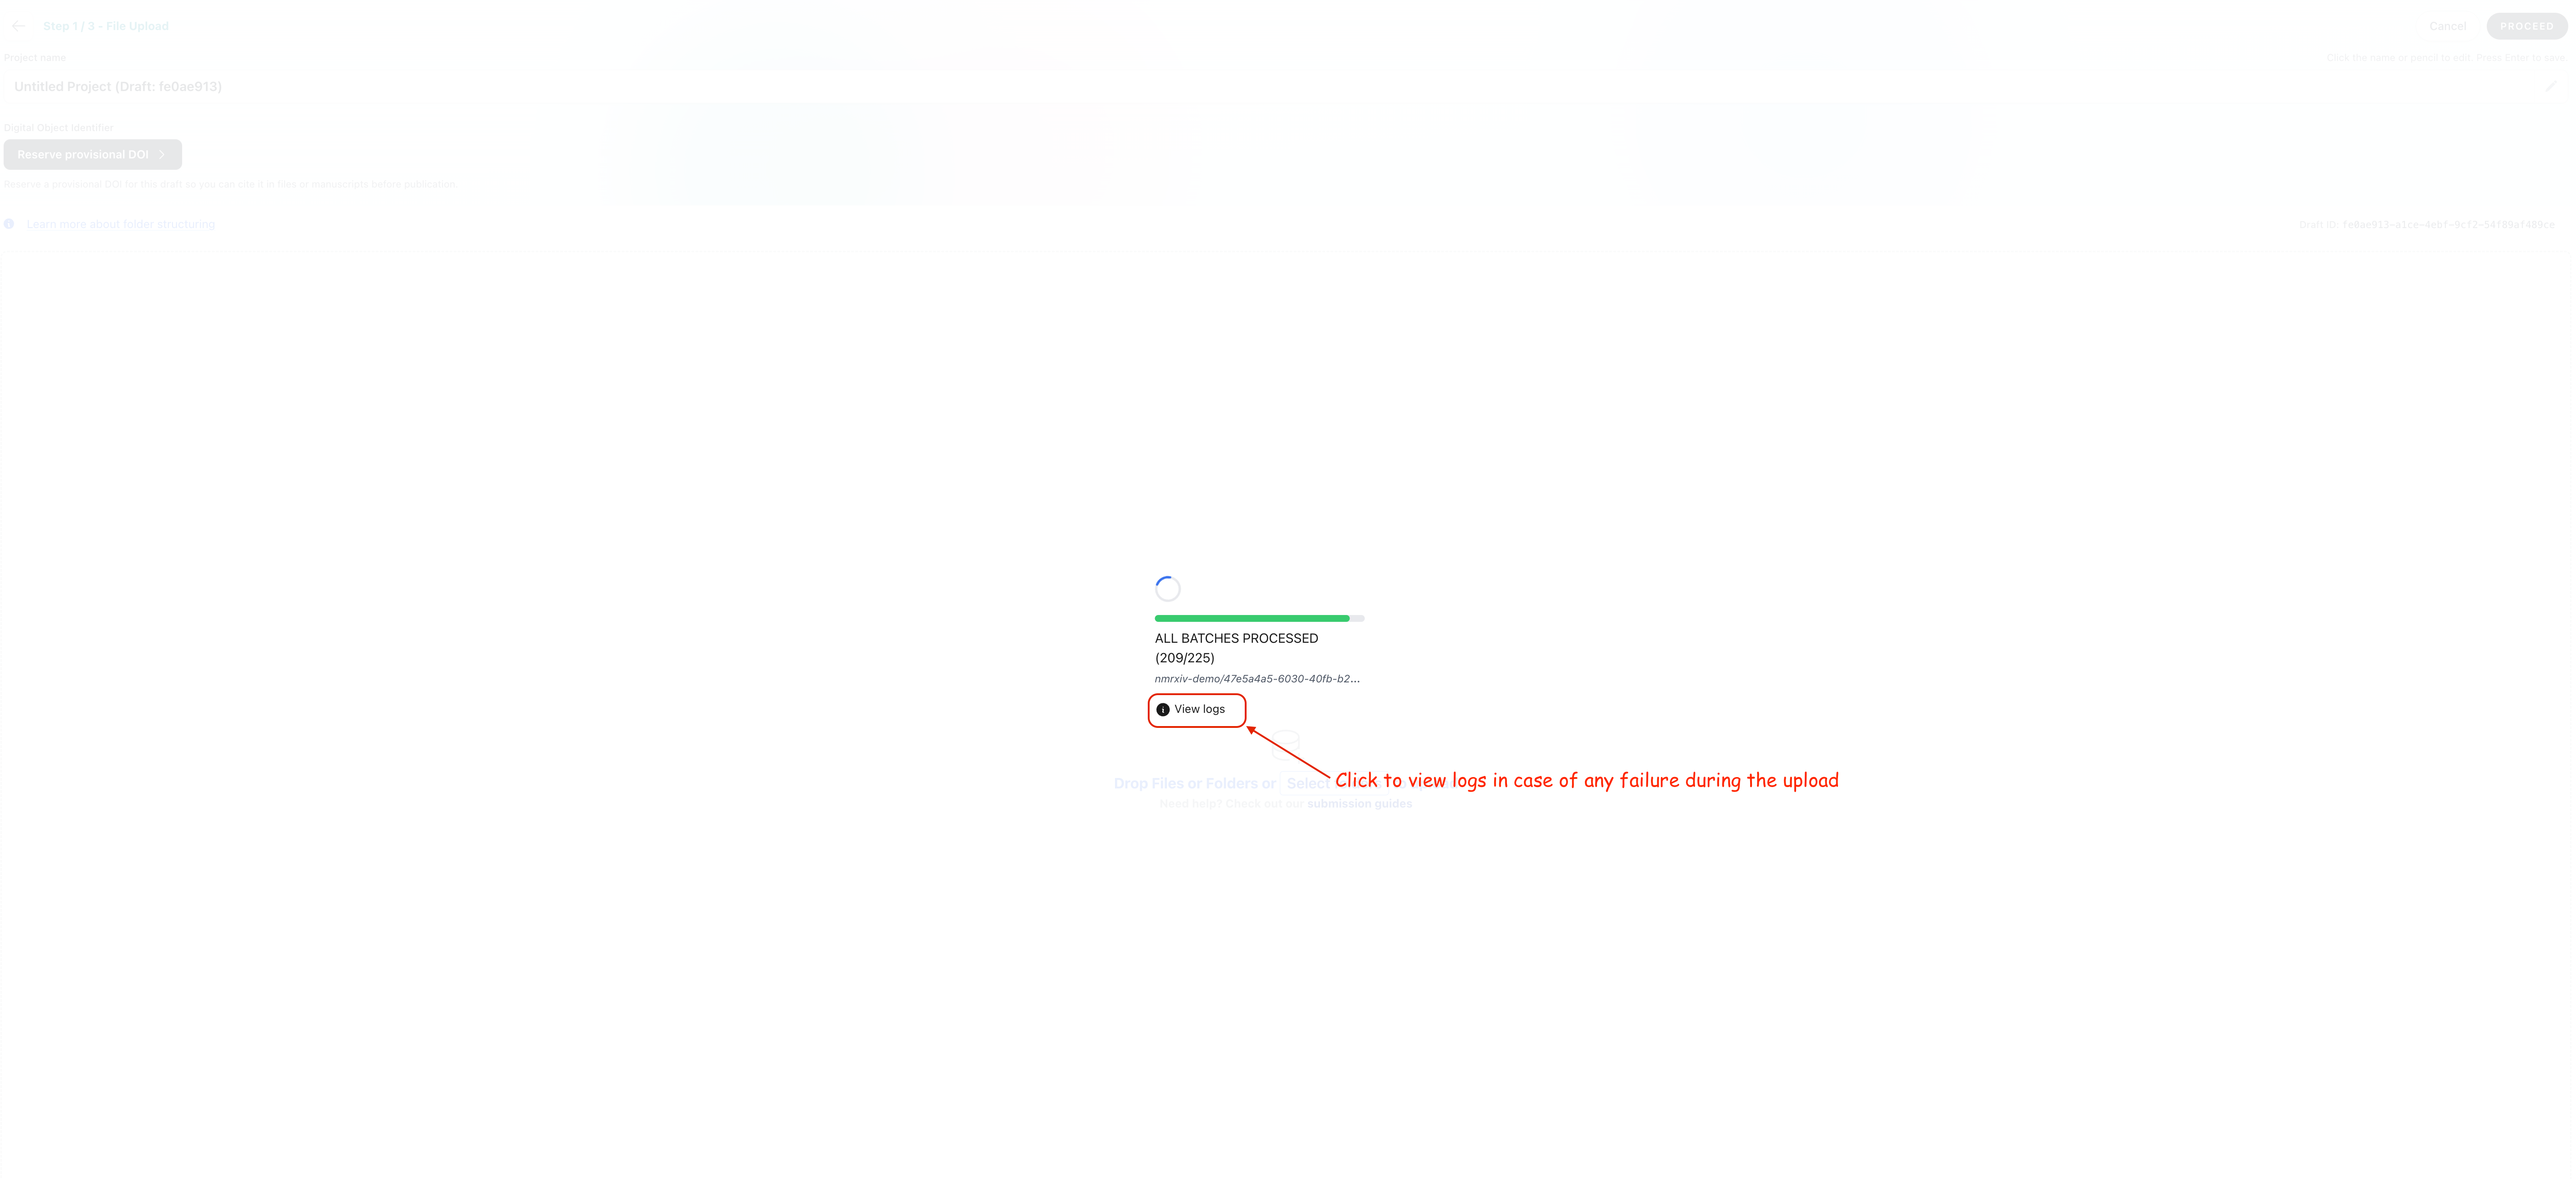
If an upload fails, open the upload logs to identify the file or batch that needs attention.
After upload, review the file tree. You can expand folders, switch between list and icon views, delete unwanted files, and add more files to the selected folder.
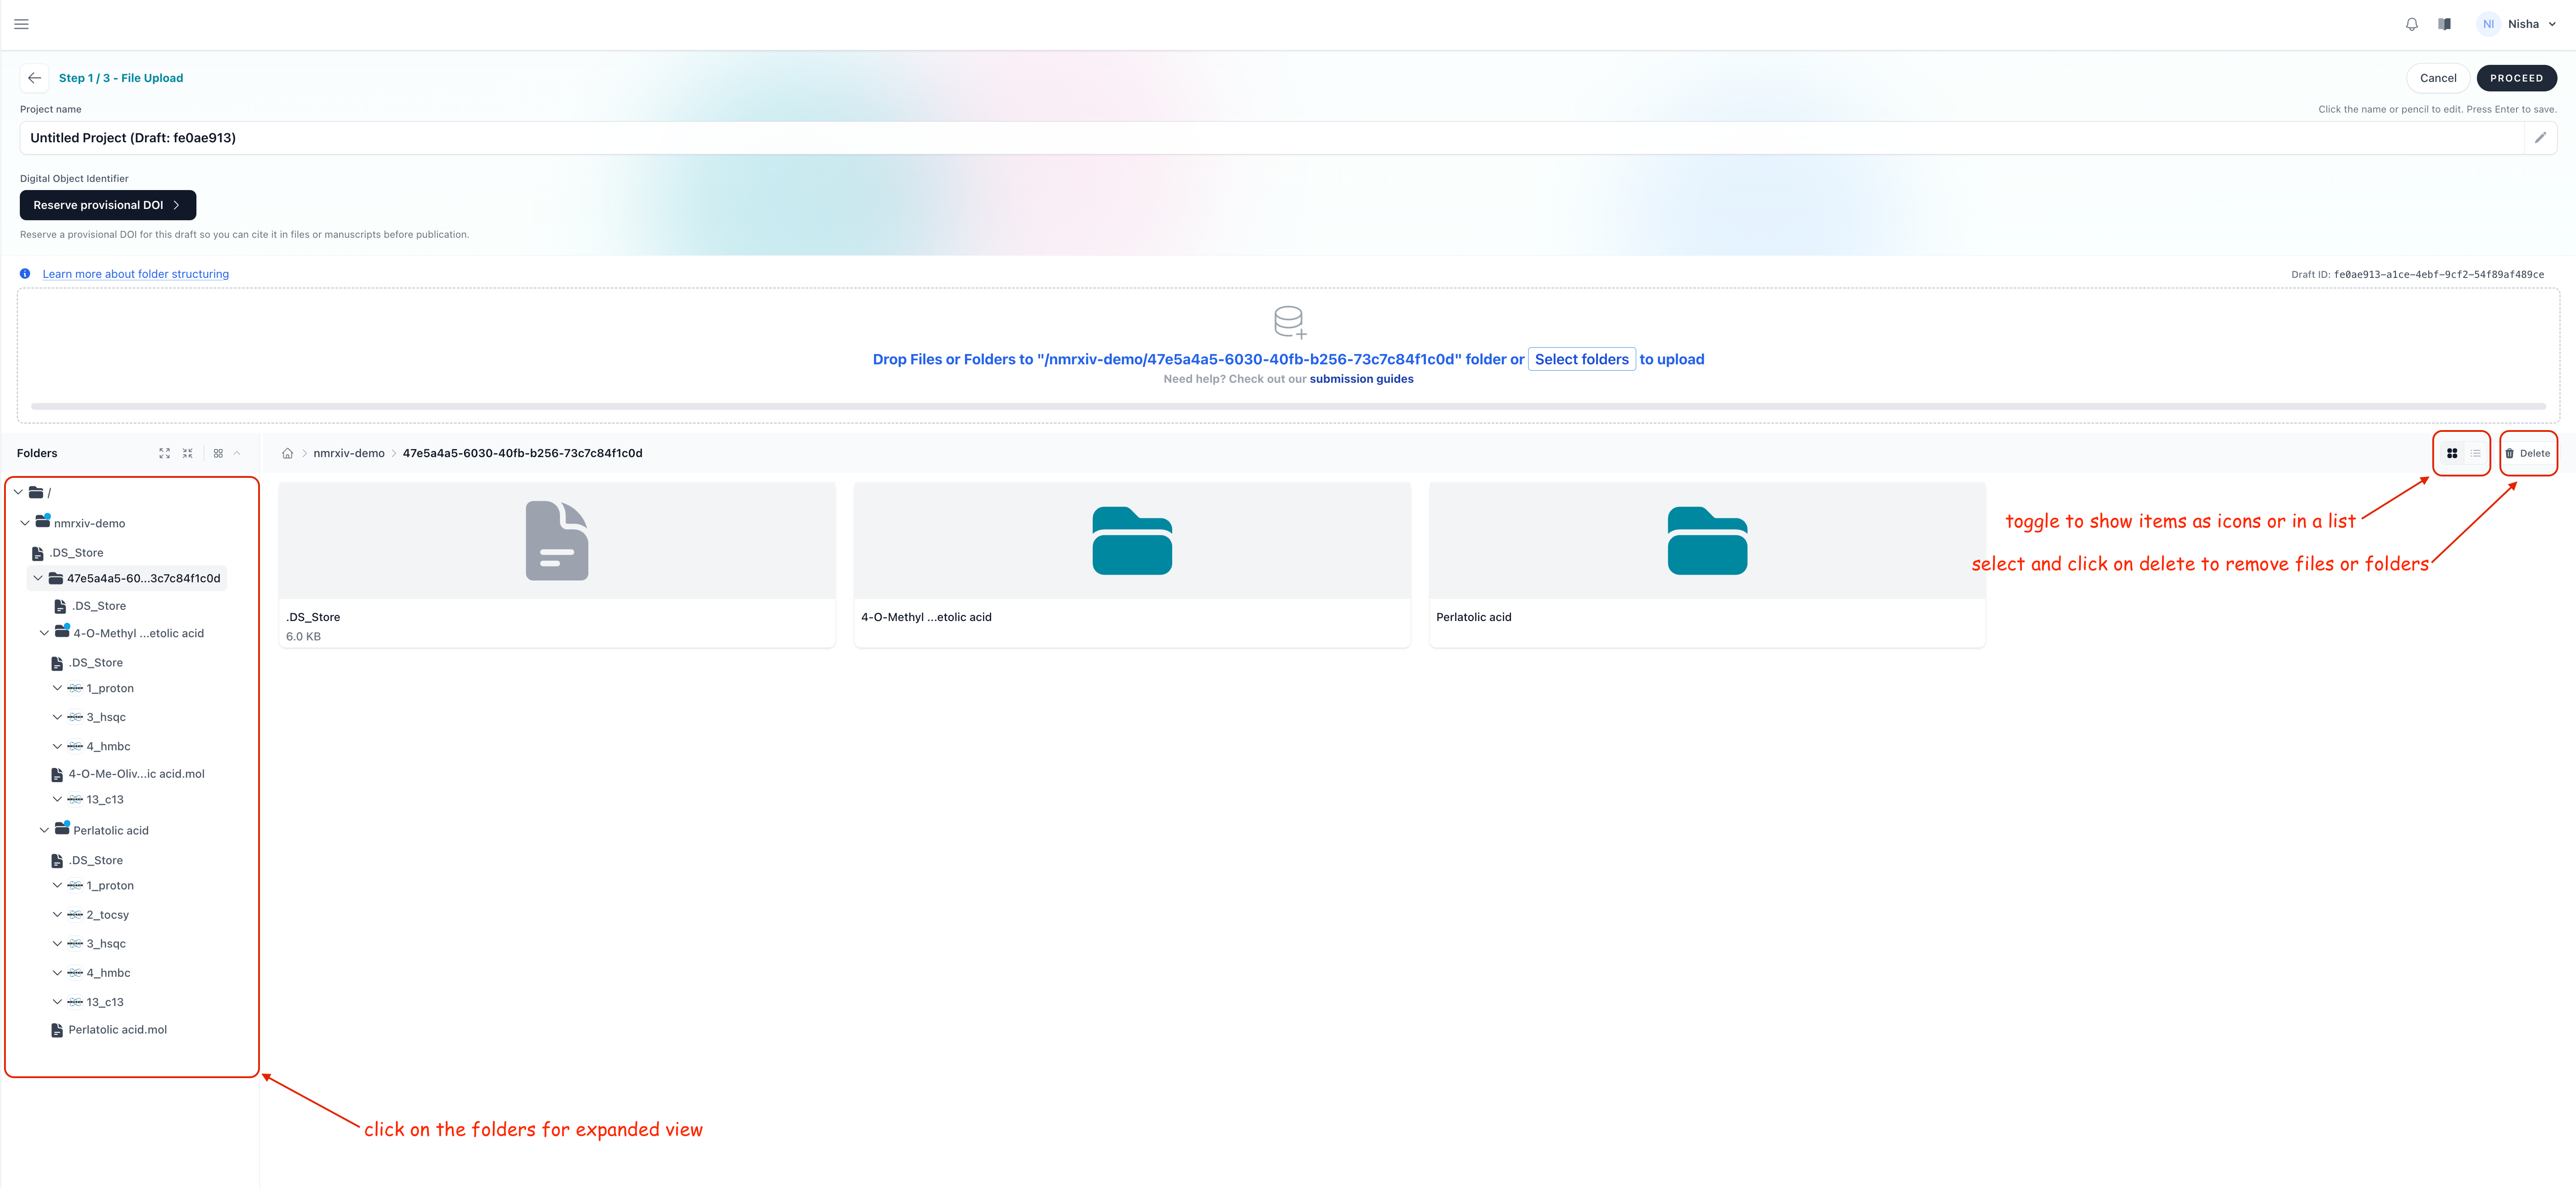
When the folder tree looks correct, click Proceed.
Step 2 - Auto Processing, Assignments and Validation
When you proceed, nmrXiv scans the uploaded folder tree and creates a private staging project.
At this step, nmrXiv has:
- detected supported NMR experiment folders and files,
- created samples from sample folders,
- created datasets from individual NMR experiments,
- imported spectra into NMRium when processing is complete,
- stored NMRium metadata and links it to samples and datasets.
Most of the sample related metadata are already been extracted and saved but if something got missed then you might have to enter them manually, to make sure the validation passes. If any information is missing an edit button will appear on the side of that particular metadata, where you can click and enter the required information. The most important fields are:
- sample name and description,
- keywords or tags,
- chemical structure or composition,
- organism or species information when relevant,
- spectral assignments.
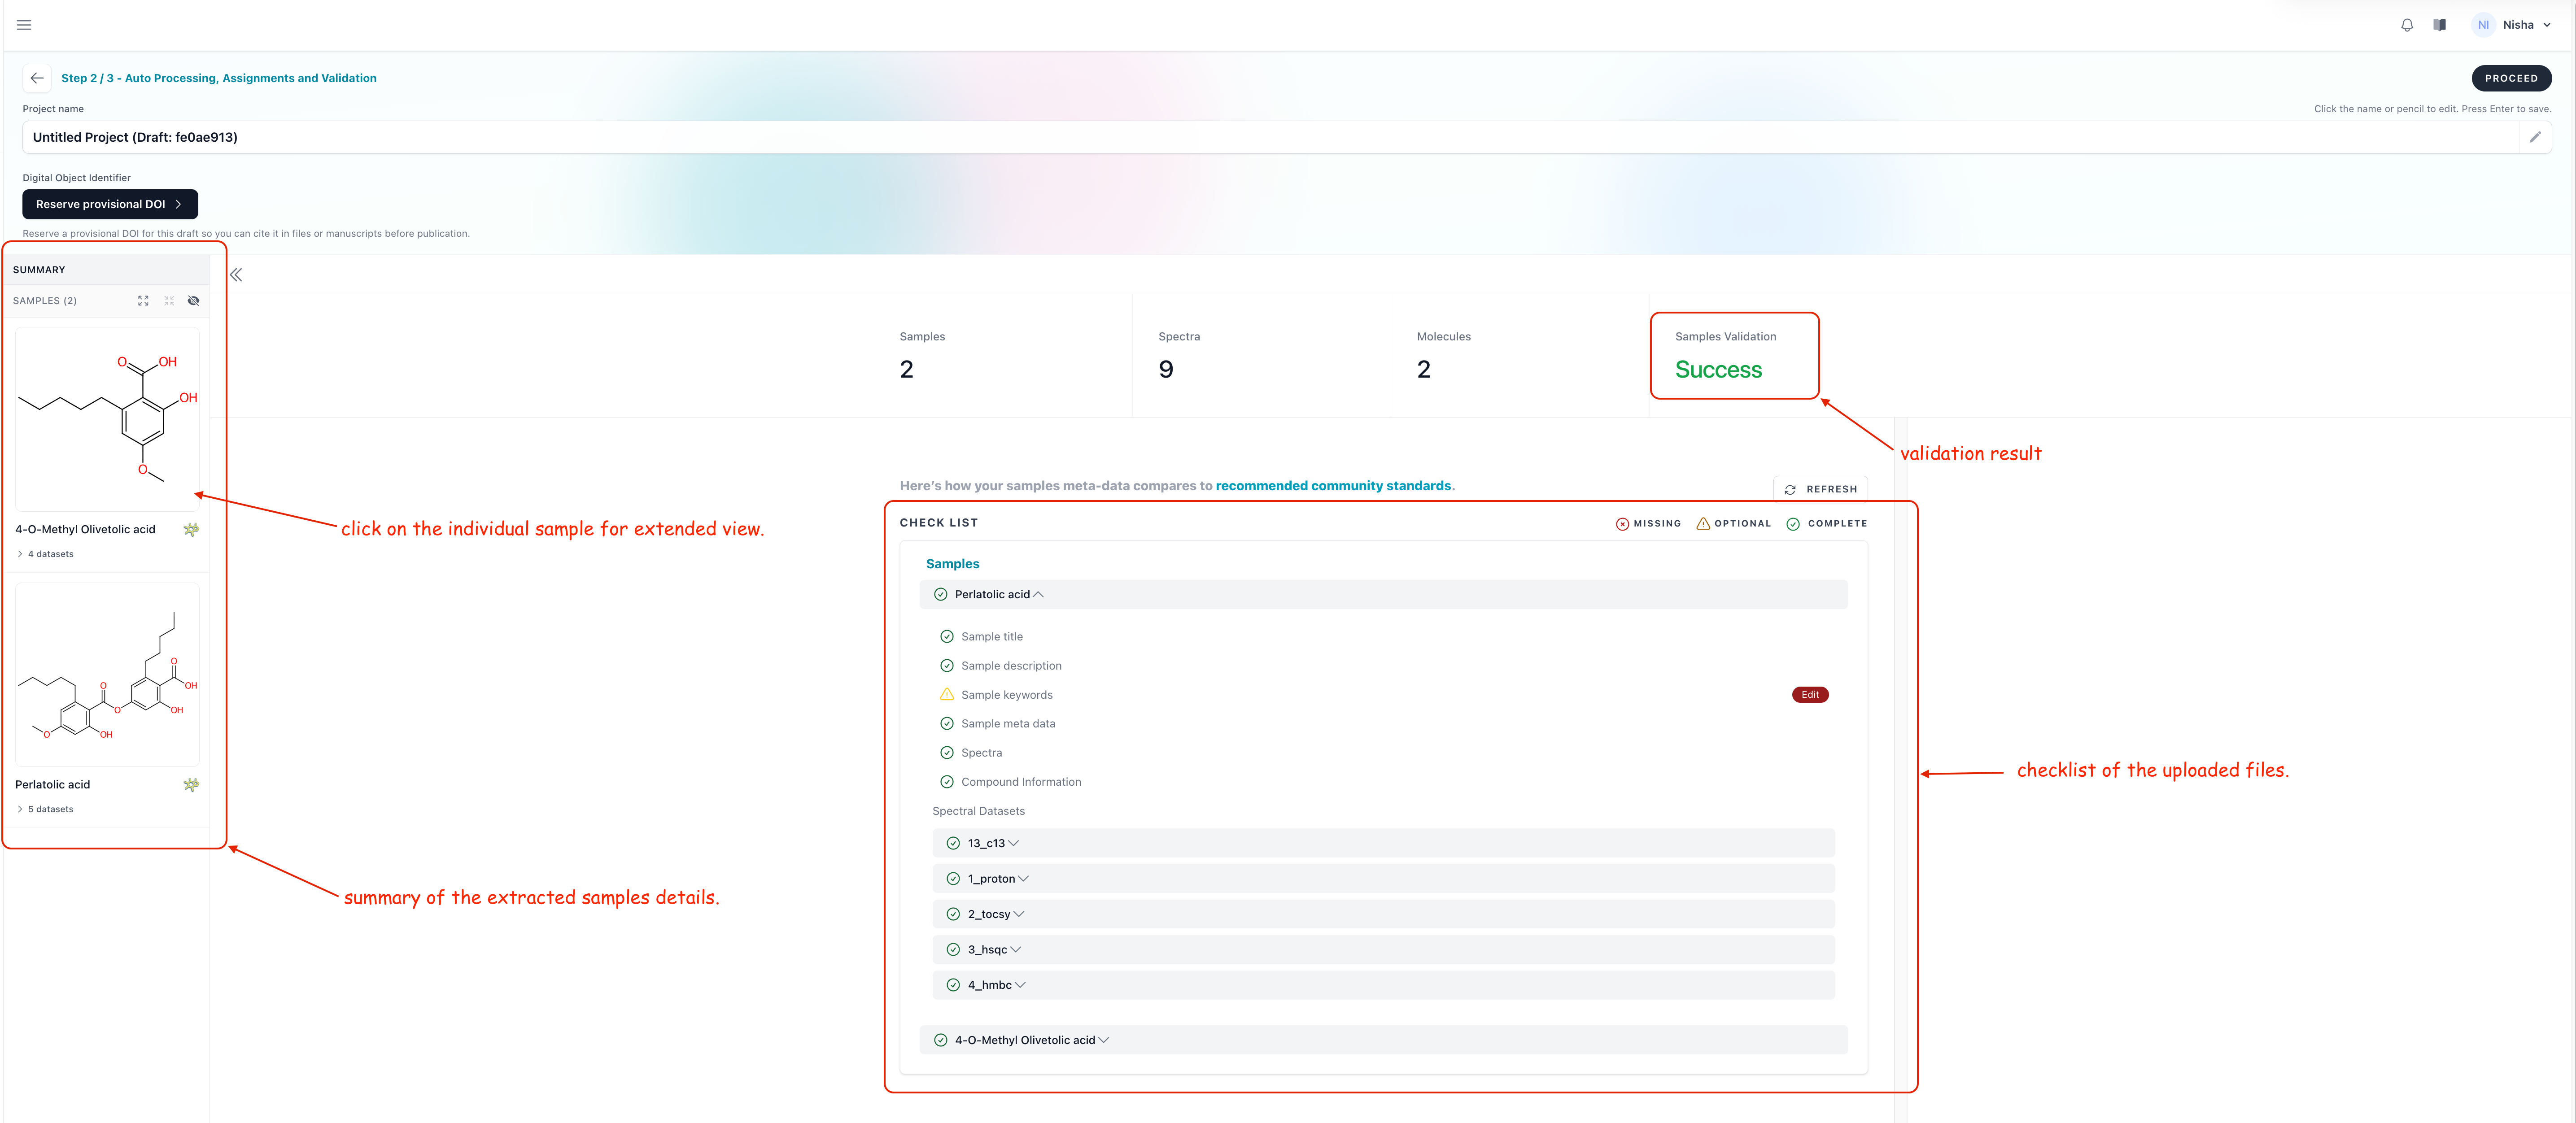
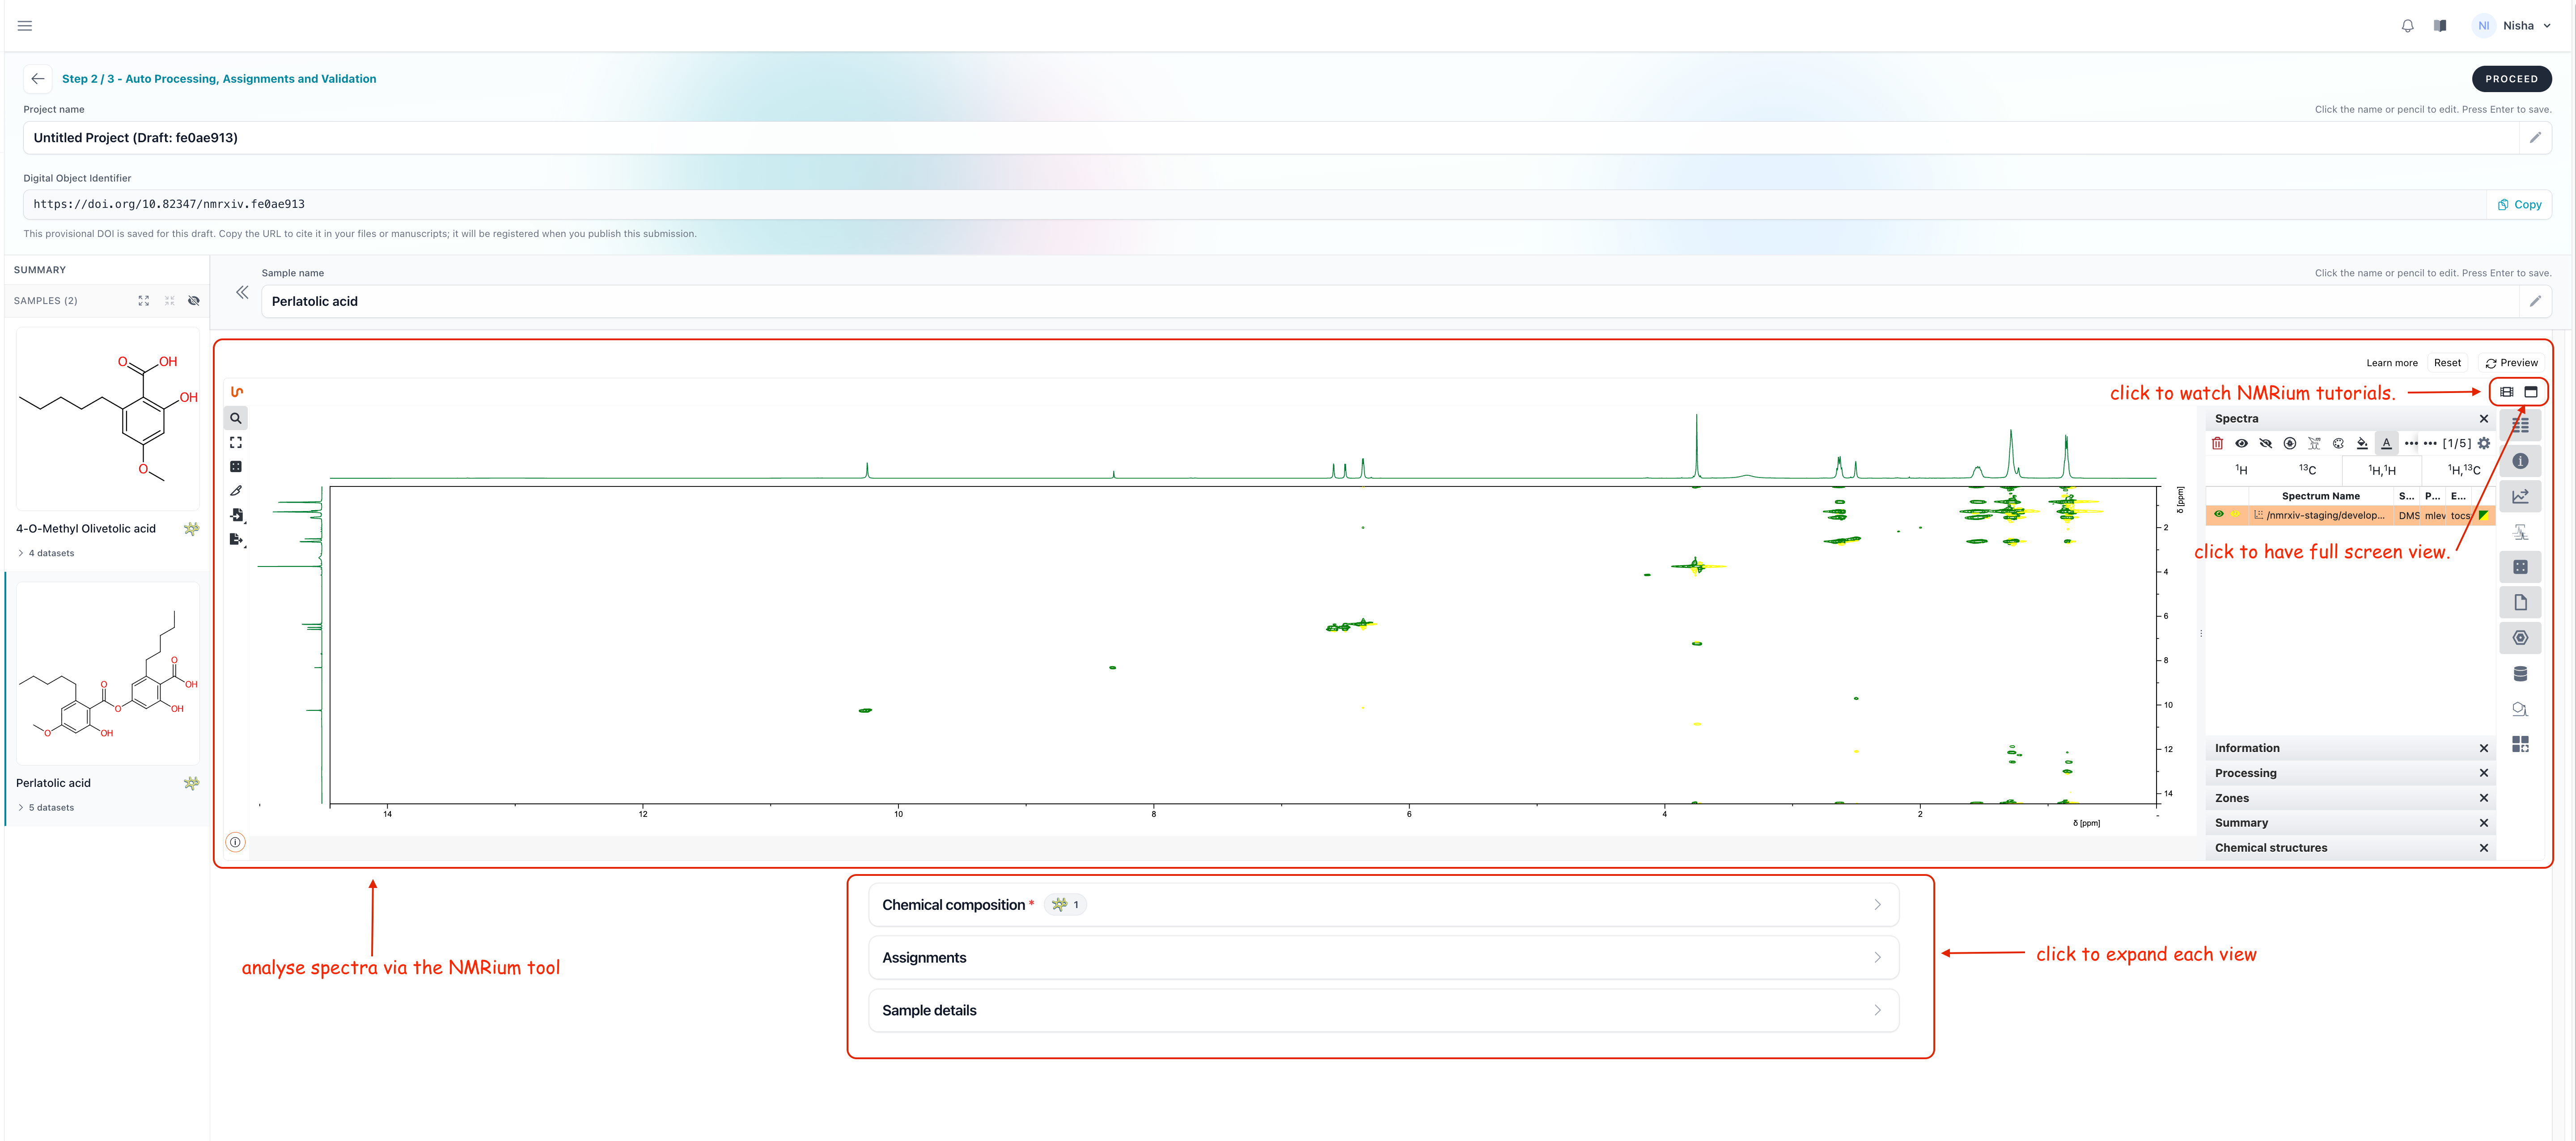
The raw NMR files are converted into an interactive NMRium state, so users can inspect spectra in the browser. You can click on the individual samples on the right side to get the more detailed information and also view, analyse, do smart peak picking, analyse 1D and 2D spectra, assign molecules and much more via the NMRium tool.
INFO
What is NMRium?
NMRium is a web-based NMR spectra processing and analysis software. It allows users to visualize, process, assign, and interpret 1D and 2D NMR spectra directly in the browser.
It supports common NMR file formats such as JCAMP-DX, Bruker, JEOL, Varian, and .nmrium and provides interactive tools for peak picking, molecular assignment, spectrum comparison, and data export.
For nmrXiv, NMRium is important because it turns deposited NMR files into interactive, reusable spectra, instead of leaving them as static figures or PDFs
To learn more about how NMRium works please follow the:
- Documentation - https://docs.nmrium.org/
- Tutorial - https://www.nmrium.com/tutorials/spectroscopists/overview
Chemical Composition:
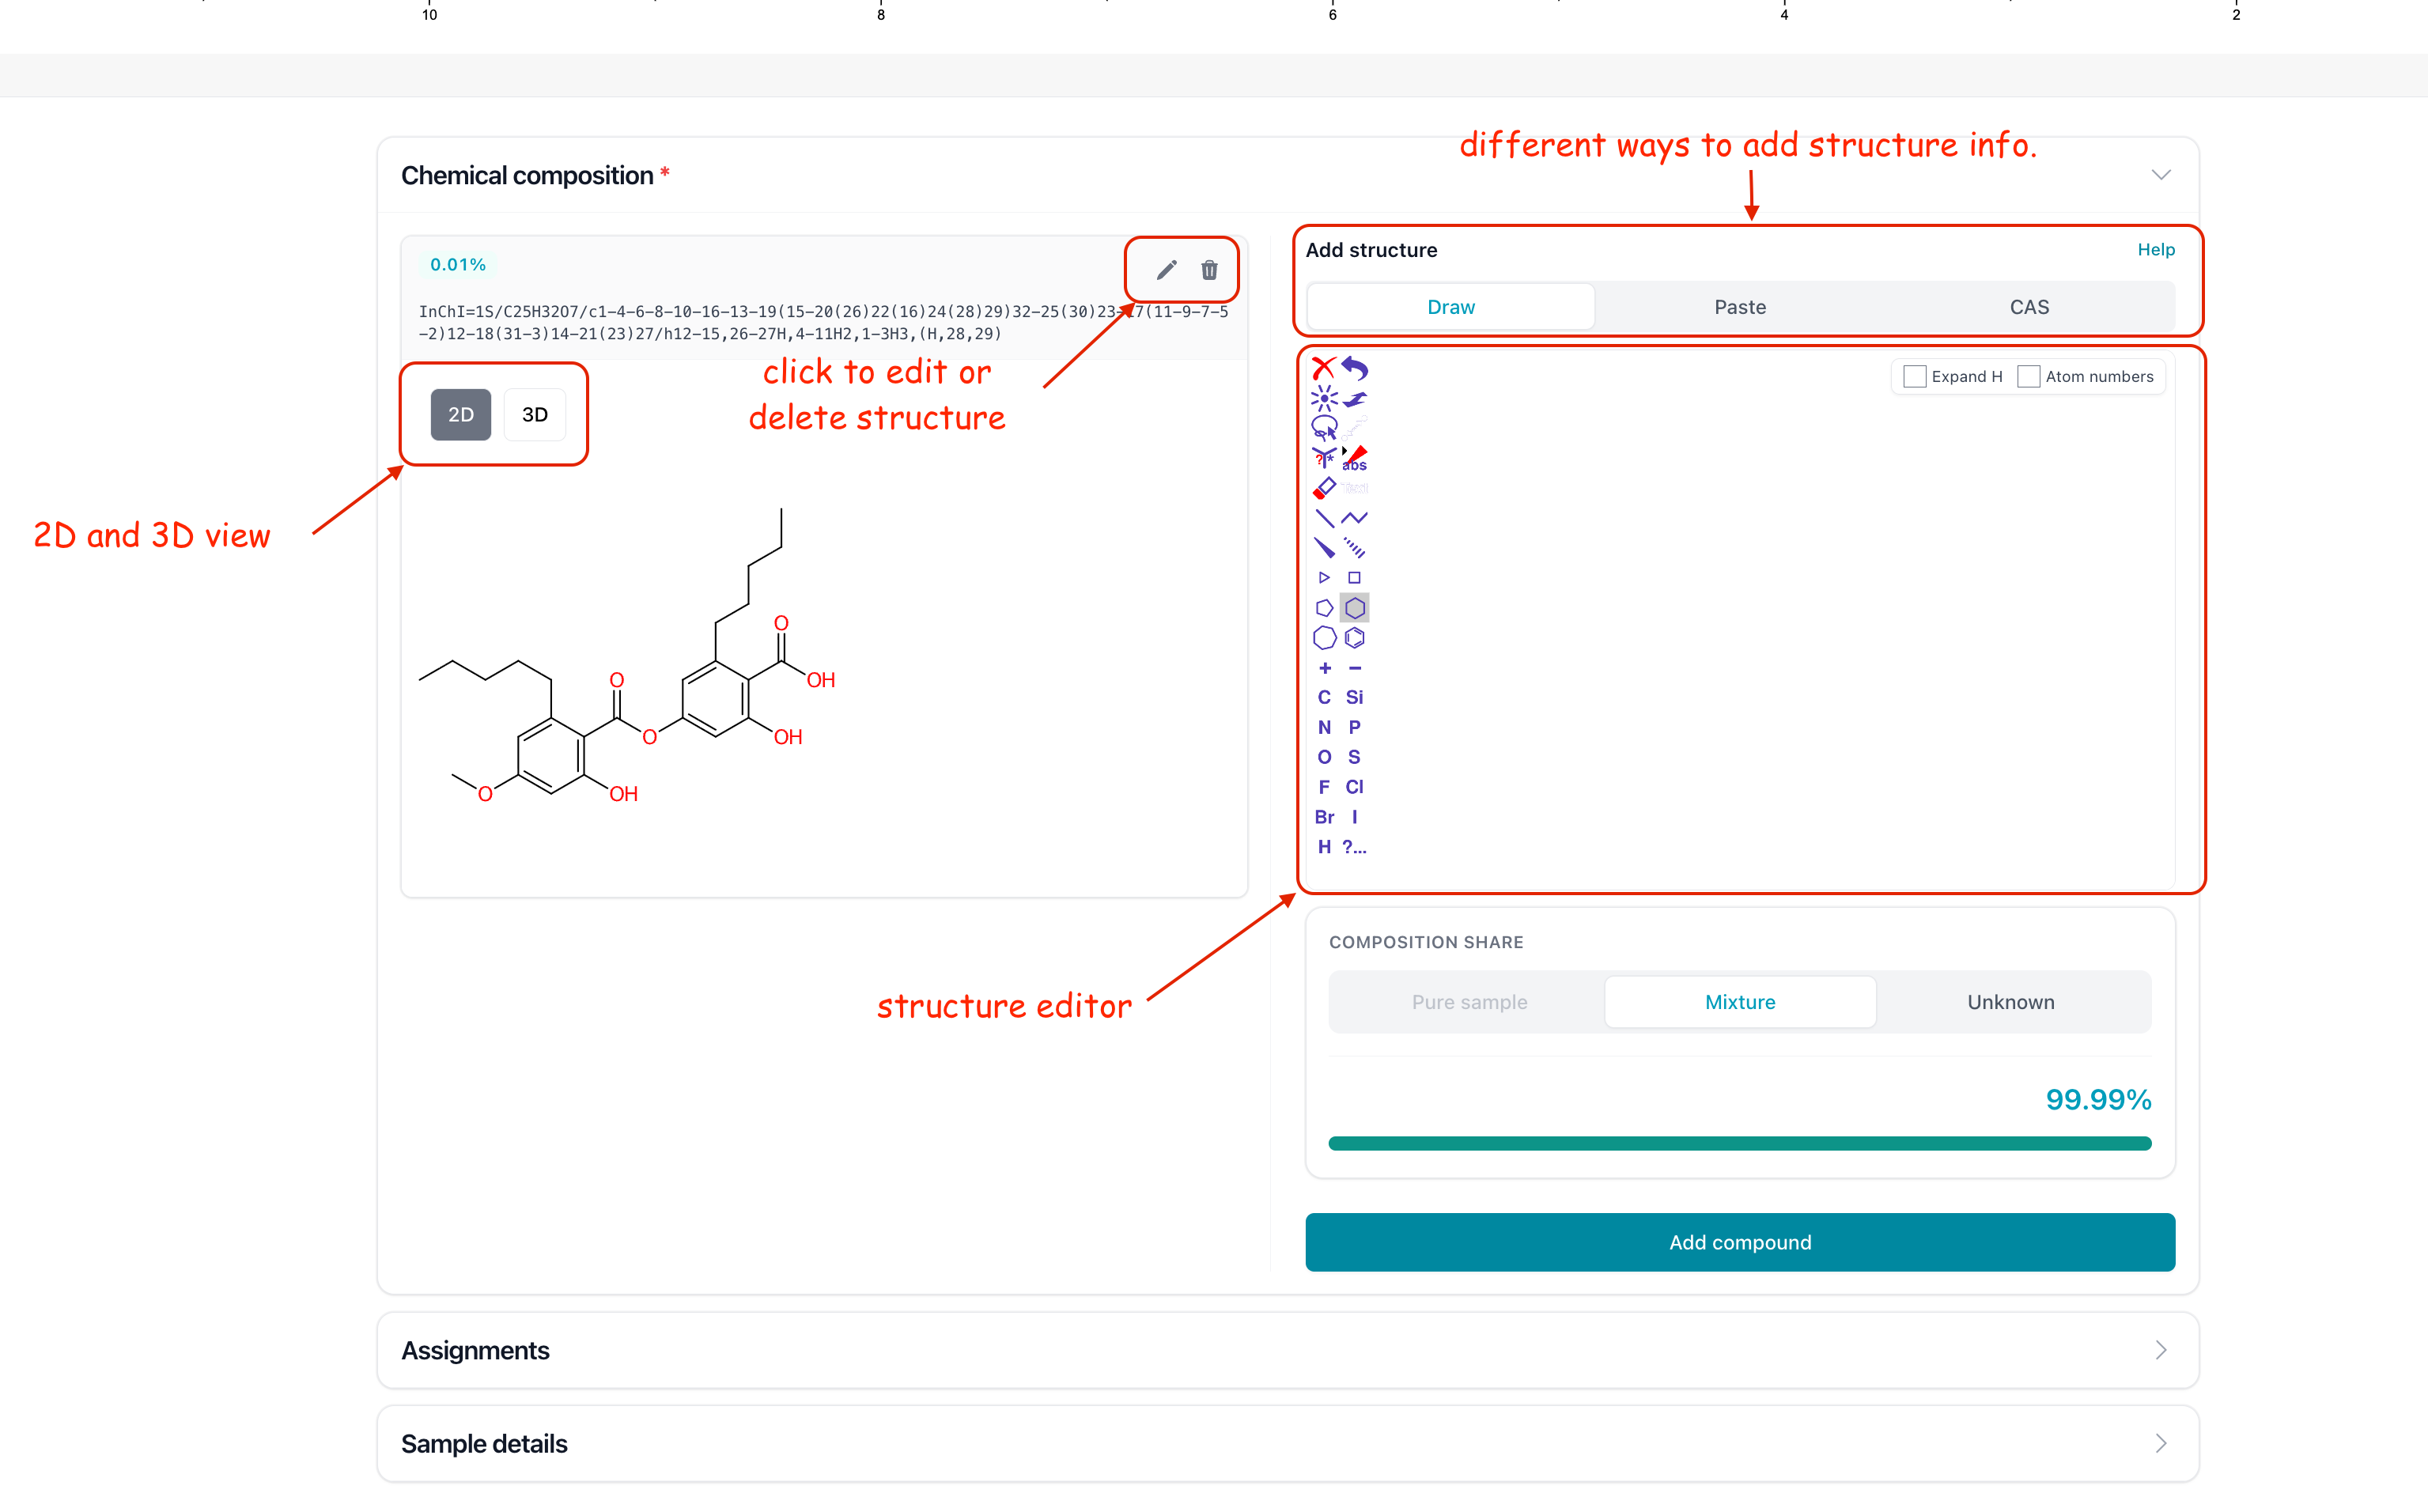
The structure information are automatically extracted when you have the structure information already available in the upload in the form of .mol or .sdf file. If not then you can add the structure information manually using three way provided in the Add structure option. You can either manually draw structure via structure editor, Import via mol, sdf or smiles or import via CAS number. To Learn more about how to use the structure editor follow the documentation here.
Assignments:
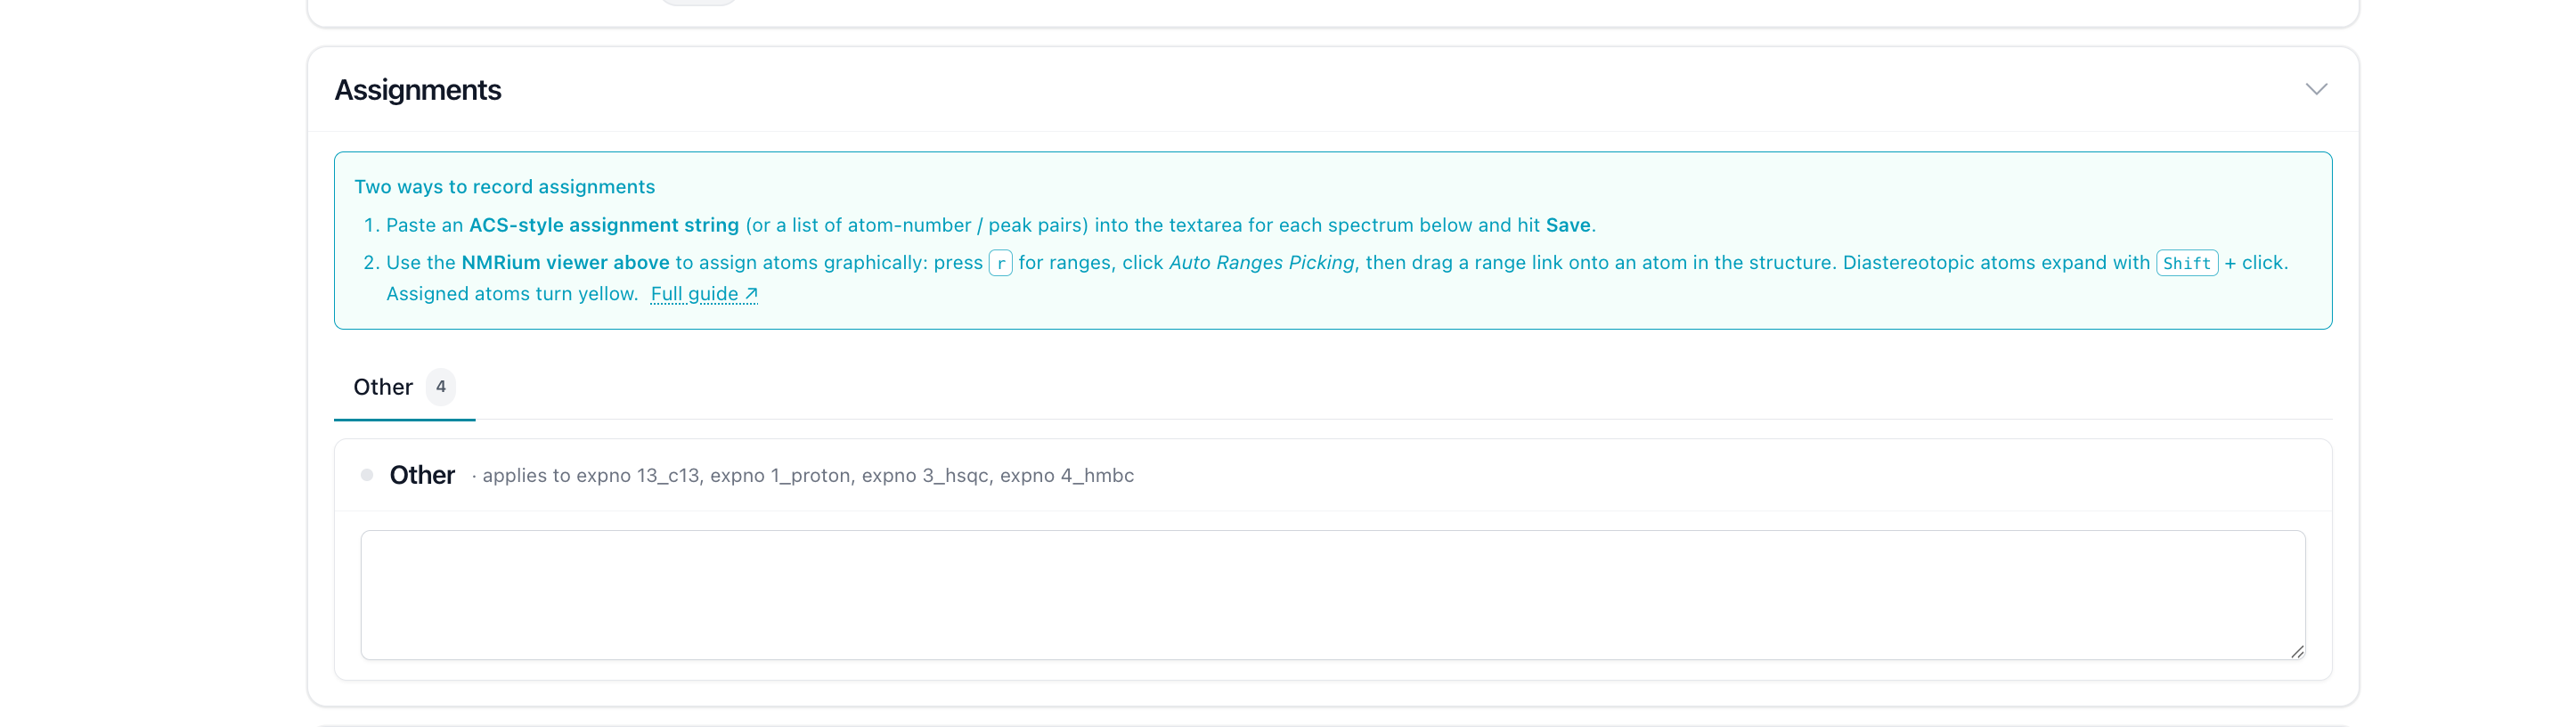
In nmrXiv, assignment means linking the signals in an NMR spectrum to the corresponding atoms or parts of a chemical structure. In simple terms, it answers: “Which peak belongs to which atom in the molecule?”
There are two ways by which you can perform the assignment.
- Paste an
ACS-style assignment string(or a list of atom-number / peak pairs) into the textarea for each spectrum below and hit Save. - Use the
NMRium viewer aboveto assign atoms graphically: press r for ranges, click Auto Ranges Picking, then drag a range link onto an atom in the structure. Diastereotopic atoms expand with Shift + click. Assigned atoms turn yellow. Full guide.
Why it matters:
- It makes the spectrum chemically meaningful, not just a set of peaks.
- It helps others verify the structure and check whether the spectrum supports the claimed compound.
- It improves reuse, because future users can search, compare, and interpret the data more easily.
- It supports better FAIR data quality, because the raw spectrum, processed spectrum, structure, and interpretation are connected.
Samples Details:
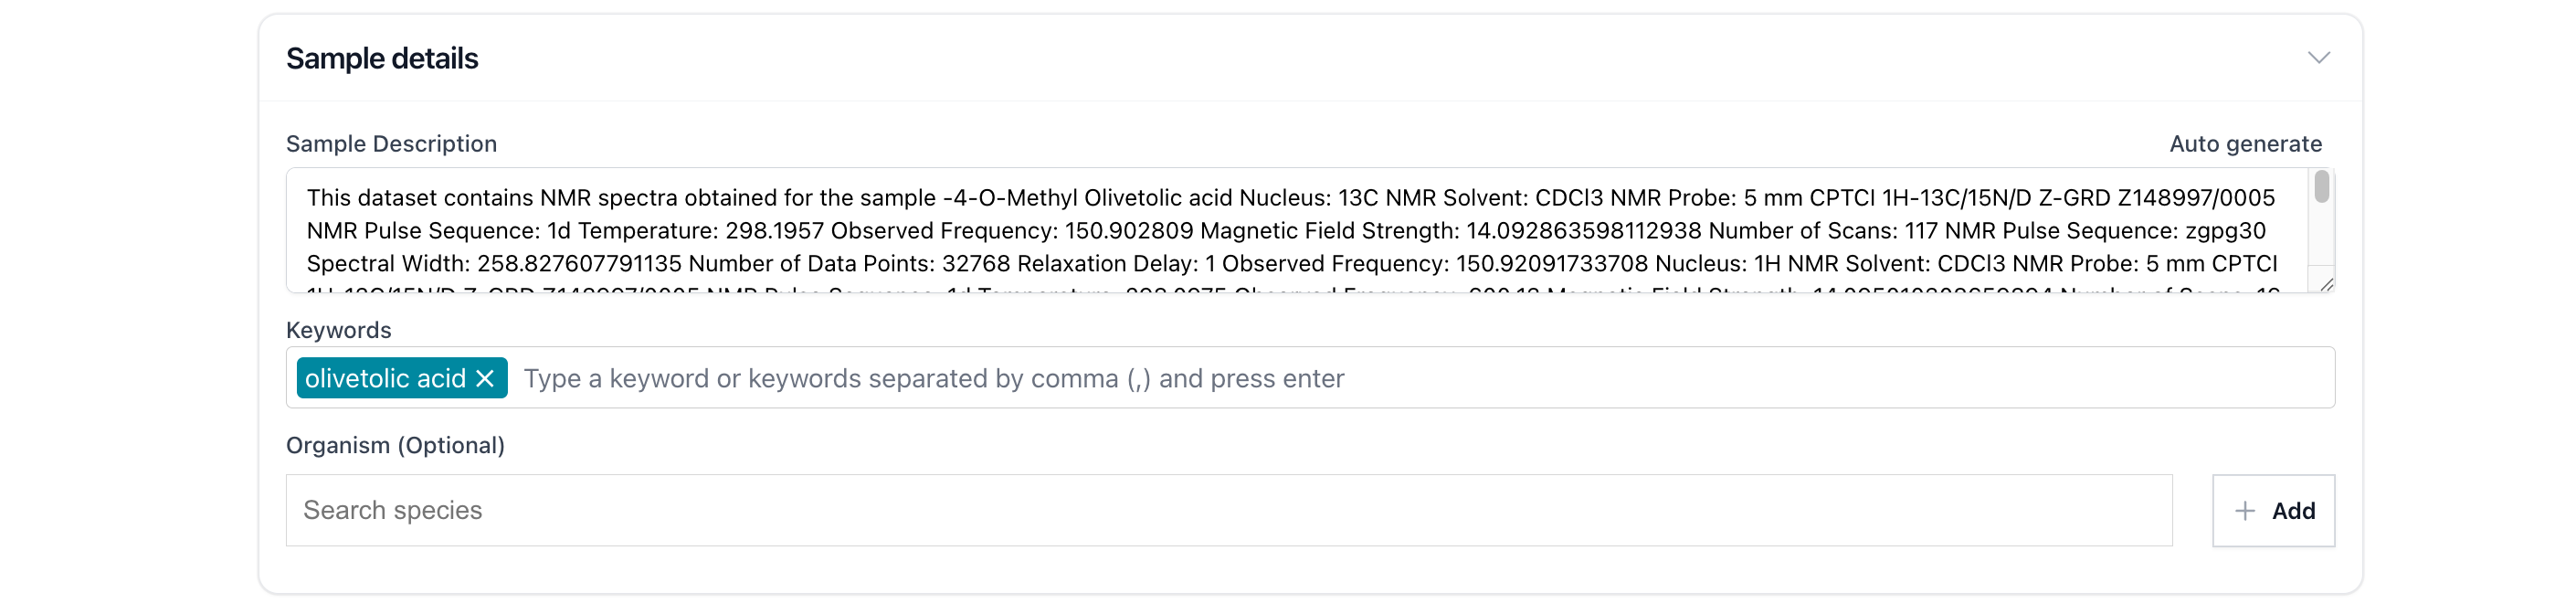
You can provide additional information about the sample, such as a sample description, keywords, and organism details.
The sample description can also be auto-generated based on information extracted from the uploaded files. To do this, click the Auto-generate button on the right side.
Step 3 - Publish Data
In the publication step, choose how the deposition should be published.
You can publish the submission in two ways:
- Group as one publication: publish one project containing all samples and datasets.
- Publish each sample on its own: publish samples as independent public records.
For publication-style deposits, Group as one publication is usually the best choice when the samples belong to one manuscript, thesis, or coherent study.
For project publication, complete the publication metadata:
- Project Name - must be unique within the workspace (personal workspace or team).
- Project Desription - must be at least 20 characters.
- Keywords(Optional) - this field is optional but can be added individually by typing the keyword and pressing "Enter," or in bulk by typing a list of keywords separated by commas and pressing "Enter." Keywords enhance the visibility of the Project.
- Organism(Optional) - this field is optional and is ontology driven organism information about your project.
- Citation - this field contains the article to which the submitted data is attached. You can either enter the citation details manually or import it directly from the DOI.
- Author - enter the details of the authors who are linked with the creation of the data. Again, these details can be entered manually or imported via ORCID IDs
- License - license is mandatory for making your data public. If you are not sure which license to use, please check the link How to choose the right license?.
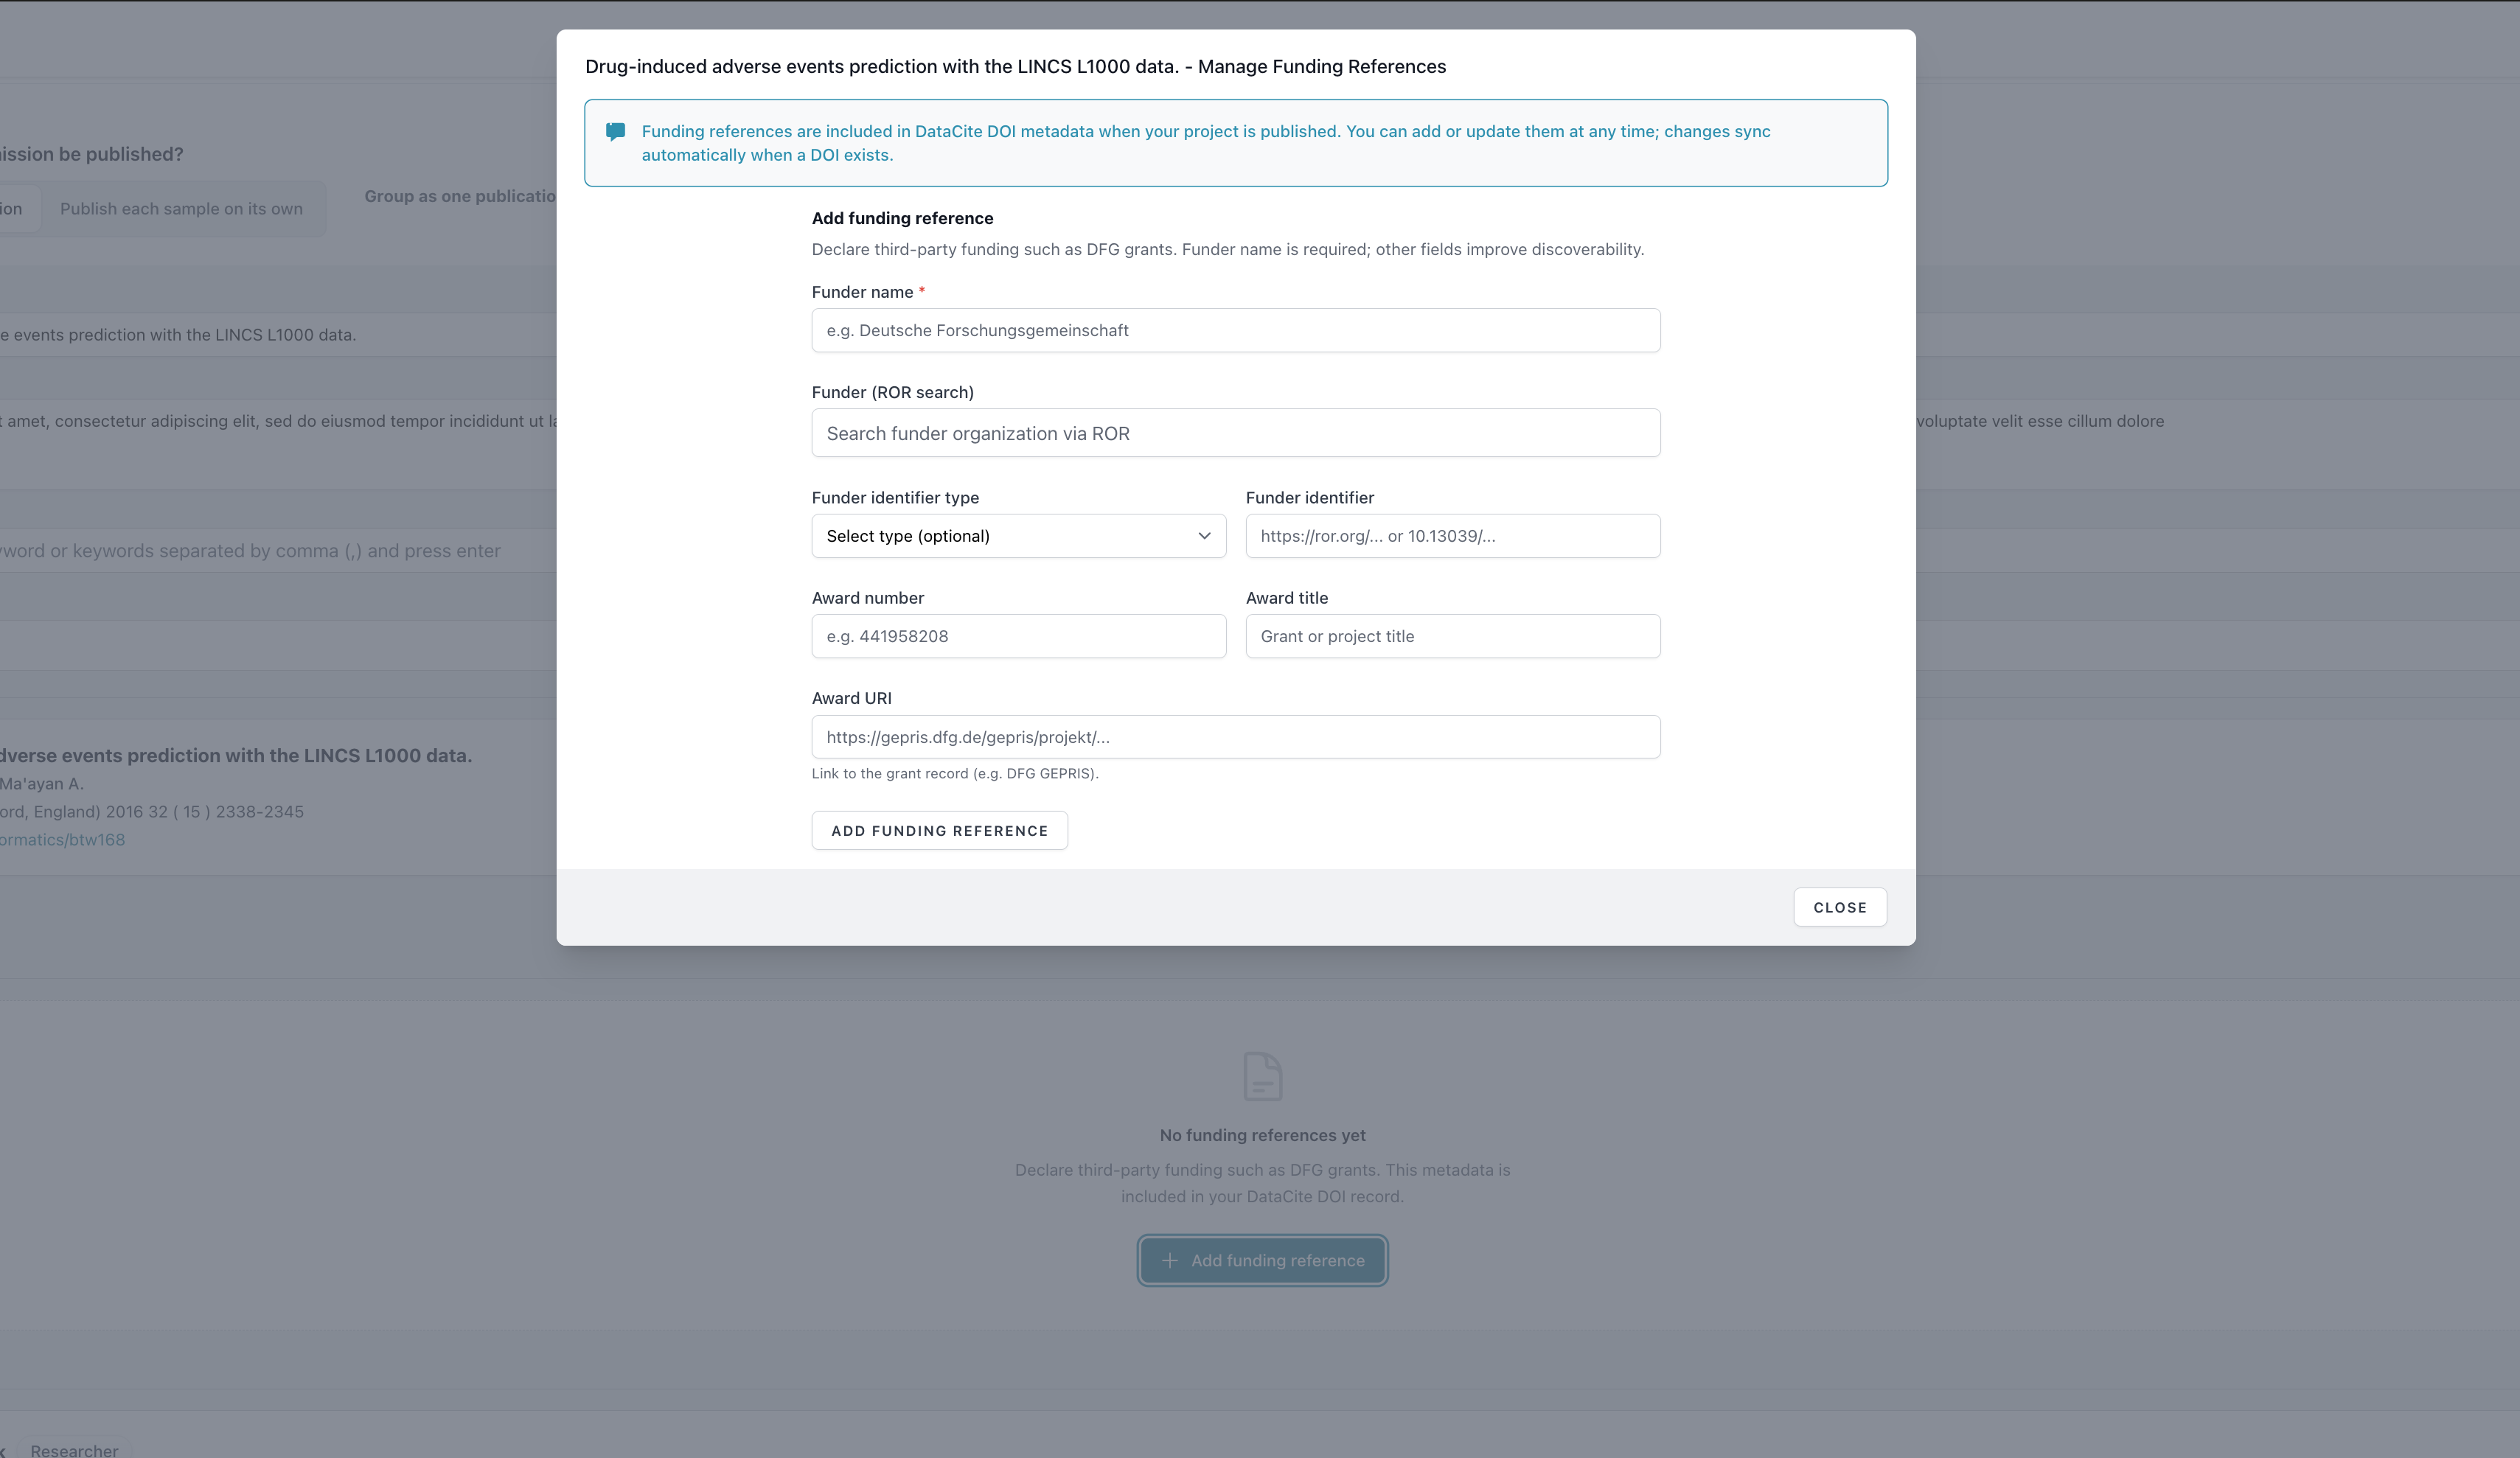
- Funding (Optional) - declare third-party funding such as grants from research organizations. Funding references are included in your DataCite DOI metadata and improve discoverability. You can add or update funding references at any time; changes sync automatically when a DOI exists.
The project name must be meaningful and cannot remain the default draft name.
Adding Funding References
Funding references help document the sources of financial support for your research. They are particularly useful when your work was supported by grants or research funding organizations.
When to add funding references:
- Your research was supported by a grant or award
- You want to acknowledge funding organizations in your DOI metadata
- Your funder requires data deposition with funding information
How to add a funding reference:
Click the Add funding reference button to open the funding reference form. You will be prompted to enter:
- Funder name (required) - the name of the organization or institution providing the funding, such as "Deutsche Forschungsgemeinschaft" or "National Science Foundation"
- Funder identifier (Optional) - a unique identifier for the funder, such as a ROR (Research Organization Registry) ID or DOI
- Funder identifier type (Optional) - the type of identifier provided (e.g., ROR, DOI, Crossref)
- Award number (Optional) - the grant or award number assigned by the funder
- Award title (Optional) - the name or title of the grant or award
- Award URI (Optional) - a link to the grant record or project page, such as a GEPRIS entry for DFG grants
You can search for funding organizations by their name or ROR identifier. Funding references can be edited or deleted at any time before publication.
Release Date and Embargo
If you choose today as the release date, nmrXiv queues the submission for immediate publication. If you choose a future release date, the project is kept under embargo and published automatically when the release date arrives. Click on the link to learn complete details about the Embargo feature.
Funding references and embargo:
Funding references can be added or modified at any time during the embargo period. If your project has a reserved DOI, any updates to funding references will sync automatically to the DOI metadata, ensuring your funding information is always current.
After publication, nmrXiv assigns identifiers and DOI metadata, moves files from draft storage to permanent publication storage, rebuilds public archives, and sends notifications.
After Publication
Once public, the record becomes searchable, reusable, downloadable, and citable. You can find your project by clicking on the Project tab in the left side bar, where all the public project are listed.
Public records include:
- a project or sample page,
- interactive NMRium spectra,
- sample and molecule metadata,
- dataset-level spectra records,
- raw file downloads,
- a downloadable BagIt archive,
- license and citation information,
- nmrXiv identifiers and DOI metadata.
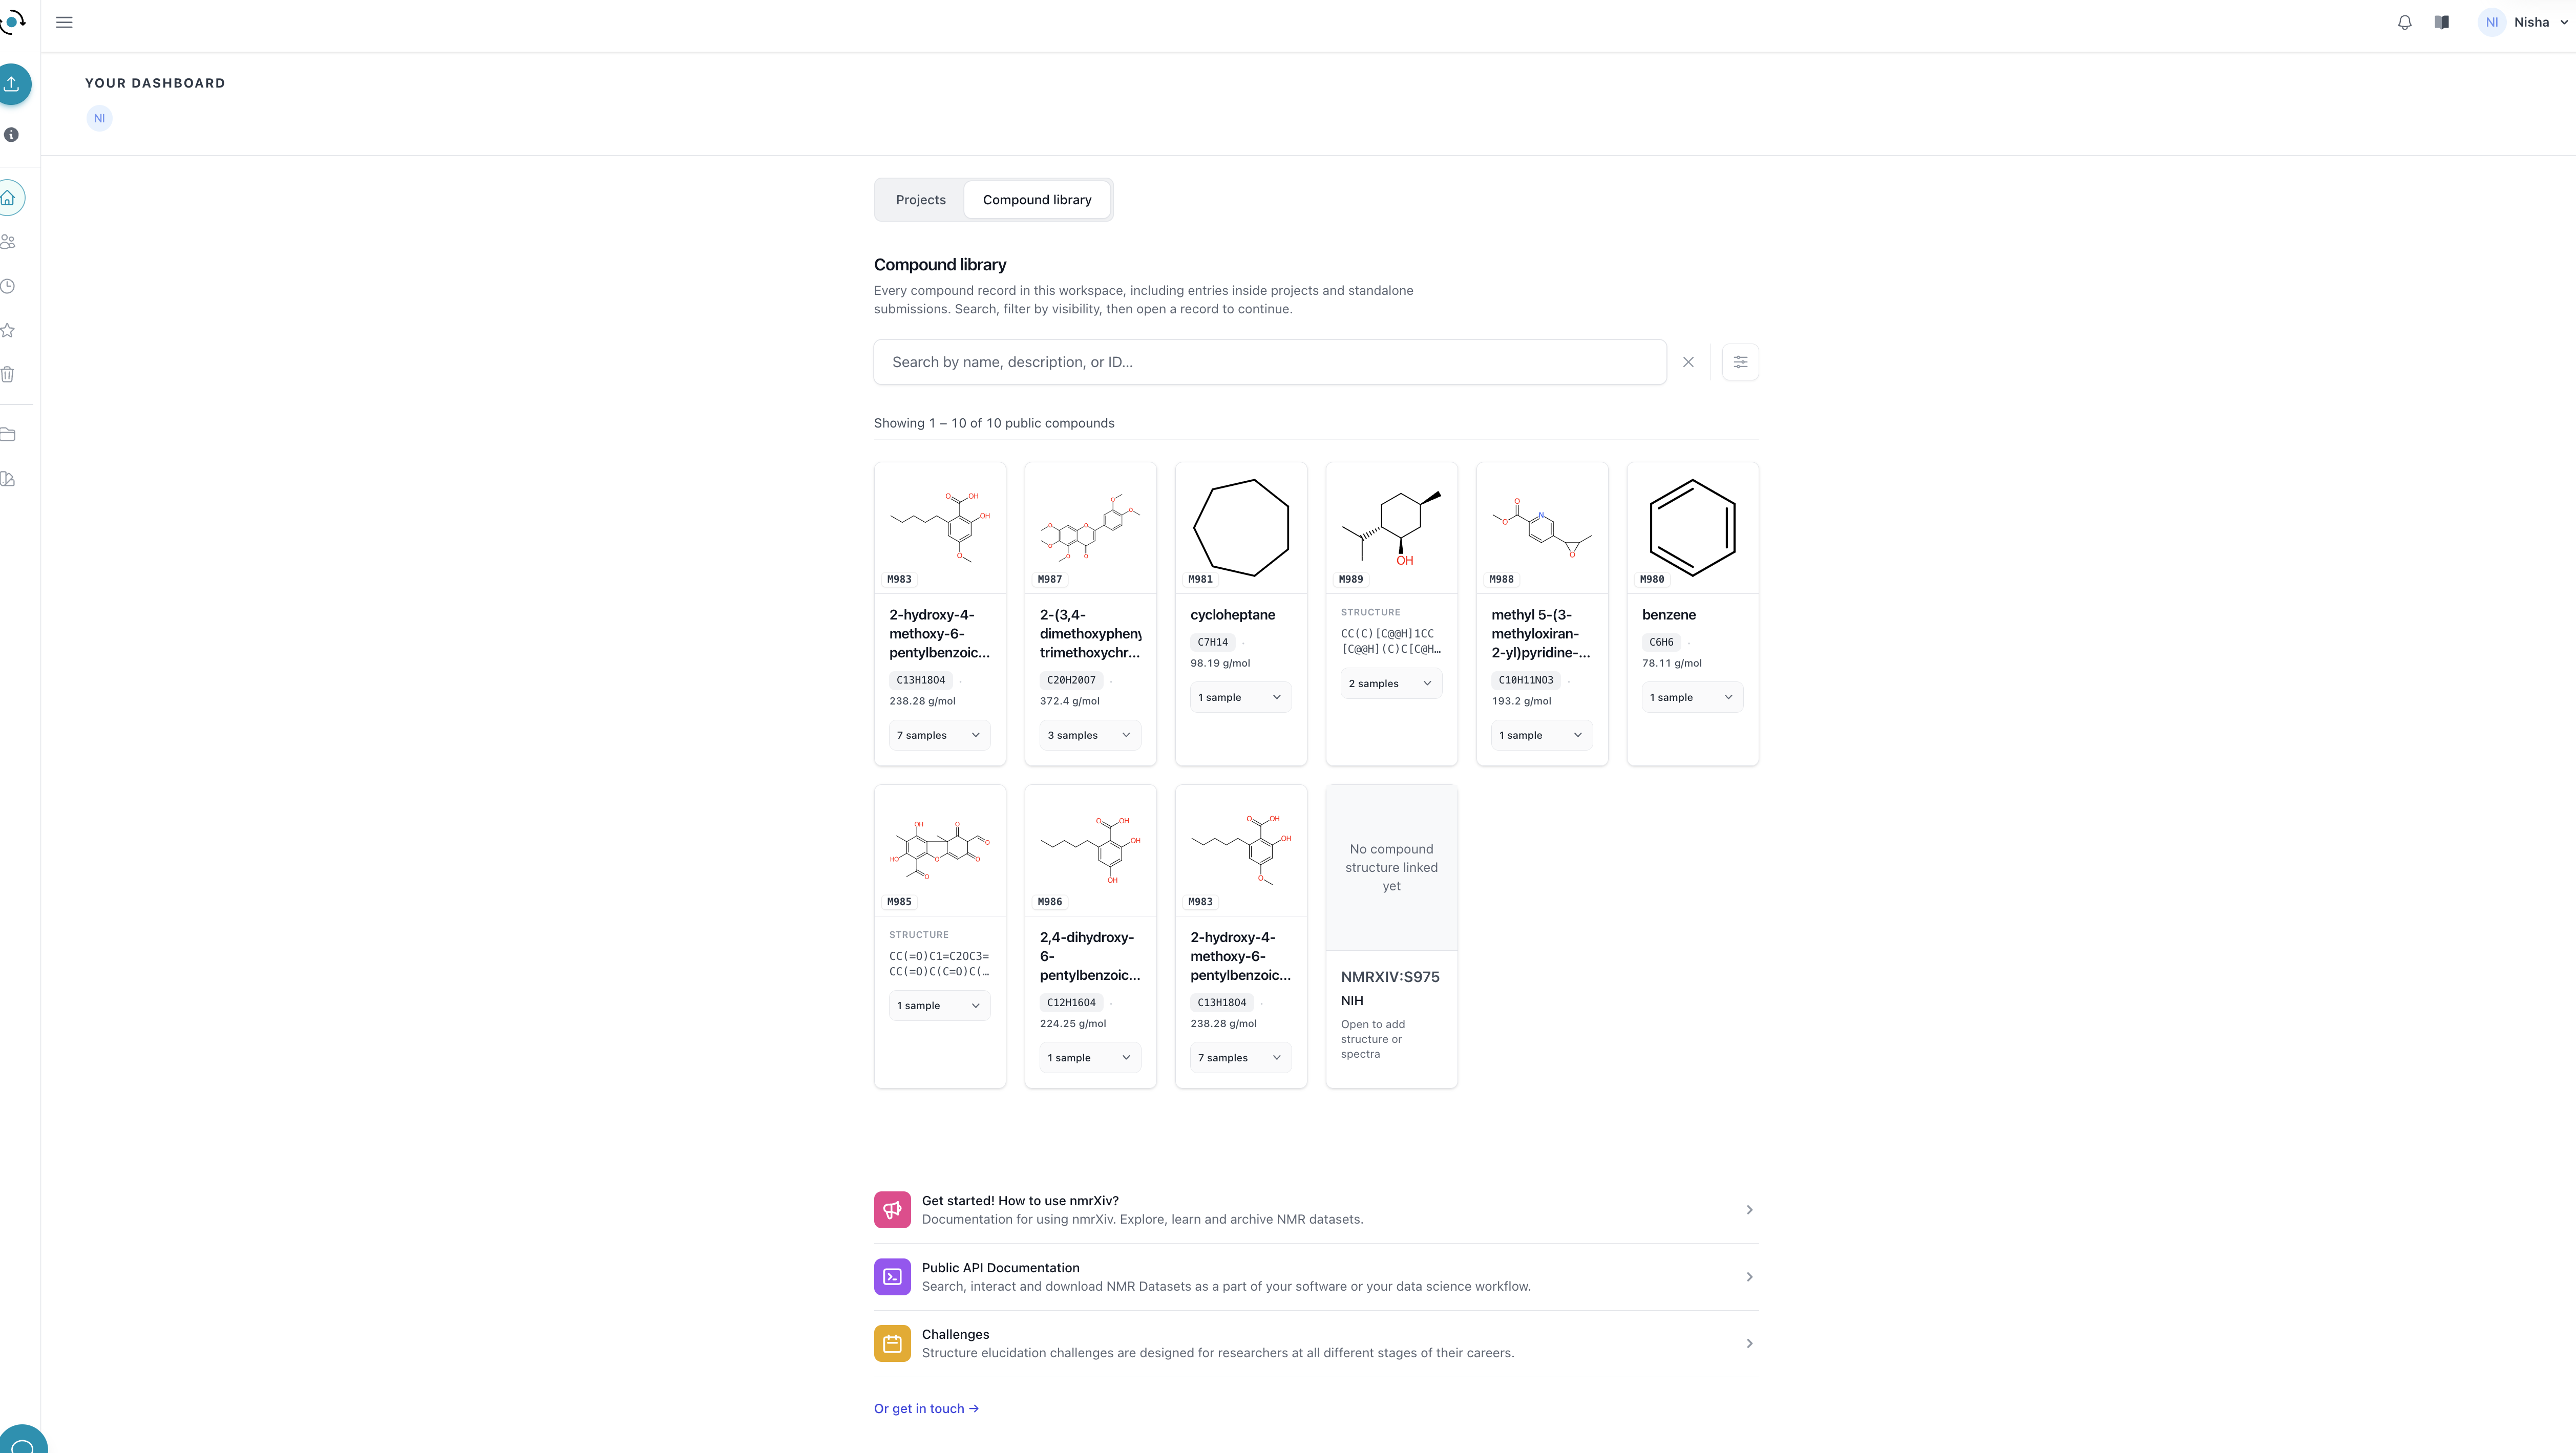
Each published sample also receives a downloadable BagIt archive that bundles its raw data, the spectra metadata produced during processing, and checksums for every file.
Downloading the BagIt Archive
BagIt is an open packaging standard for preserving and transferring digital research data. It keeps the sample's raw files, metadata, and integrity checksums together in a structured archive, so the contents can be verified and reused independently of nmrXiv.
After a sample is published, nmrXiv creates its BagIt archive in the background. The archive may take a few minutes to become available, depending on the amount of data in the sample. We will email you when it is ready to download.
To download it, open the public sample page and use the Download menu in the top right corner. It offers two options:
- Project Data - the complete project data as a plain ZIP file.
- BagIt Archive for this sample - the BagIt package for the sample as described below.
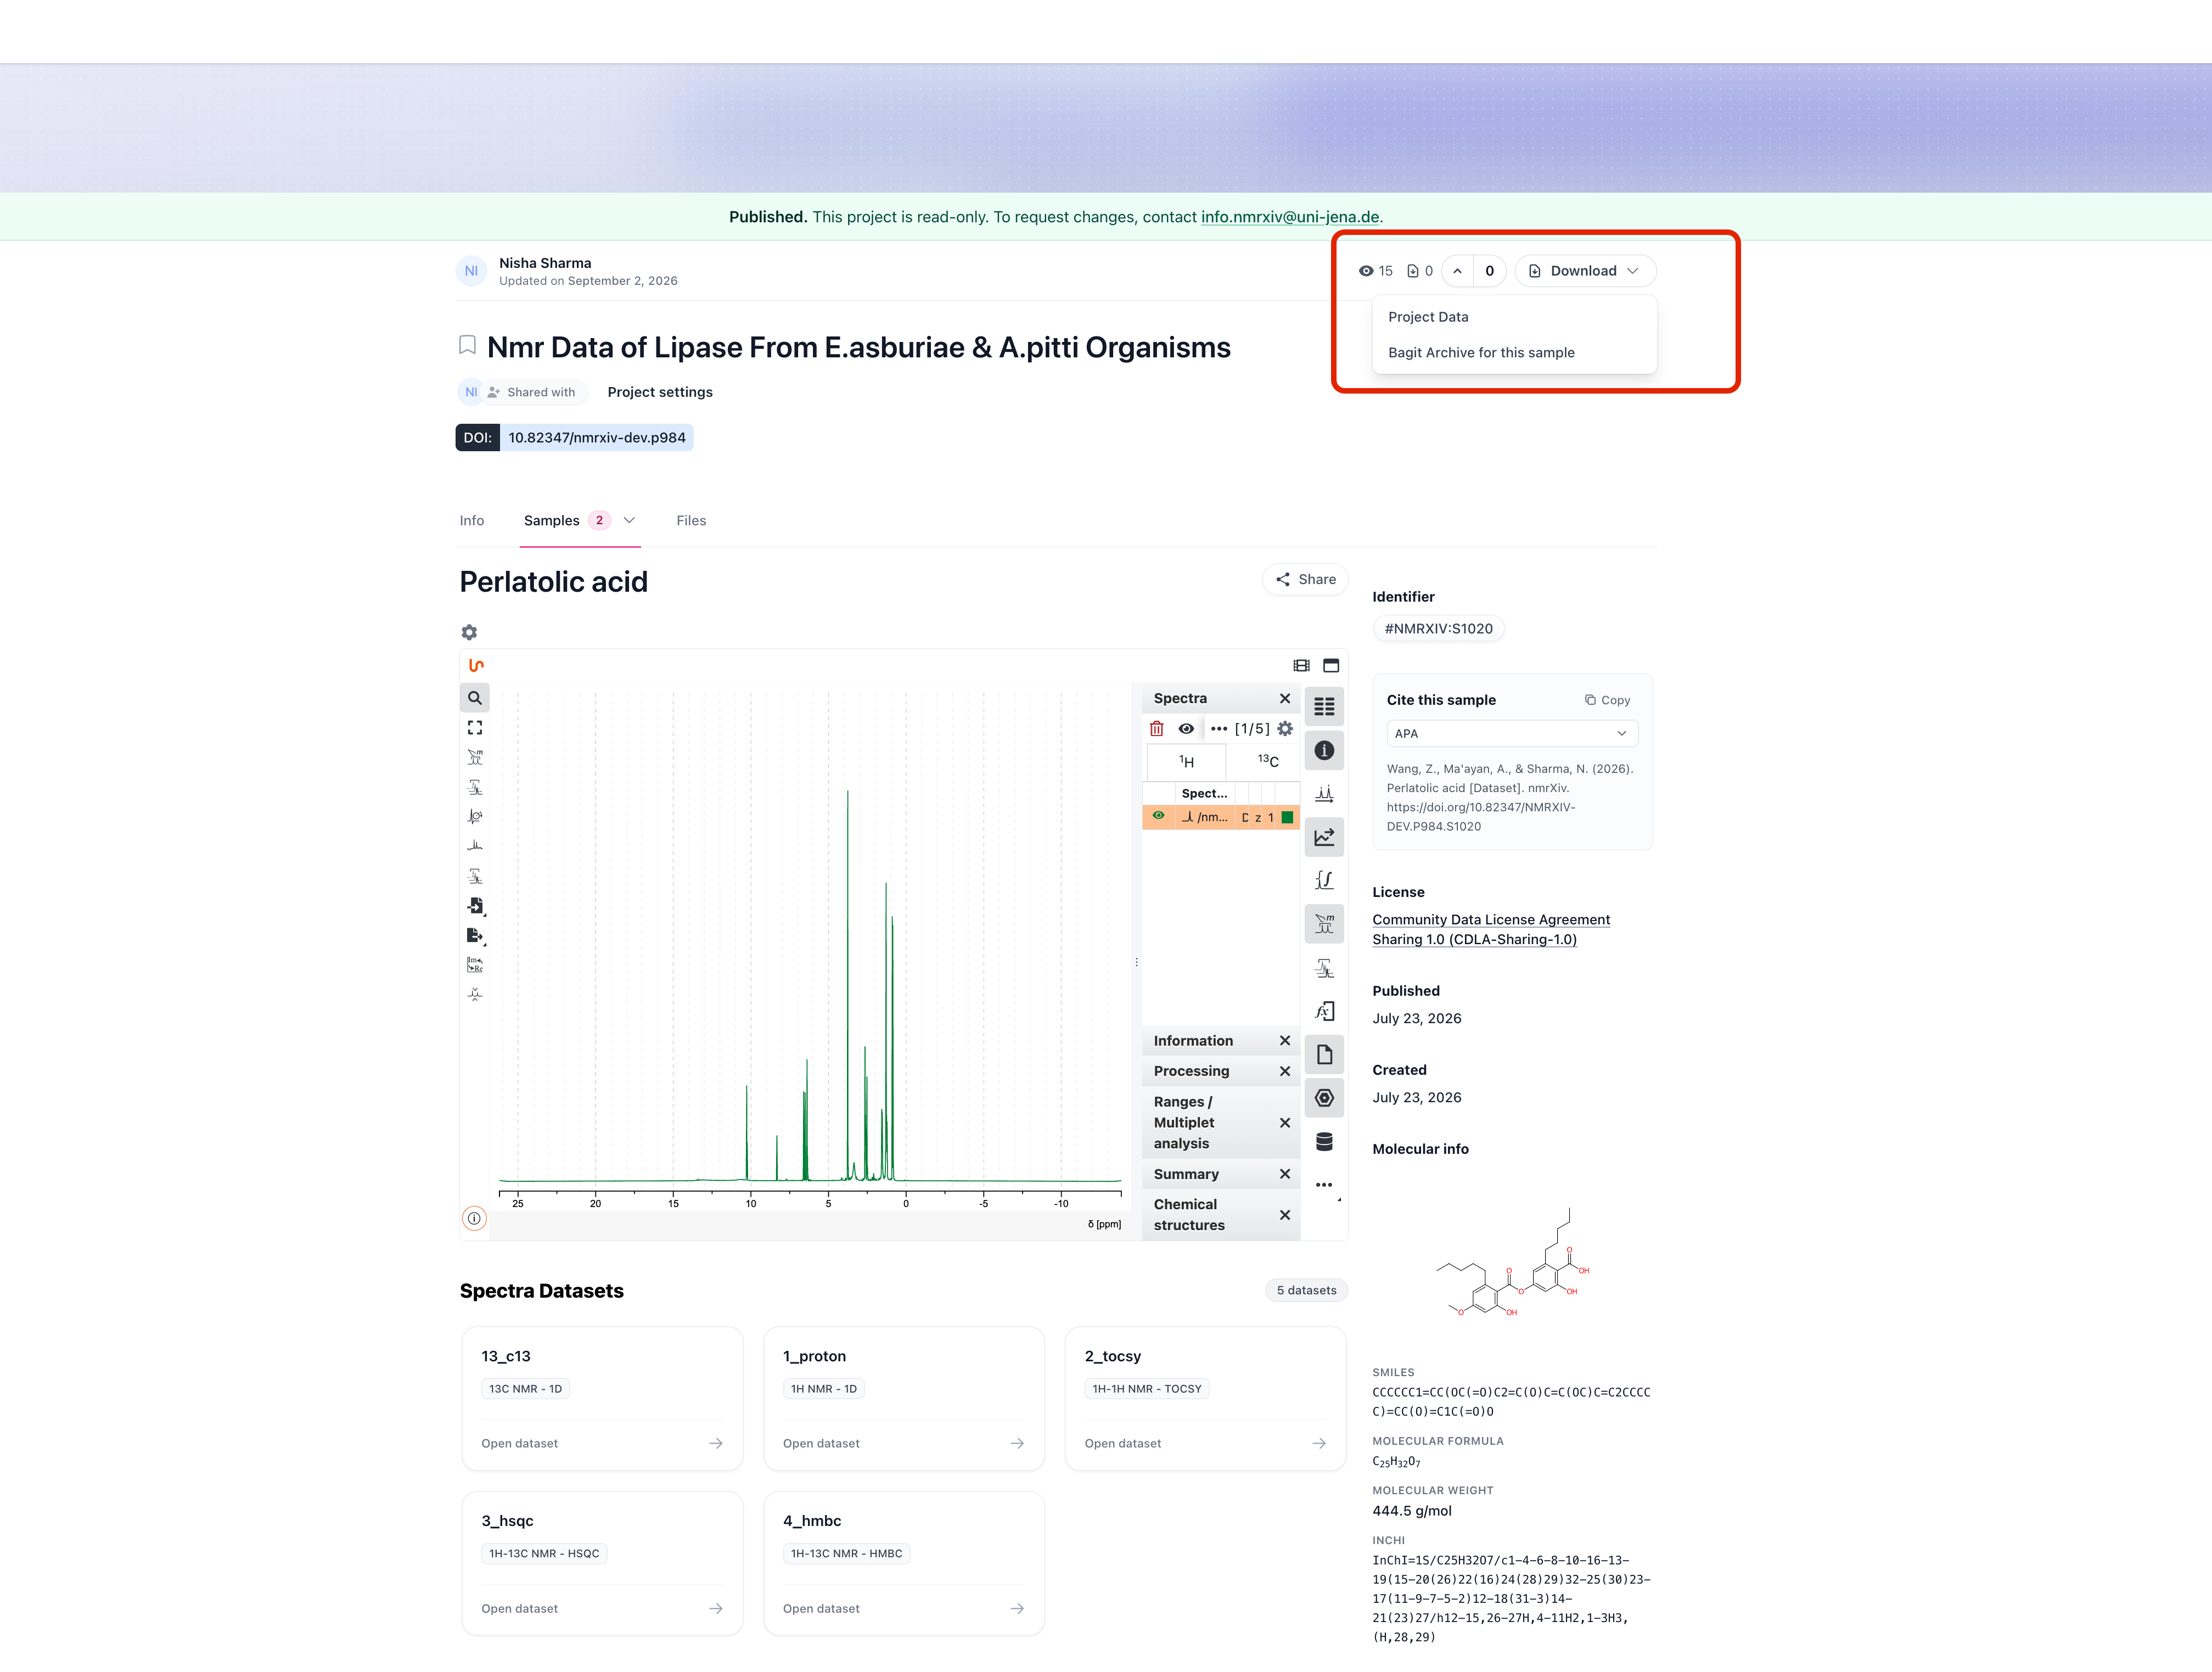
While generation is still running, the BagIt Archive for this sample option stays greyed out. Once the archive is ready the option becomes clickable.
What the BagIt Archive Contains
The archive follows the BagIt structure: a data/ folder holding the payload, plus tag files that describe and verify it.
S1020.zip
├── bagit.txt                     BagIt version and character encoding
├── bag-info.txt                  payload size, file count, bagging date
├── manifest-sha256.txt           SHA-256 checksum of every file under data/
├── tagmanifest-sha256.txt        SHA-256 checksum of the three files above
└── data/
    └── Perlatolic acid/          the published sample
        ├── Perlatolic acid.mol   the assigned chemical structure
        ├── 1_proton/             one folder per spectra dataset, as uploaded
        │   ├── acqu, acqus       acquisition parameters
        │   ├── fid               raw acquisition data
        │   ├── pulseprogram      pulse sequence used
        │   └── pdata/1/          processed spectra (1r, 1i, procs, title)
        ├── 13_c13/
        ├── 2_tocsy/
        ├── 3_hsqc/
        ├── 4_hmbc/
        └── nmrxiv-meta/          metadata generated by nmrXiv
            ├── S1020.nmrium      processed spectra metadata
            ├── bio-schema.json   Bioschemas description of the sample
└── images/ rendered spectrum previews (PNG)- Raw data - every spectra dataset you uploaded is preserved unchanged under
data/<sample name>/, including acquisition parameters, FIDs, pulse programs, and processed spectra inpdata/. - Structure - the
.molfile for the structure assigned to the sample. - nmrXiv metadata - the
nmrxiv-meta/folder adds the.nmriumfile with the processed spectra metadata, abio-schema.jsondescription of the sample, and PNG previews of each spectrum. - Checksums -
manifest-sha256.txtlists a SHA-256 hash for every payload file, so you can confirm the download is complete and unmodified using any BagIt-compatible tool.
BagIt makes each published sample a self-describing and portable data package. It keeps the raw data, processed metadata, structure information, previews, and verification files together, allowing the package to be shared, preserved, or moved between storage systems without relying on the nmrXiv website to interpret the files.
- Integrity and preservation - SHA-256 manifests help detect incomplete, damaged, or changed files when data is downloaded, copied, backed up, or restored.
- Reproducibility and reuse - raw acquisition files and processed spectra information remain available together for independent analysis, comparison, teaching, and method development.
- Interoperability - BagIt is an open packaging convention, so other repositories and compatible tools can inspect and validate the archive without the nmrXiv web application.
DANGER
Once a project or sample is public, it cannot be reverted to a private draft. Review files, metadata, authors, license, and release date carefully before publishing.
WARNING
Screenshots and GIFs may show the nmrXiv development environment. Do not upload sensitive or unpublished real data to a demo or development server.
INFO
In any step if you face any issue or have any question, please dont hesitate to reach out to us at info.nmrxiv@uni-jena.de