Sample
The concept of sample in nmrXiv is similar to the one of sample in ISA model. Therefore, the sample helps group related datasets and describe their collective metadata. Those datasets are related as they correspond to experiments applied to the same sample. nmrXiv is capable of detecting datasets automatically and grouping them in amples, which requires the user to make sure that they submit their data in a compatible way. For more details, it is highly recommended to check the folder structuring section before submitting data.
sample View
Private sample View
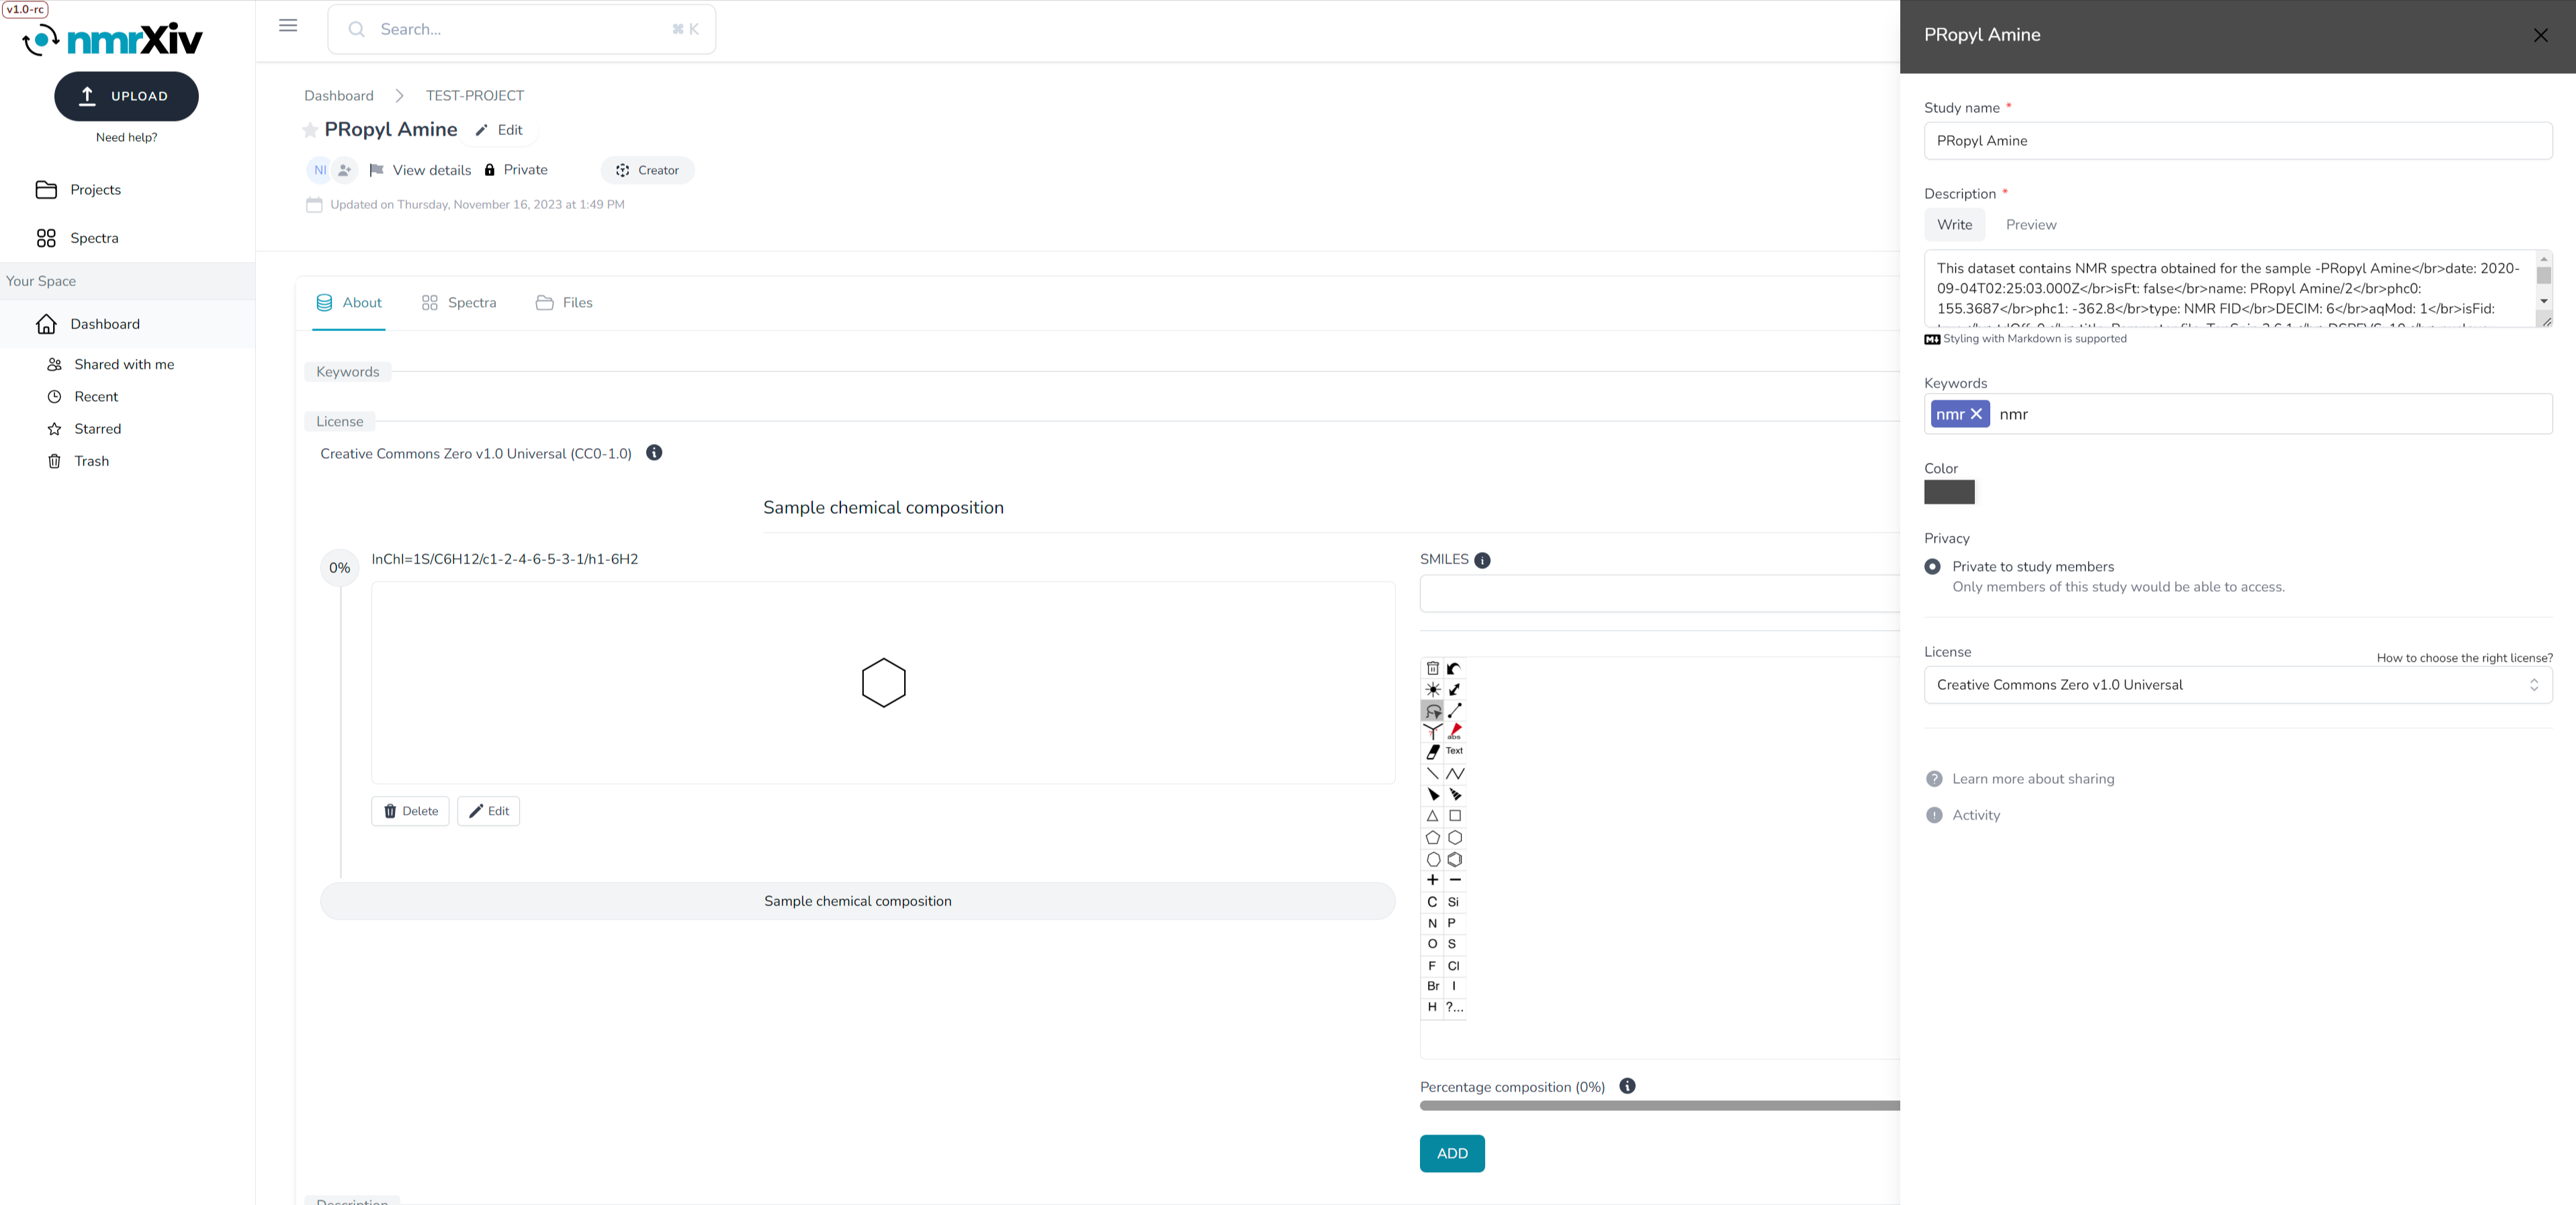
As with the project, the sample's public view differs from the private one. Starting with the private one, at the top, there is the path to the sample (Dashboard > CENAPTnmr), followed by a somehow similar view to the project. Below is the sample name (Eugenol 400 MHz CDCl3 NMR data), which in contrast to the project, doesn't have to be unique within the project namespace. Next to the name is a star to indicate whether the sample is starred and to enable starring/de-starring, which helps to bookmark samples. Starring a project doesn't propagate to the underlying samples. Starred samples can all be found in the Starred folder in the left panel. Below, one can see the avatars of the users with whom the sample is shared as circles with either their images or names' first letters. Clicking on those avatars enables sharing control (more on that in Share). One can also click on View details to view and edit the sample details (more on that in Edit), and see the privacy of the sample, when it was last updated, and the ownership by the user. Those three are not clickable but editable from View details and Share.

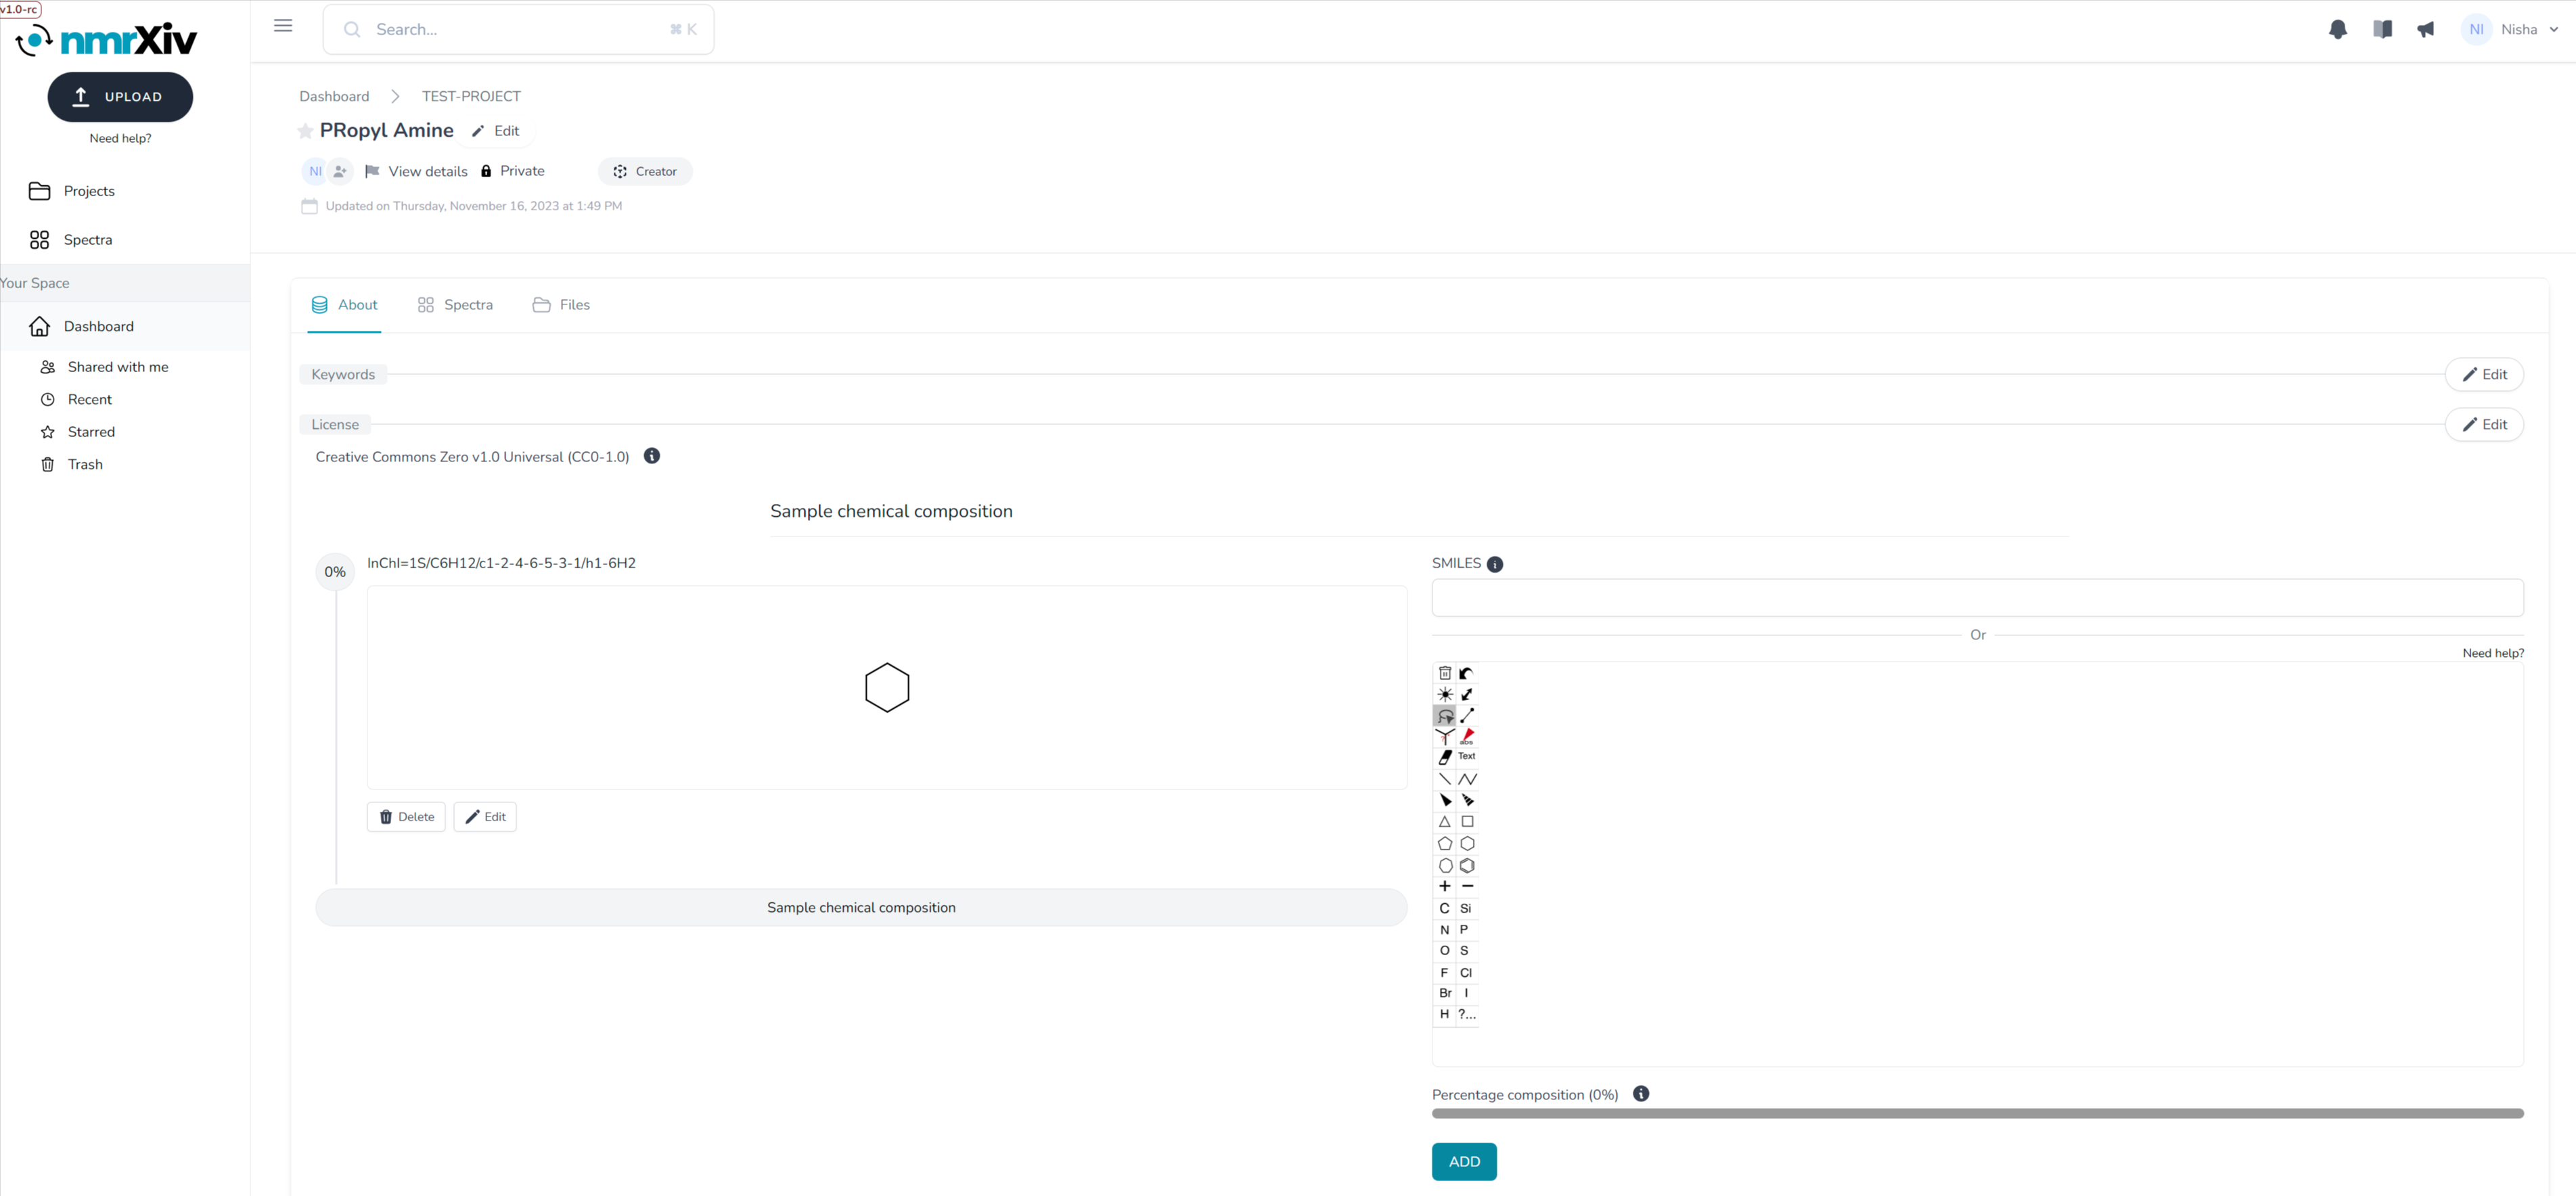
Moving down, there are three tabs: About, Datasets, and Files, with About being the one shown by default when entering a sample, and the one similar to the project view. Its view differs in the private sample from the public's one by having edit buttons next to the fields in the private one. Those fields include the sample Description must be at least 20 characters describing its content and/or its purpose, while the Keywords are tags used to search for the sample and increase its findability. Then comes the License with an information sign. When hovering over the i, a brief description of the license appears. More about nmrXiv licenses can be found here
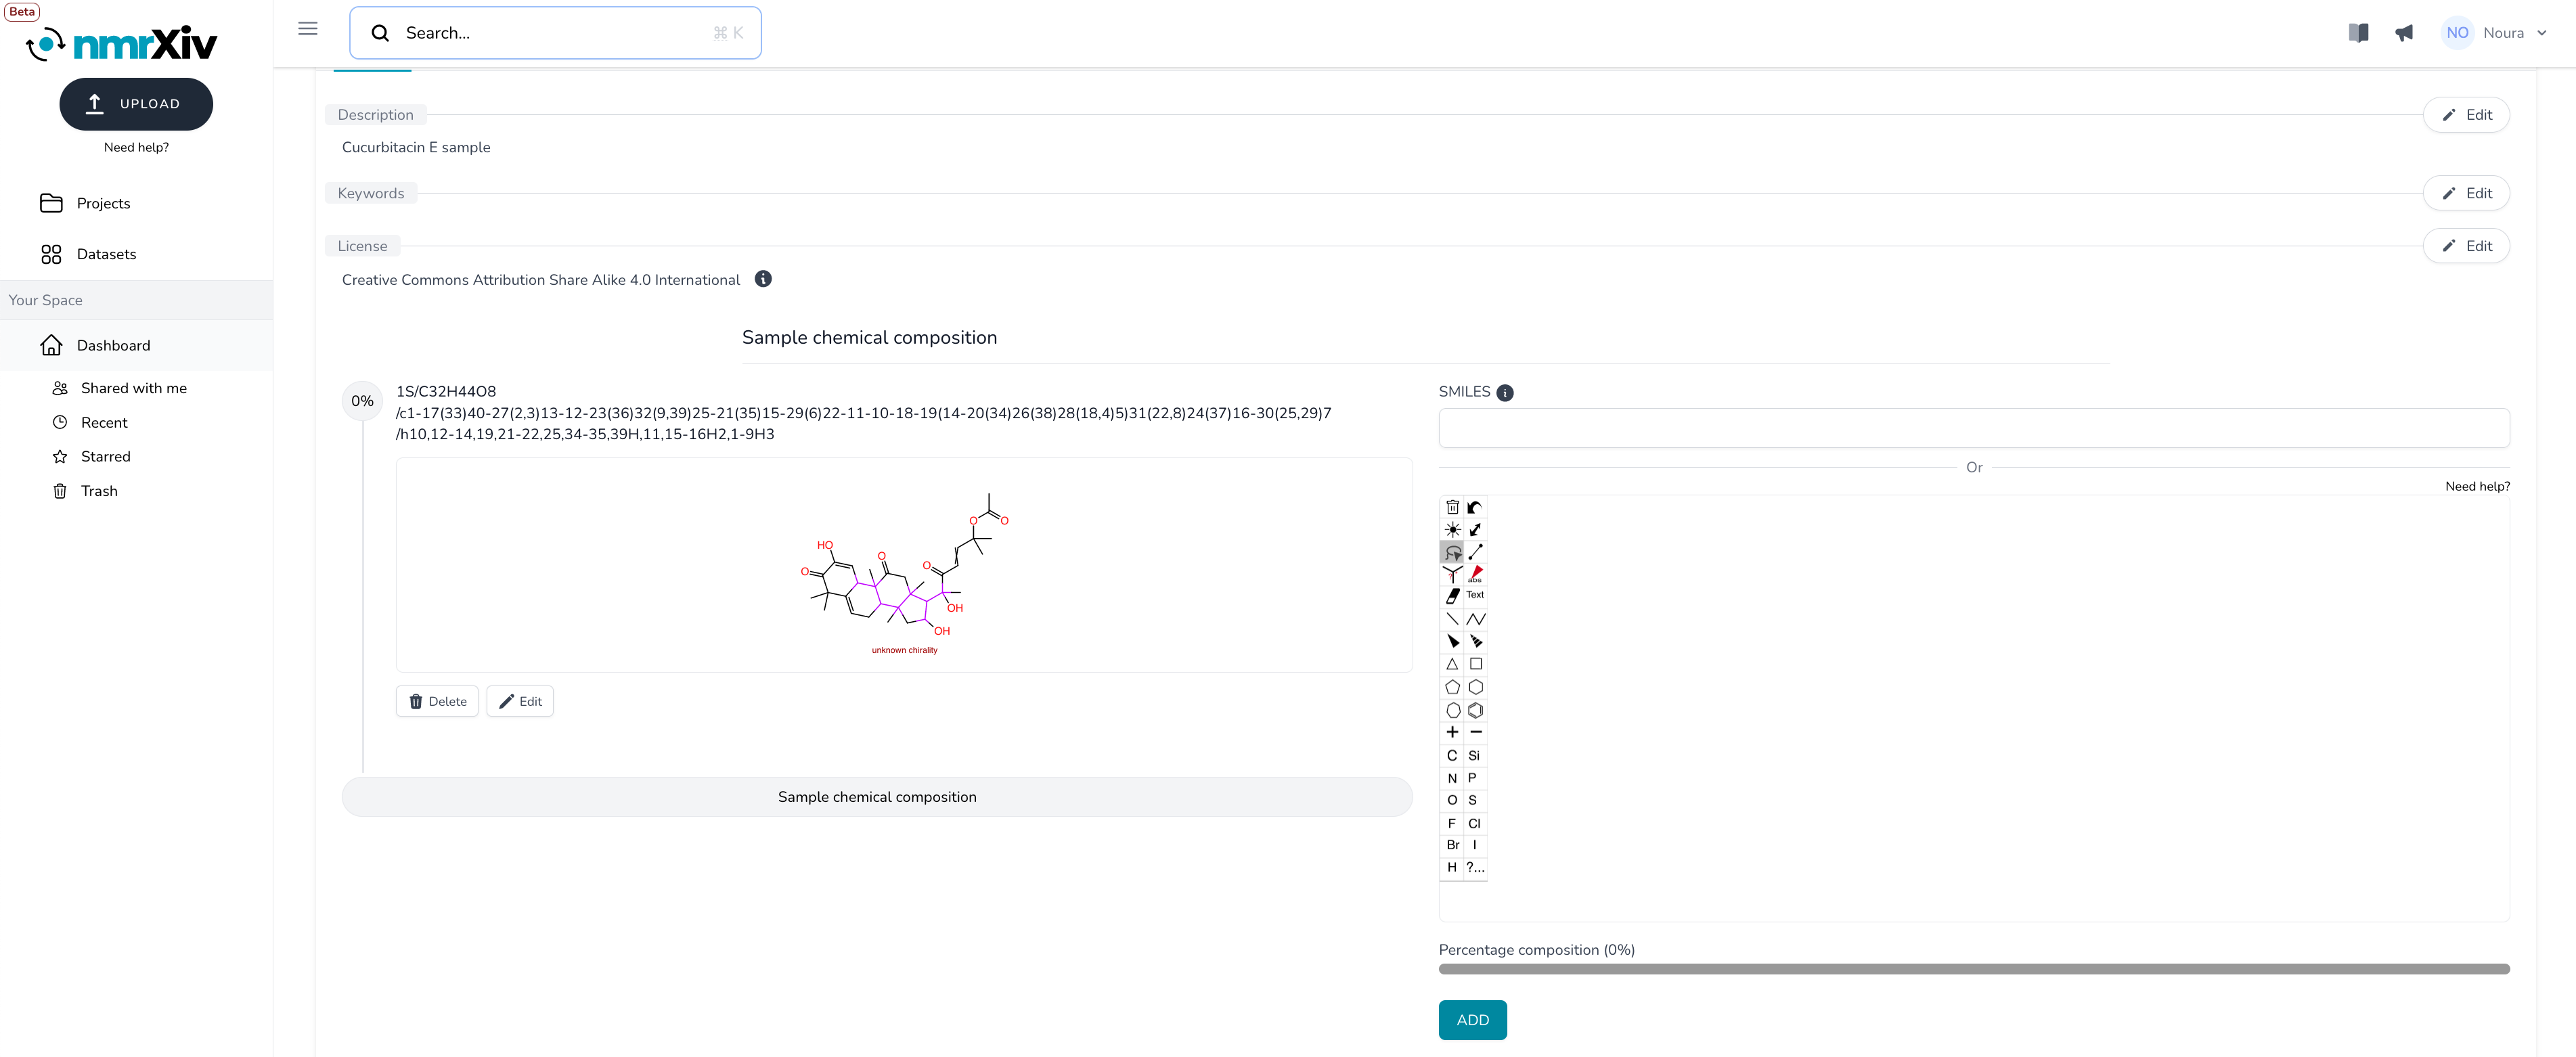
At the bottom is the Sample chemical composition, which also differs between private and public samples. This section is similar to the Sample Info tab during the submission upload. More on how to edit this section in Sample chemical composition section. More on how to use the structure editor in Structure Editor Page.
The purpose of the Sample chemical composition section is to enable the user to add the molecules they are aware of their existence in the sample before the NMR spectroscopy along with their percentages. Molecules identified through the NMR analysis are located at the dataset level.
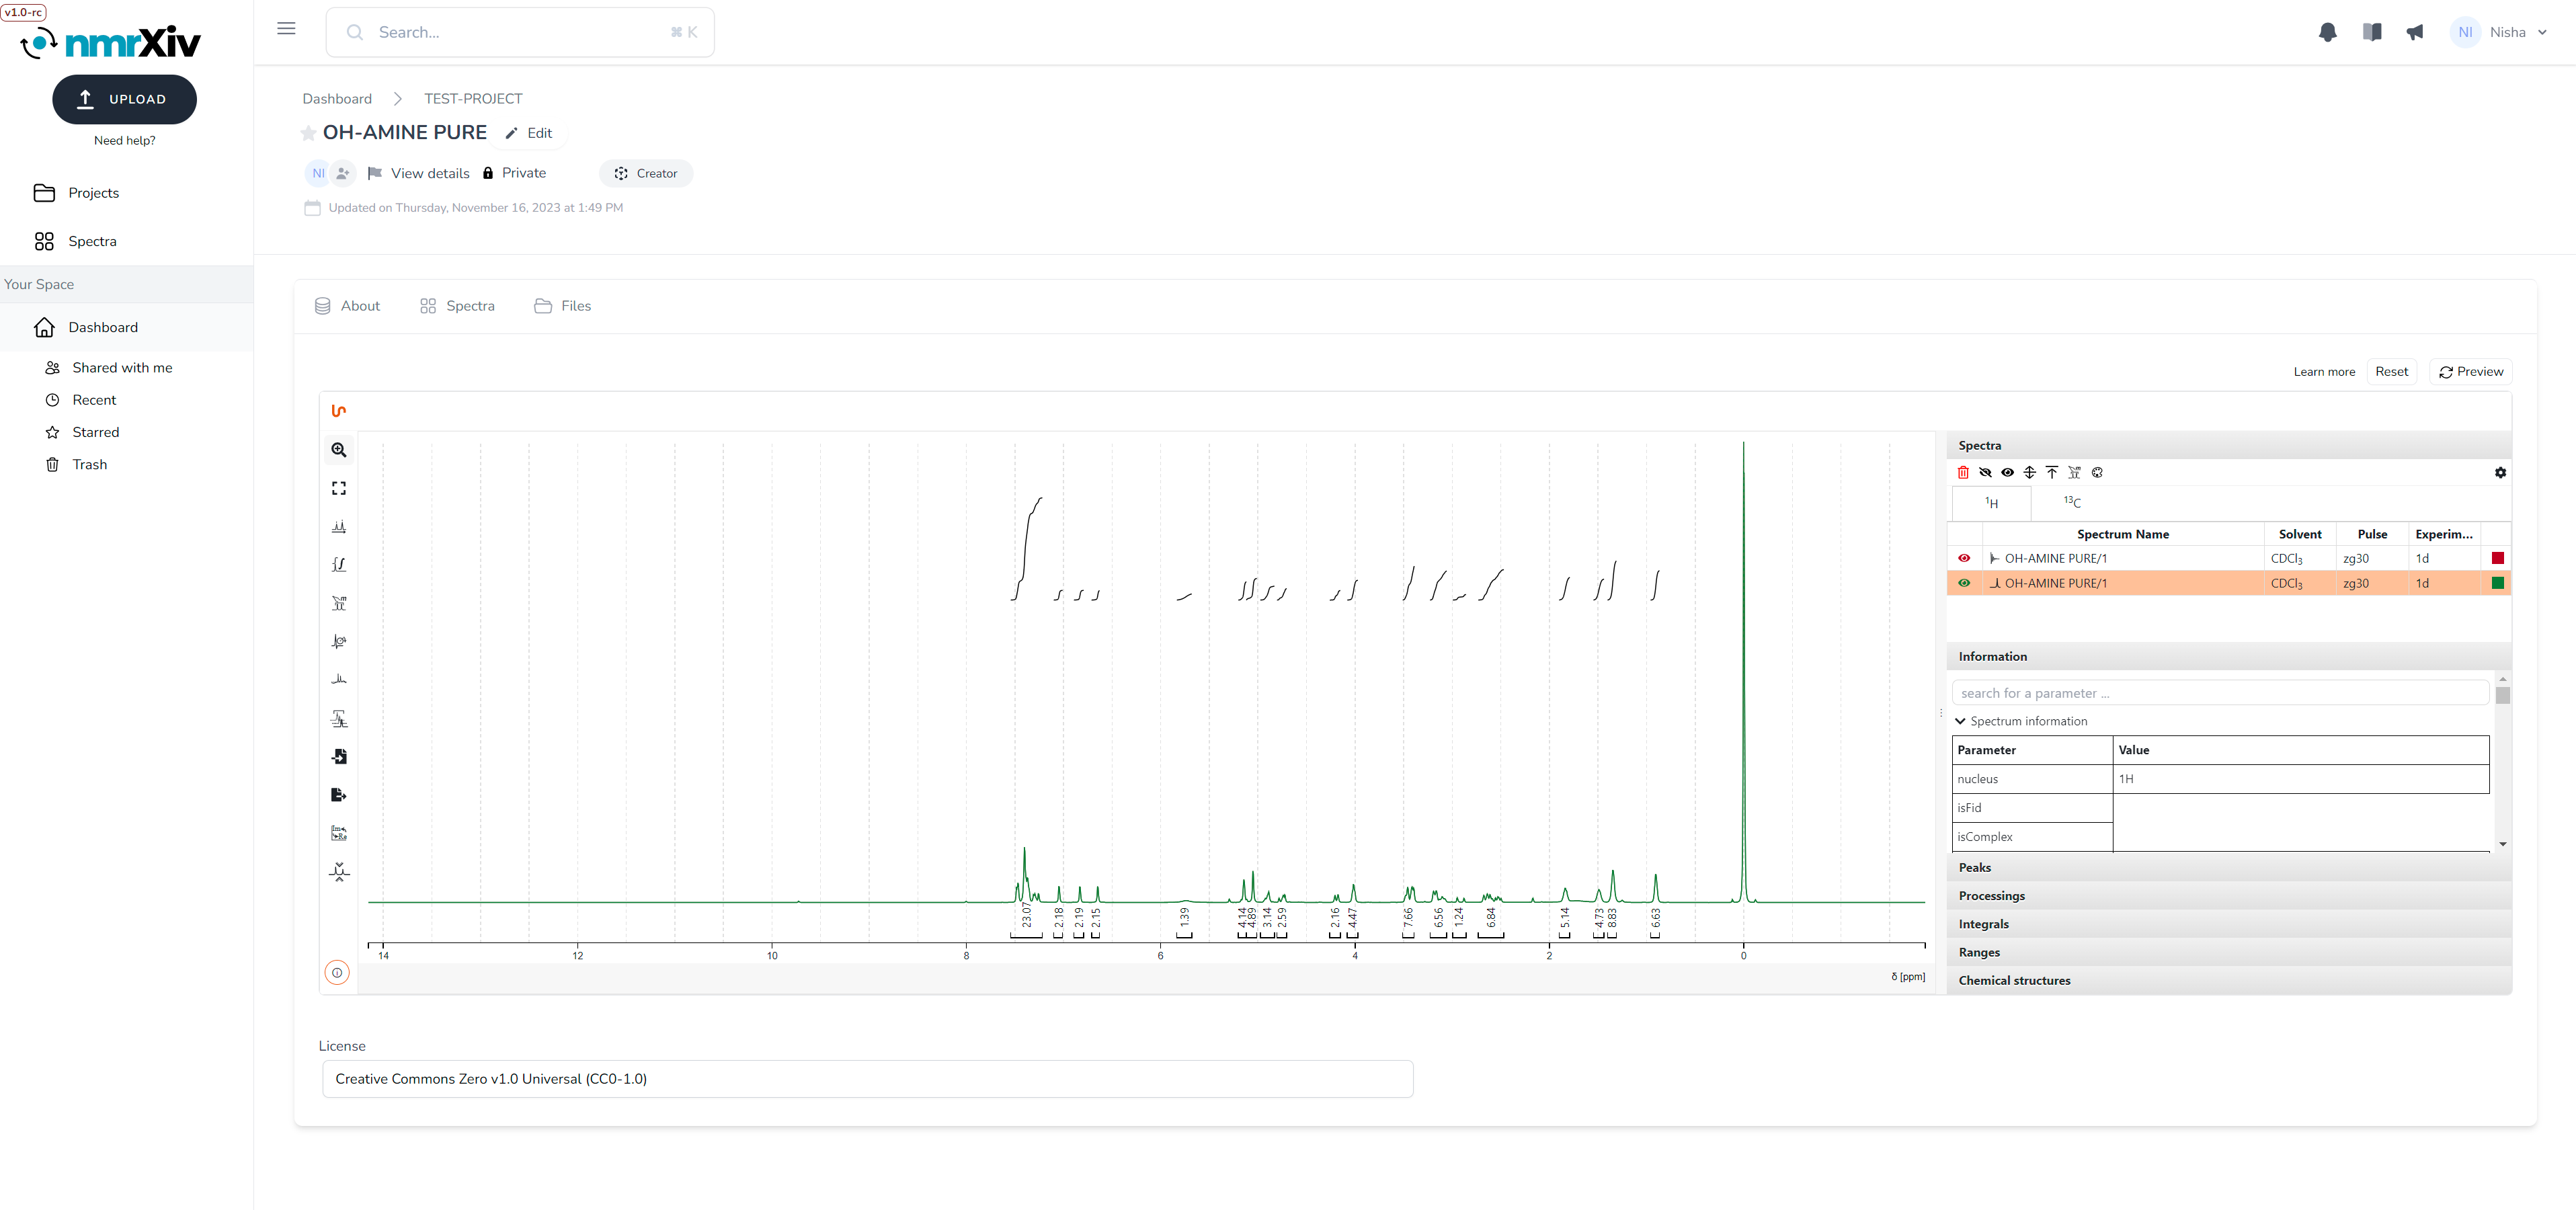
The Spectra tab opens the sample experiment in NMRium. You can navigate through individual experiments by double-clicking on the three dots on the right. This tab will be covered in Spectra page.
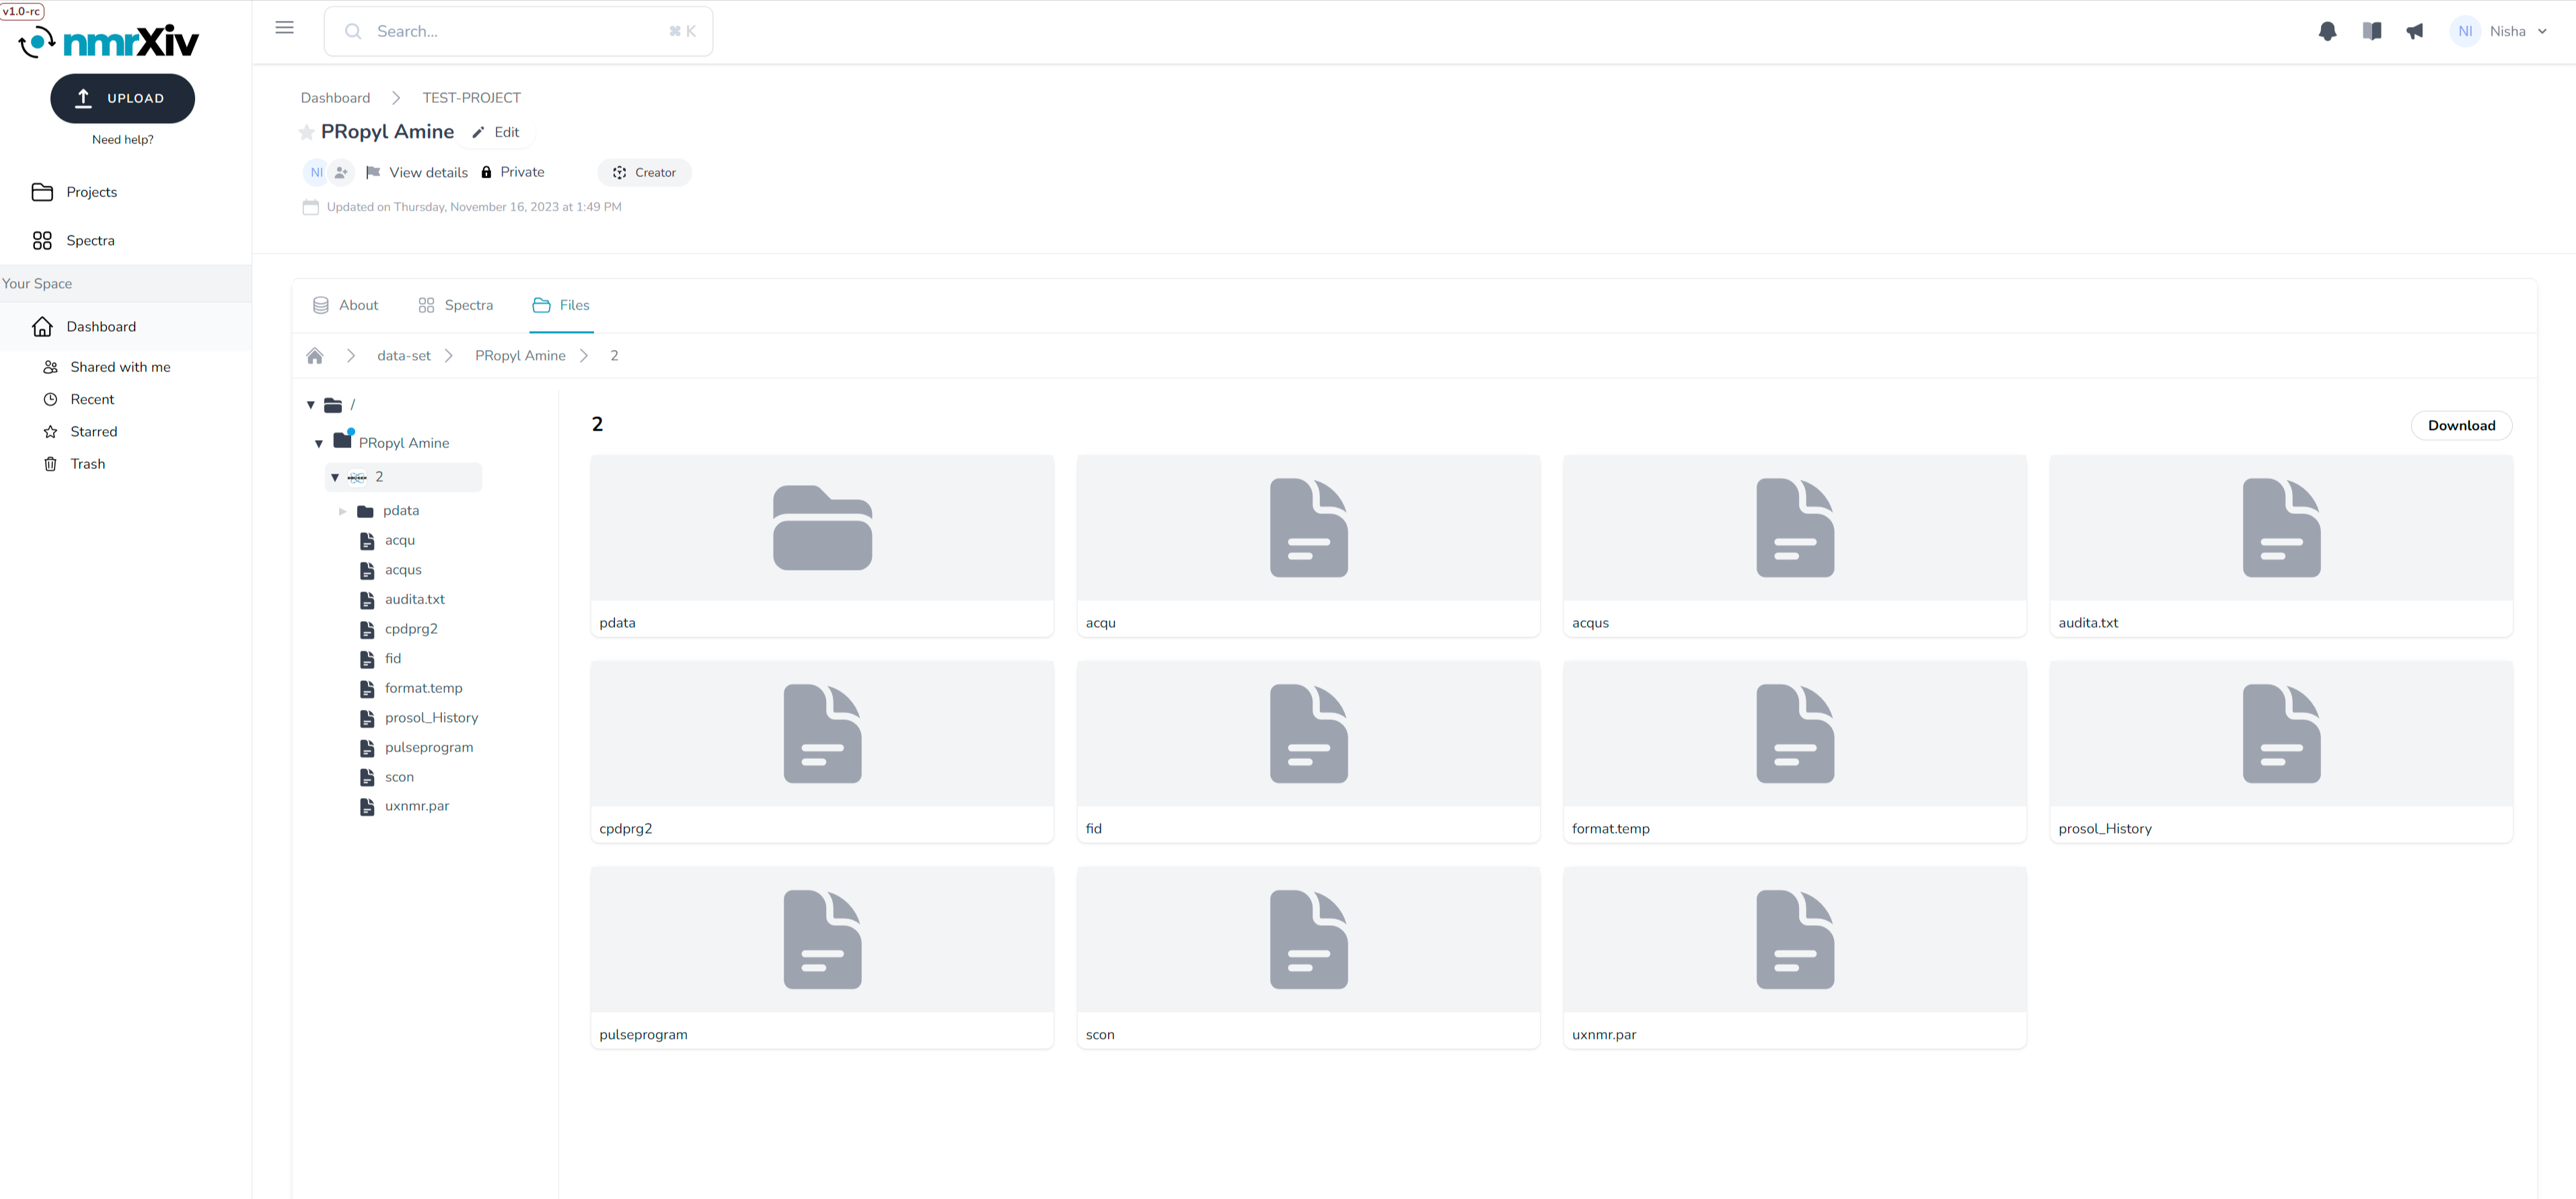
The Files tab view is similar in both private and public samples where the user can select folders on the left side to show an overview of their content on the right side. They can also navigate the folders with arrows. Within the folder, they can select files to show their metadata on the right side. For both selected folders and files there is a Download button.
Public sample View

The public sample view is similar to the private's, but still, there are some differences. Once a project is public, a green bar appears at the top informing the user that no more edits are possible, and any needed changes can be made as a new version. Moving down, a blue bar contains the citation details which can be adjusted according to the citation system (can be picked from the drop-down menu on the right). The citation includes a DOI to the sample, which contains the sample identifier (S46 in the image). This identifier always has the structure of "S", which stands for the sample, and a number. Samples identifiers are Persistent Identifiers (PID) within the repository. Additionally, all the Edit buttons disappear in public sample as no more editing is allowed after publishing.
With public samples, the option of adding more structures disappears, removing the entire right side of the section, including the structure editor with the SMILES field and the percentage bar. On the left side, one can see all the added molecules with their percentage and INChI in the molecules list.
Create
There are two ways to create samples. First is through the submission pipeline where the samples will be created within the submitted project. Second is after submission from within the project view using Manage Samples button, which leads back to the submission pipeline.
Access
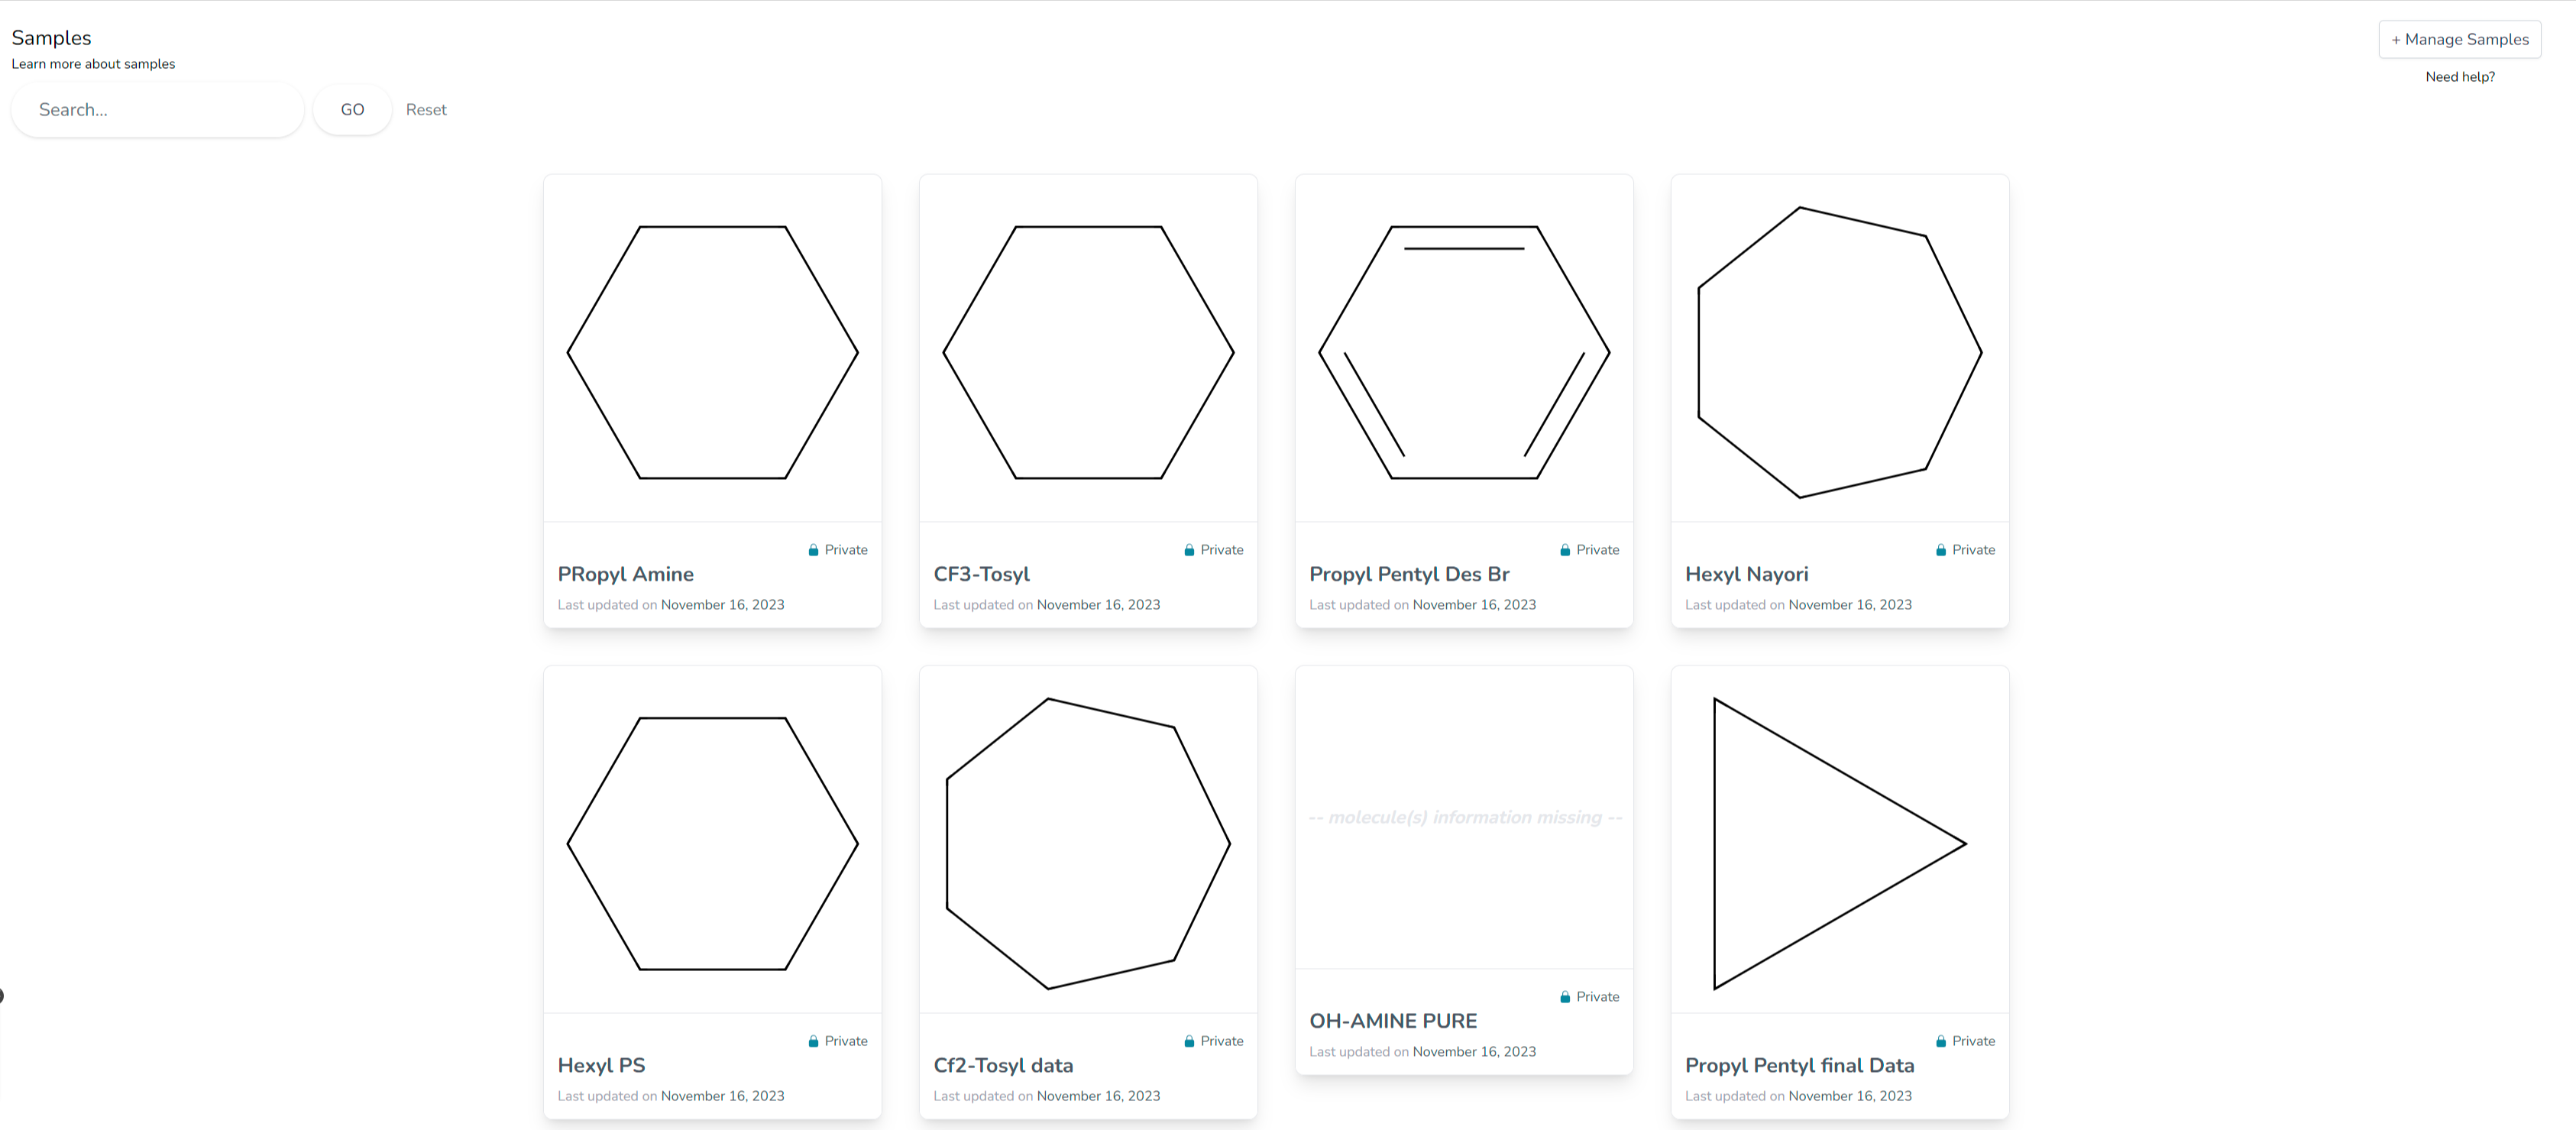
You can access your created samples by entering their parent projects and scrolling down to Samples. You can also find the ones shared with you by others in the Shared with me folder directly if the parent project is not shared with you. Studies that you have starred can be found in the Starred folder. Other folders, such as Recent and Trash, can include projects only. Lists of samples show a quick view of them, including their name, privacy, and last updating date.
View Details
Clicking on View details opens a side menu where the user can edit the sample name, description, keywords, color, and license, and they can view the privacy.
At the bottom, there is a link to the Share section and an activity button, which opens a new side menu to show the updates history of the sample.

Sample chemical composition
In the private mode, you can load structures by adding SMILES to the corresponding field and pressing Load Structure. It will view the structure in the structure editor, where you can apply any needed changes. Alternatively, you can draw the structure in the editor from scratch. Here are more details on how to use the structure editor. When you feel satisfied with the structure, set its percentage using the bar and press ADD. The molecule with its percentage and INChI will appear in the molecules list on the left side. Added structures can be Edited and Deleted using the corresponding buttons.
The purpose of the Sample chemical composition section is to enable the user to add the molecules they are aware of their existence in the sample before the NMR spectroscopy along with their percentages. Molecules identified through the NMR analysis are located at the dataset level.
If you don't know the percentage of a molecule in your sample, you have to set it to zero.
Validation
To publish a sample, i.e., to make it public, you need to publish its parent project, which must comply with community standards. At the moment, we are checking for DataCite mandatory metadata needed to receive a DOI in addition to requesting an image for the project. If any piece of metadata is missing, you will see a Why can't I publish? link message at the top of the project view.
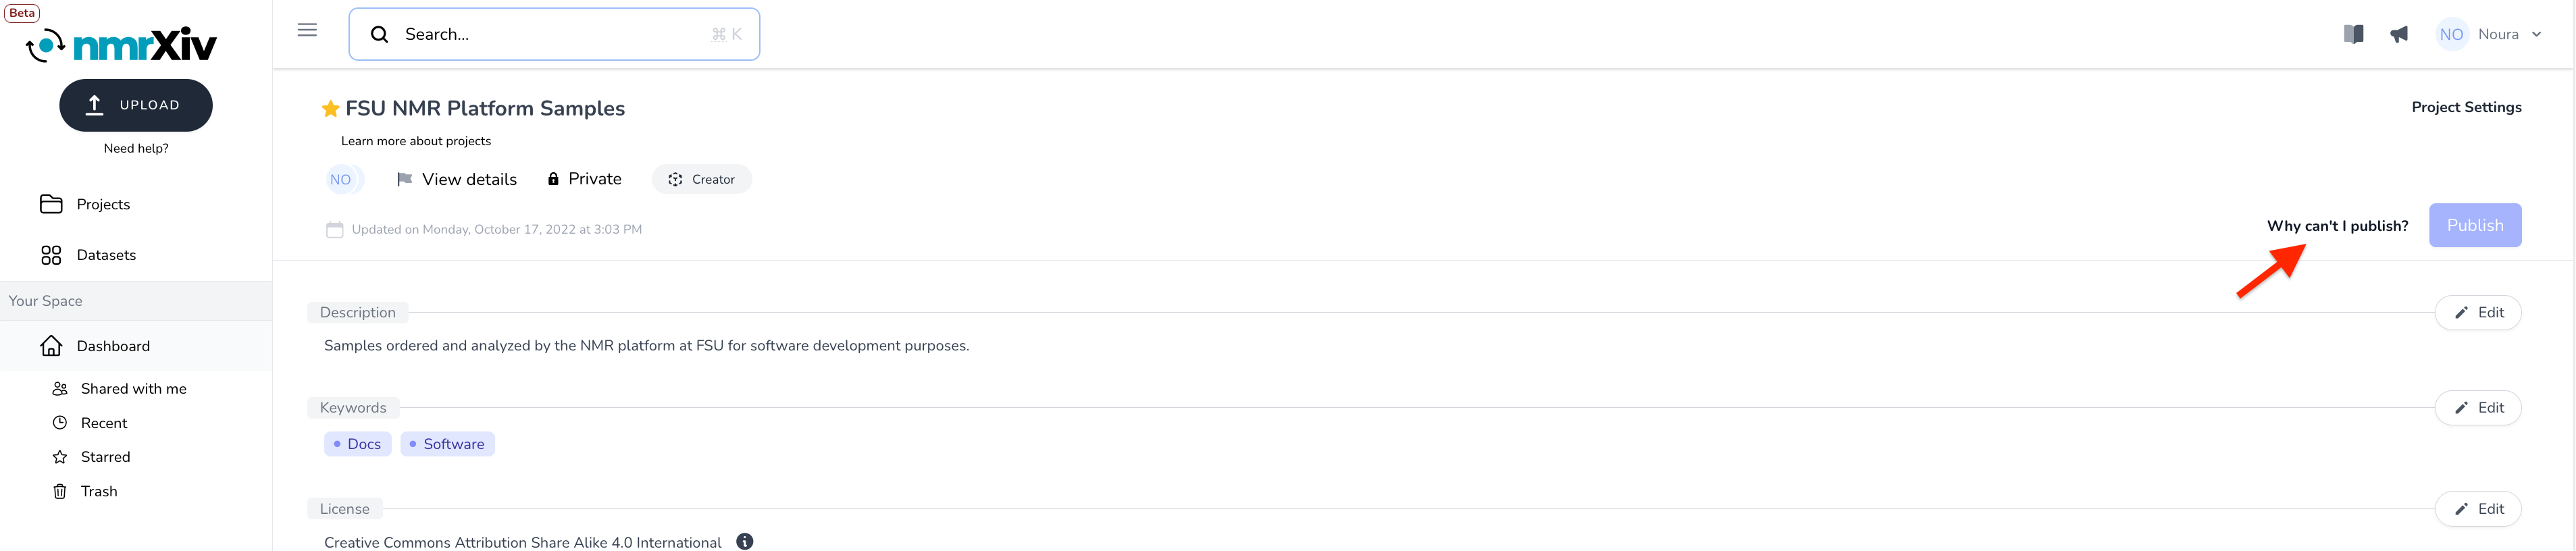
Clicking on Why can't I publish? leads to a new page similar to the step-3 of the submission pipeline. Here you can find either red x or green ✓ to indicate the existence or absence of the metadata respectively. Whenever the red x exists, it is accompanied by an Edit button to facilitate providing the missing data. If the datasets validation fails, the sample validation fails too as a parent, which can be inferred from the red highlighting of its name. More on validating datasets in the dataset page

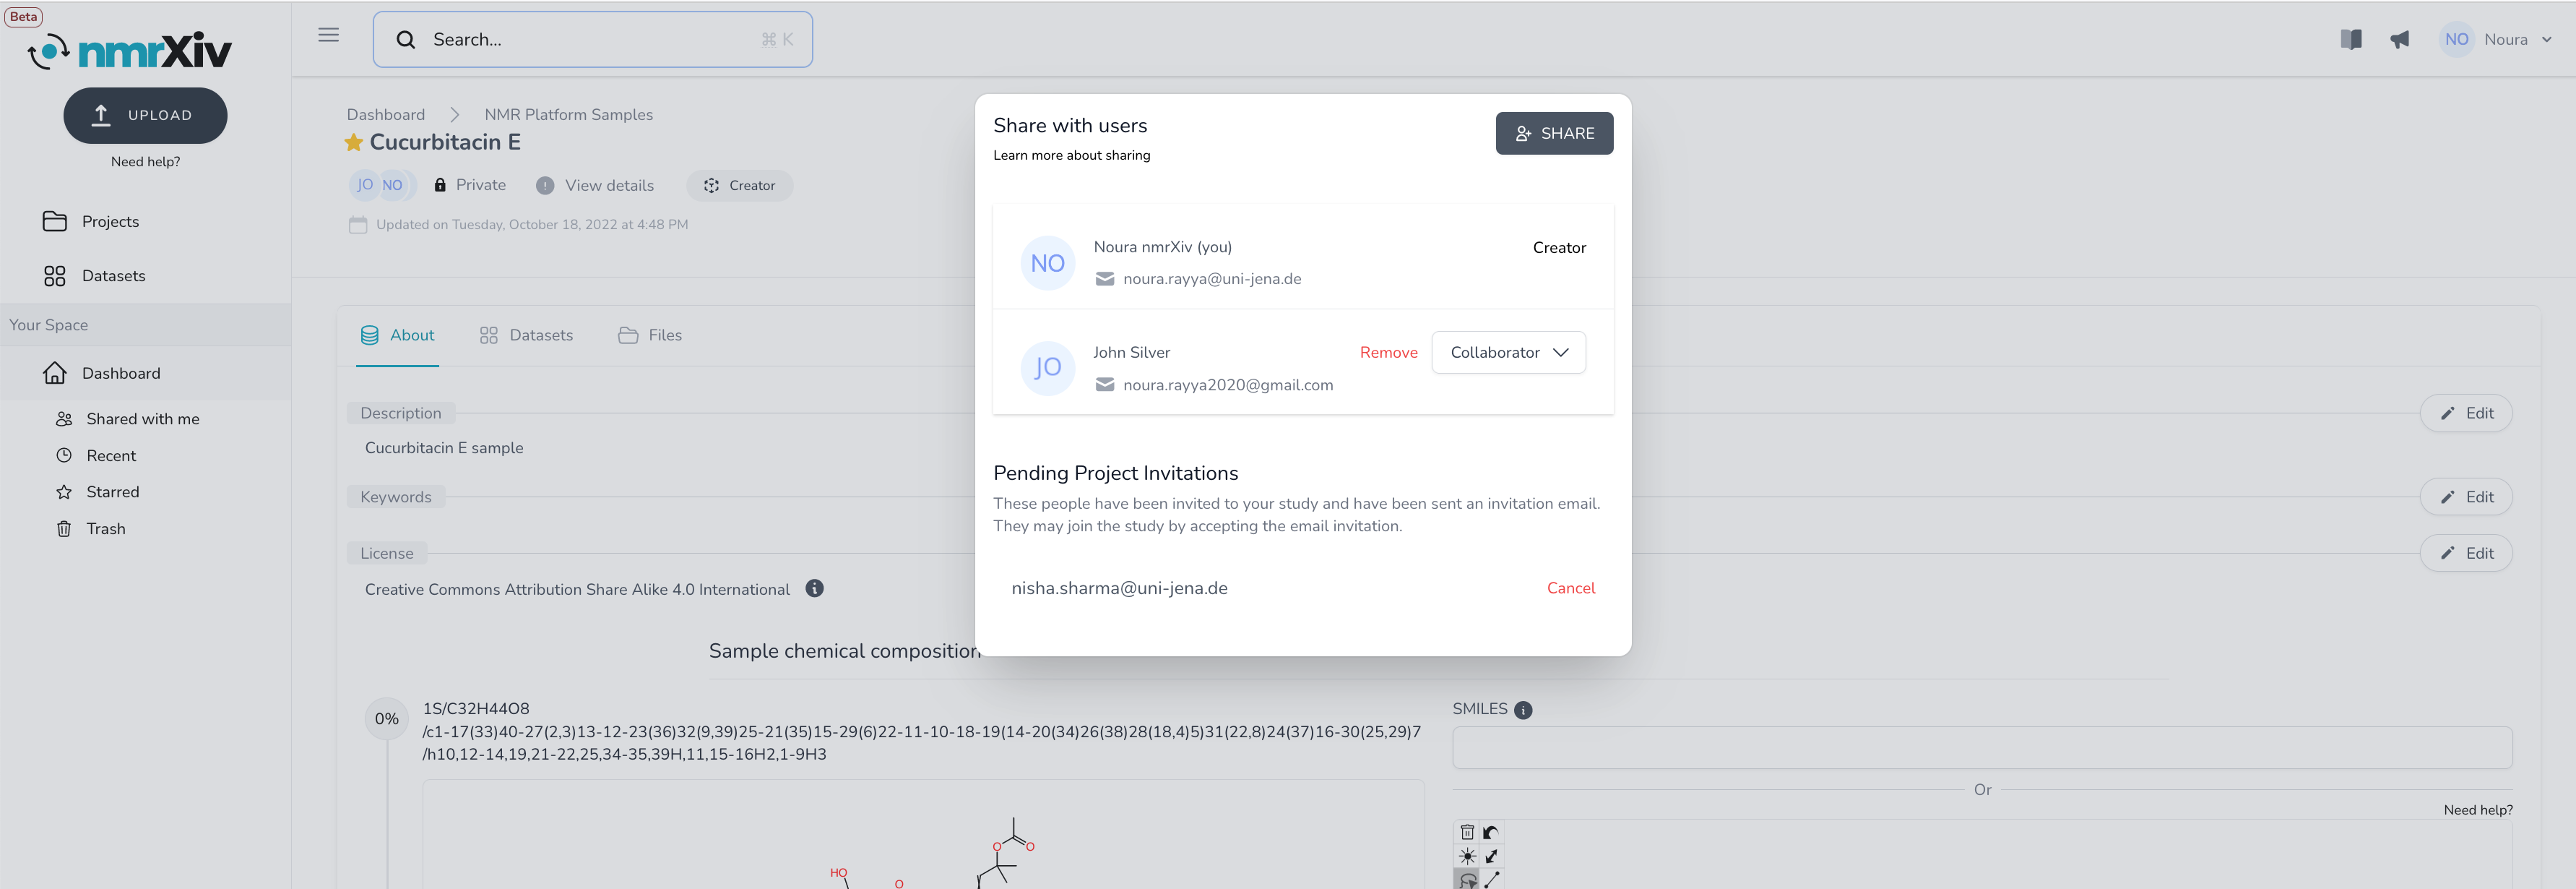
Share
Samples are shared by default with the members of the parent project. At the top of the sample view, there are avatars of the users with whom the sample is shared as circles with either their images or names' first letters. Clicking on those avatars enables modifying the sharing settings by first opening a window that shows with whom the sample is already shared along with the roles.

Then the user can click on the button Share, which will open another window to share the sample with other users.
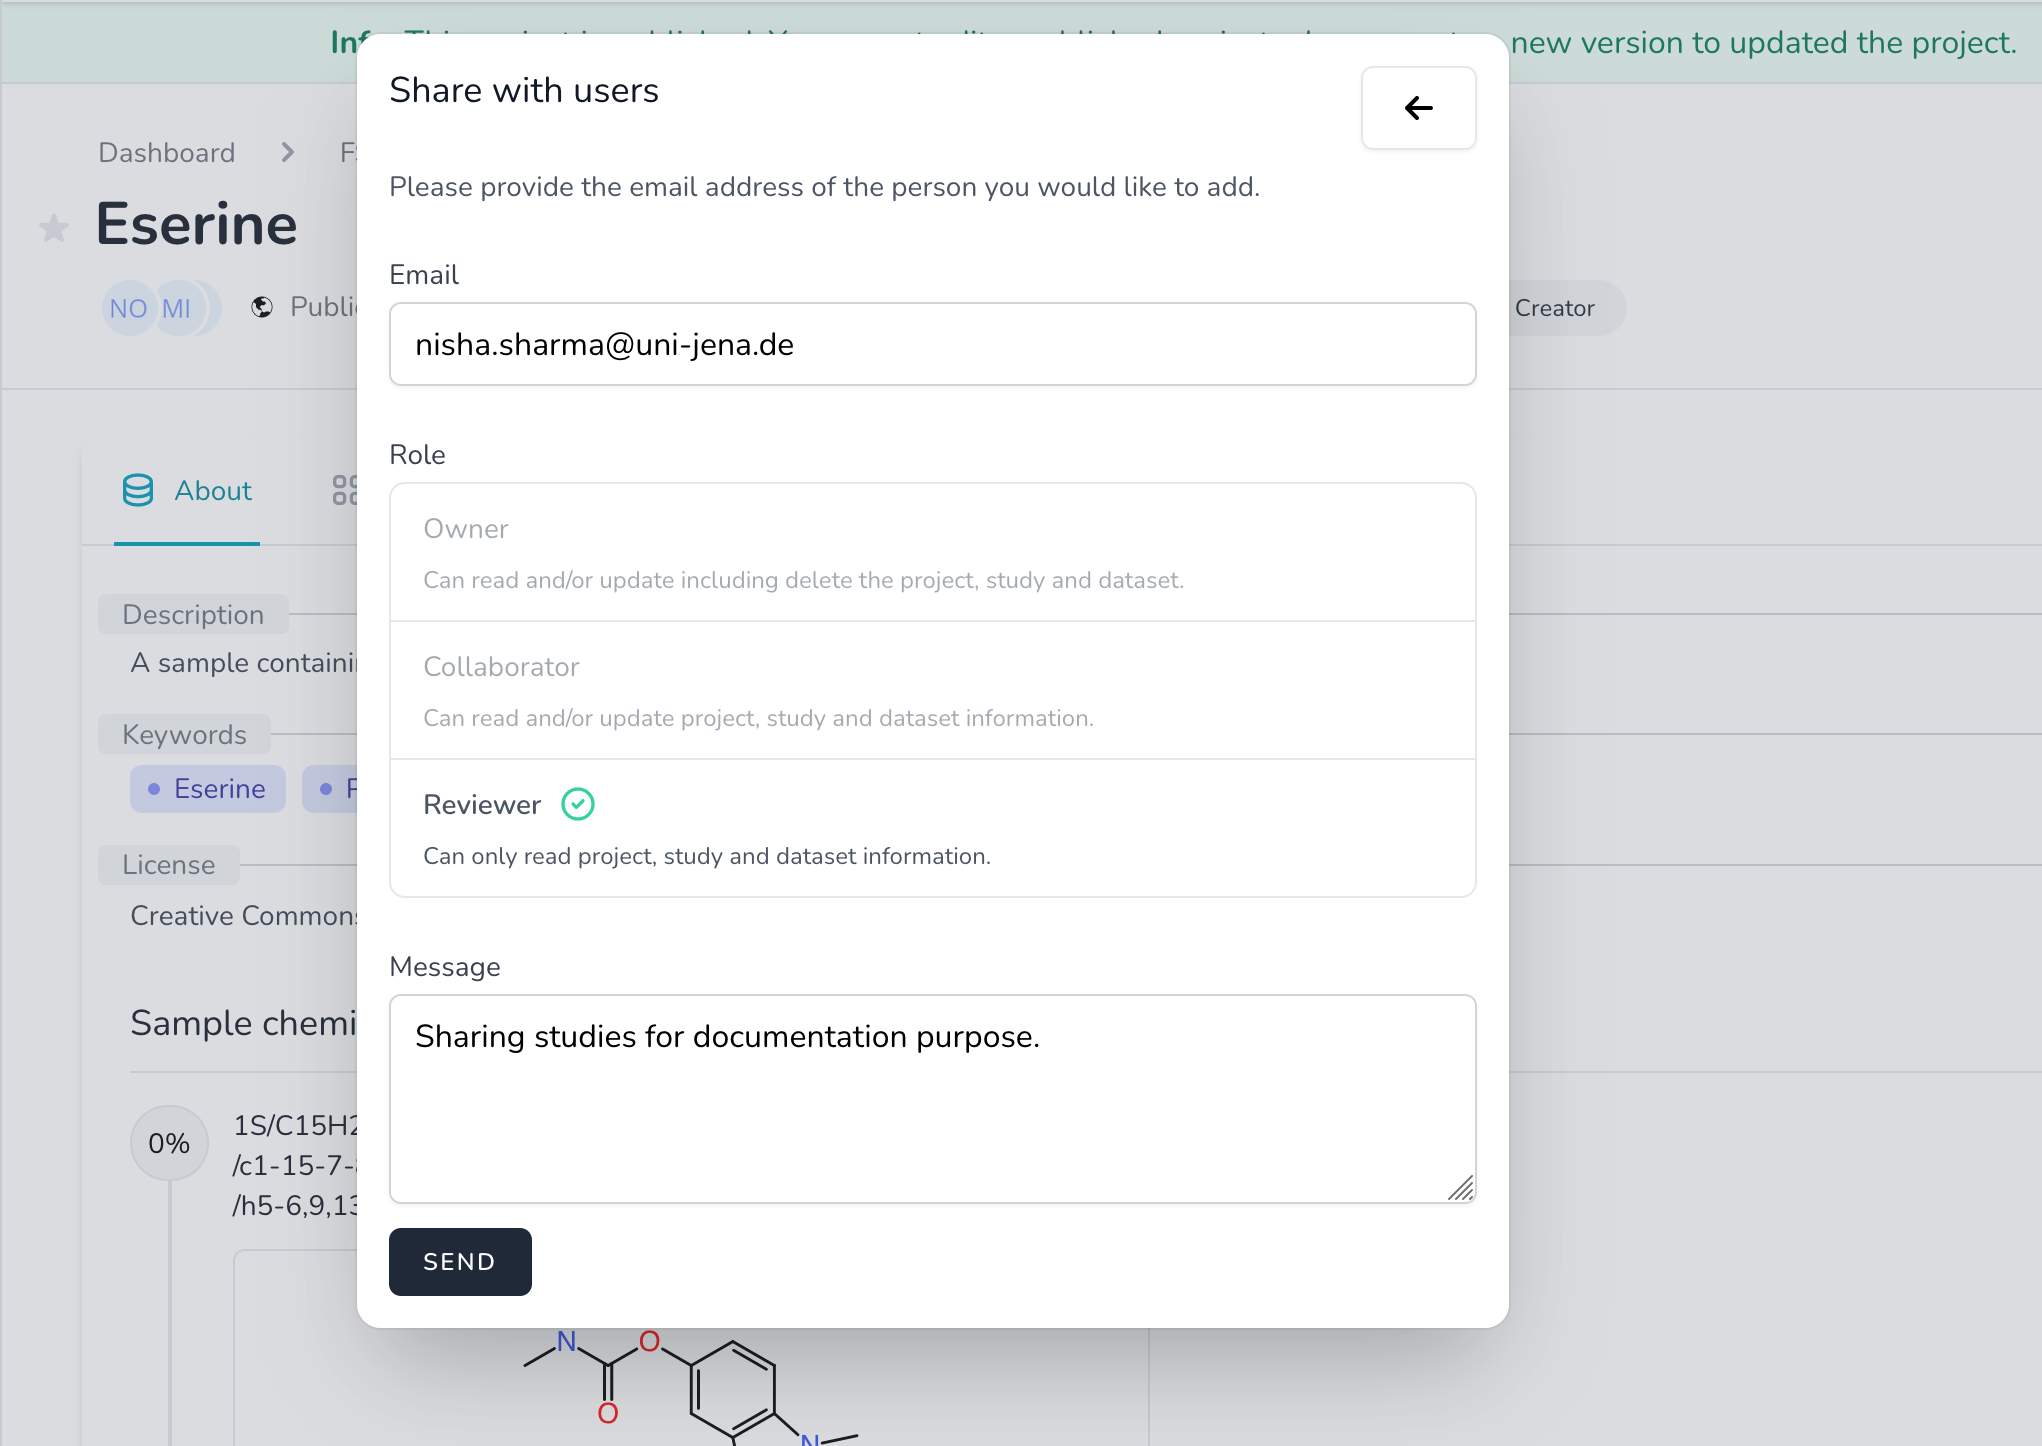
In the opened window, the user needs to fill in the email and select the role of the user to share with, and they can optionally add a message. There are three roles for sharing:
- Owner: read/update/delete the sample/datasets.
- Collaborator: read/update the sample/datasets. A collaborator cannot delete any of the sample content.
- Viewer: read the sample/datasets. A viewer cannot update or delete any of the sample content.
When the user is satisfied with their entries, they can click SEND to send an email to the other user. Then the window gets refreshed to enable entering details of other users to share with them. When all the invitations are sent, the user can click the back arrow to go back to the project-sharing status window, which will be updated to show the status of the new invitations. Sharing can be canceled as long the invitation is still pending (not accepted or rejected by the receivers).
After an invitation is accepted, the creator can still remove any of the members, while the owners can remove any of them but the creator.
Delete and Archive
Only private samples can be deleted, while public ones can be archived. The reason is that once a sample is public, it can be referenced somewhere else, which requires the repository to keep an active link to this sample. Therefore, when the creators of a public sample decide that it is no longer maintained, or that the data provided is not accurate, they can only archive it instead of deleting it, while deletion is always an option for private samples.
Deleting/Archiving will delete/archive all the underlying samples. In the case of project deletion, this action is reversible for 30 days as the deleted project will be stored in the Trash folder, where the user can find the project and restore it from the Project Settings. After 30 days, deletion leads to permanently deleting the project and all of its content data. In the case of archiving, the user can unarchive the project anytime from the Project Settings. Archived projects are not moved to the trash.
However, there is another way to delete samples, which is from the Manage samples button in the project view.